Master the Art of Natural Style with the Crochet Bag “Sun”
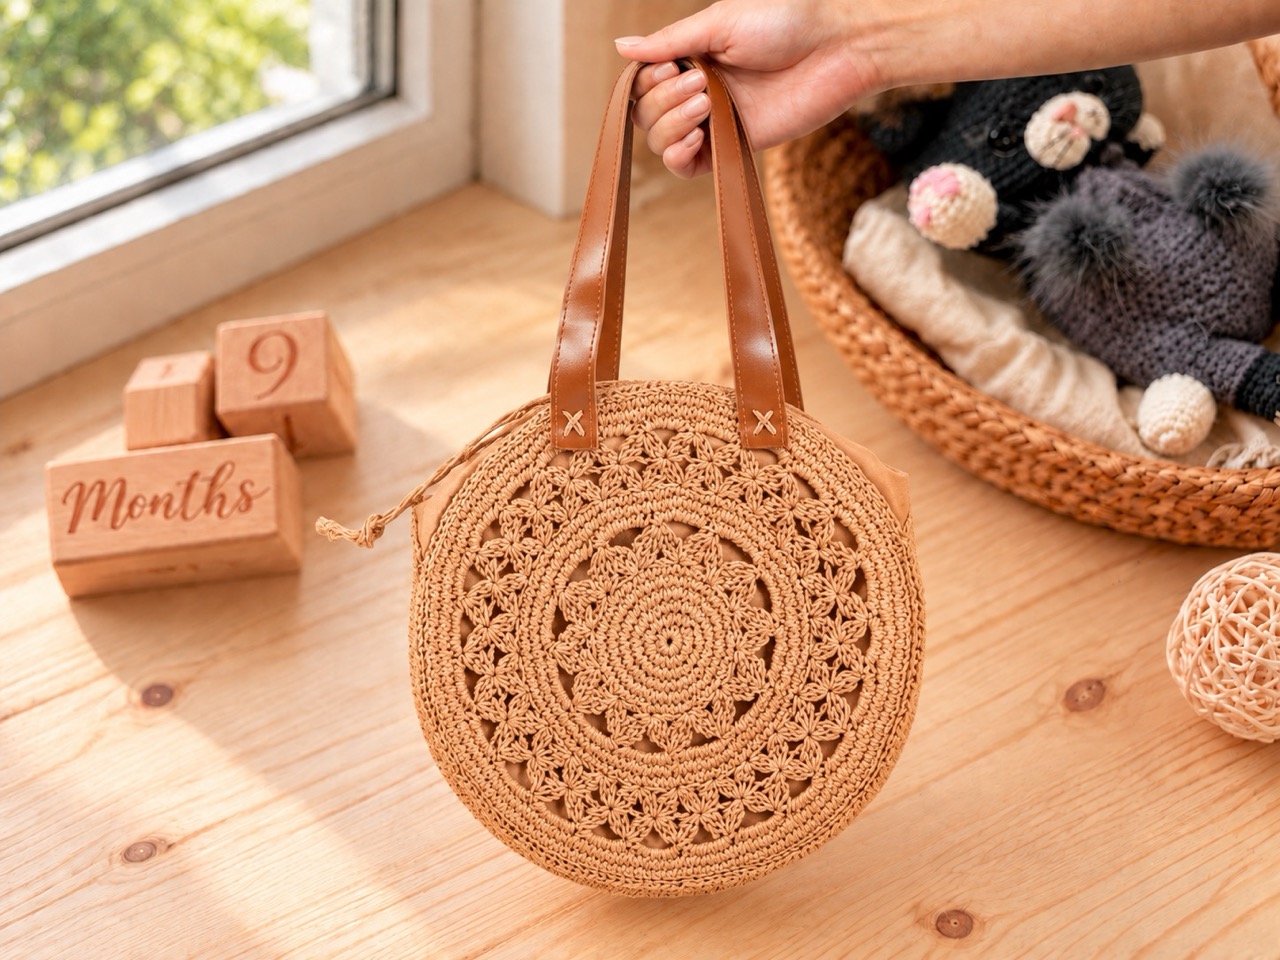
Infused with organic textures and a striking mandala-inspired circular design, the Crochet Bag “Sun” is an exquisite statement accessory that brings timeless bohemian elegance to your handmade wardrobe. Crafted primarily from sturdy raffia yarn, this circular bag combines intricate cluster stitches with a structured side gusset, a custom fabric lining, and hand-twisted cords. Whether you are heading to a summer farmers market, a beach getaway, or a casual weekend outing, this project offers an immensely rewarding crafting experience for intermediate makers looking to expand their skills.
Comprehensive Materials and Tools Checklist
To ensure your bag holds its shape and maintains professional durability, gather all required supplies before beginning your project:
- Raffia Yarn: 180 grams of raffia yarn. The designer specifically utilized a double, twisted, and very strong variety purchased on AliExpress (note that the seller does not specify exact meters per 100 grams).
- Crochet Hook: Size 4 mm (US G/6) crochet hook.
- Bag Handle / Strap: Handles or strap materials (the designer used a 70 cm length).
- Blocking Tool: Steam iron for steaming and shaping the crochet pieces.
- Lining Materials: Cotton or suitable lining fabric, sewing thread, sewing needle, and an optional sewing machine.
- General Notions: Scissors and a tape measure.
Gauge Specifications
Maintaining proper tension is essential for achieving the correct structural rigidity and finished size. Check your gauge before diving into the main pattern:
- Single Crochet Gauge: A $2 \times 2$ cm square equals 4 single crochets by 3 rows.
Understanding and Preparing Your Raffia Yarn
Working with raffia requires a slightly different approach than traditional wool or cotton yarns. Because raffia can be stiff, the pattern incorporates structural techniques like working around hidden inner strands of raffia to reinforce the fabric.
- Before starting your round pieces, cut two additional pieces of raffia measuring 130 cm and 200 cm long, which will be integrated into rows 9–10 and rows 14–15 respectively.
- You will work your single crochets as usual, but encase this additional inner strand of raffia inside your stitches, occasionally pulling on the inner yarn to keep the tension taut and even.
Step-by-Step Construction Guide
Part 1: The Front and Back Panels (First Piece)
You will need to crochet two identical round pieces, each measuring approximately 28 cm in diameter.
Building the Center Circle
- Start with a double magic ring, leaving a 100 cm tail of raffia that will be needed for working through the first 6 rows.
- Row 1: Chain 1, work 10 single crochets into the ring, and tighten the magic ring. Total: 10 stitches.
- Row 2: Crochet 2 single crochets in each stitch around (you can use a stitch marker to keep track of your rounds). Total: 20 stitches.
- Row 3: Work 1 single crochet, followed by 2 single crochets in the next stitch, repeating this sequence to the end of the row. Total: 30 stitches.
- Row 4: Work 2 single crochets in the next stitch, followed by 1 single crochet in the next 2 stitches, repeating to the end. Total: 40 stitches.
- Row 5: Work 1 single crochet in the next 3 stitches, followed by 2 single crochets in the next stitch, repeating to the end. Total: 50 stitches.
- Row 6: Work 1 single crochet in the next 2 stitches, [2 single crochets in the next stitch, followed by 1 single crochet in the next 4 stitches] repeated 9 times, then 2 single crochets in the next stitch, and 1 single crochet in the last 2 stitches. Total: 60 stitches.
Working the Textured Texture Rounds
- Row 7: Chain 3. Yarn over two times and insert your hook into the same stitch, draw up a loop, yarn over and draw through the first two loops, yarn over and draw through the next two loops (leaving two loops on your hook as an unfinished treble crochet cluster). Repeat this two more times so you have three unfinished treble crochets in total. Count four stitches across, and on the fifth stitch work three more unfinished treble crochets. You will have 6 loops on your hook; yarn over and draw through all loops to complete the cluster. Make 5 chains and repeat the $2 \times 3$ treble crochet cluster group. Complete a total of 12 cluster sets around the row and join with a slip stitch.
- Row 8: Chain 1, then work 8 single crochets inside each chain arc. You can now cut away the additional inner raffia strand.
- Rows 9 & 10: Work single crochets in each stitch around. Introduce the 130 cm additional piece of raffia into the work, encasing it within your single crochets and periodically pulling on the inner strand for added firmness.
- Row 11: Chain 2, work 3 unfinished double crochets into the same stitch, skip three stitches, and work 3 more unfinished double crochets into the fourth stitch. With 6 loops on your hook, yarn over and draw through all loops to complete the double crochet cluster, then chain 3. Repeat this pattern to create a total of 24 cluster sets, joining with a slip stitch.
- Row 12: Work in the exact same manner as the previous row, but increase the spacing by making 4 chains between the double crochet cluster stitches.
- Row 13: Chain 1, and work 7 single crochets into each chain arc.
- Rows 14 & 15: Work single crochets in each stitch around. Integrate the 200 cm additional strand of raffia into your stitches, working around it and pulling gently on the inner strand as needed.
- Note on Blocking: Apply steam treatment to your crocheted panels both before and after completing subsequent steps to relax and flatten the raffia fibers.
Part 2: Crafting the Side Gusset (Second Piece)
The side piece provides the depth of your bag, measuring 7 cm by 59 cm.
- Chain $100 + 1$.
- Round 1: Work 1 single crochet in the 2nd chain from the hook, 1 single crochet in each stitch until the last stitch, and work 5 single crochets into the final stitch. Continue working along the opposite side of the chain: 1 single crochet in each stitch until the last stitch, and 5 single crochets in the final stitch.
- Round 2: Work 1 single crochet in each stitch until you reach the turning group of 5 single crochets, then work 2 single crochets into each of those 5 stitches to create increases. Continue working 1 single crochet in each remaining stitch until the next corner, and repeat the 2 single crochet increases across the turning stitches. (Remember to work around your additional raffia strand when specified).
- Round 3: Work 1 single crochet in each stitch until the corner set, then alternate 1 single crochet and 2 single crochets in the next stitch across the turning group. Continue down the straight edge and repeat the increase sequence at the opposite corner.
- Rounds 4 & 5: Continue working stability rounds utilizing specified single crochet and increase sequences (such as alternating single crochet increments and double increases) to build up the sturdy 7 cm width of the gusset.
- Steam the completed side gusset piece thoroughly.
Part 3: Assembling and Connecting the Bag
- Take your two circular front and back panels and align them with the long side gusset piece.
- Connect the parts securely by working a continuous row of single crochets through both corresponding edges.
- Finish the connection row with a slip stitch back to where you started, ensuring a clean, stable seam. Repeat this attachment process for the second circular panel.
Part 4: Sewing and Attaching the Fabric Lining
To give your bag a professional interior finish and prevent small items from slipping through the open crochet stitches, you will sew a fabric lining.
- Cutting the Fabric: Cut out fabric pieces based on your measurements including a 1 cm seam allowance: two rectangular pieces measuring 10 x 100 cm and two oval/rounded pieces measuring 30 x 82 cm. Overlock the raw edges if desired.
- Assembly Steps:
- Sew the two long fabric pieces together at their short ends.
- Pin and attach the long strip around the perimeter of the oval side pieces, making sure to leave designated gaps or holes unstitched where your cord will pass through.
- Turn the lined fabric pouch right-side out.
- Fold the top opening edge as instructed and secure it with a neat circular hand stitch.
- Mark the center points of both your crocheted bag and your fabric lining, align them carefully, and hand-sew the lining securely to the interior of the crochet bag.
Part 5: Making the Custom Twisted Cords
Hand-twisted cords provide a strong, rustic handle option that complements the natural texture of raffia.
- For a single cord, take a strand of raffia measuring 240 cm and fold it in half to equal 120 cm.
- Twist the folded strand tightly, then let it fold back on itself naturally to form a sturdy double-ply cord measuring approximately 60 cm.
- Make two identical cords to serve as your bag straps or drawstring closures.
Final Finishing and Care
Once your lining is hand-stitched in place and your twisted cords are secured, weave in any remaining loose ends with your tapestry needle. Give your finished “Sun” bag a final light steam if needed, fill it with your daily essentials, and enjoy showing off your stunning handmade creation!