Master the Elegant Cinta Bag: A Comprehensive Crochet Pattern Guide
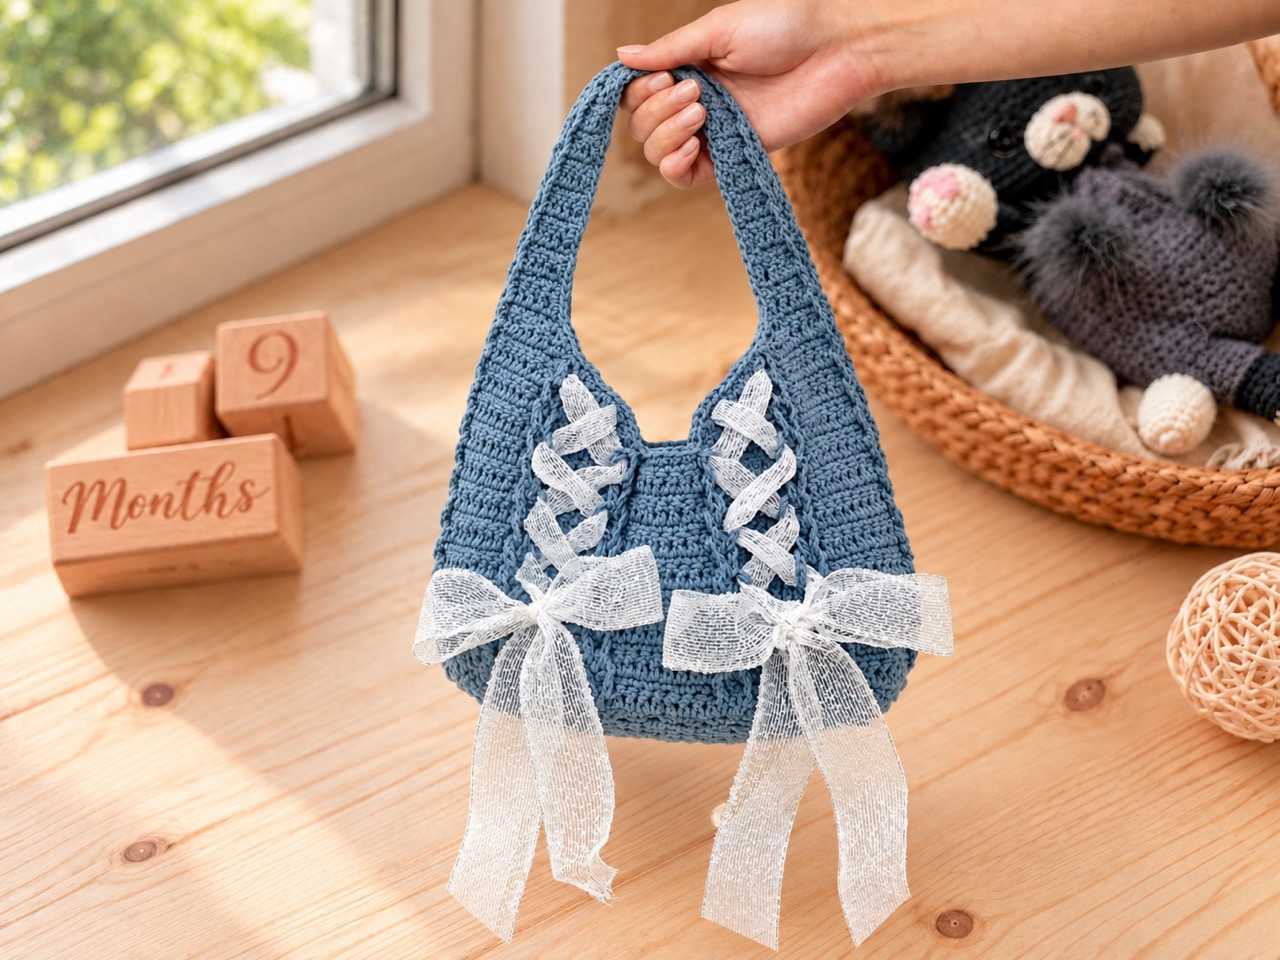
Designed with meticulous attention to detail sophisticated accessory that blends modern aesthetic charm with an engaging intermediate-beginner construction. Featuring unique textured vertical loops reminiscent of a modified Jacob’s ladder stitch and customizable ribbon lacing, this bag serves as a versatile statement piece. This guide offers an in-depth walkthrough of the entire pattern, covering materials, structural foundations, body creation, handle shaping, assembly, and ribbon embellishments.
Materials and Tools Checklist
To achieve the ideal drape, firmness, and structure for your Cinta Bag, gather the following supplies:
- A 4.5 mm crochet hook.
- Medium weight (size 4) cotton yarn. The pictured sample was created using Sugar’n Cream cotton yarn, measuring 232 meters per 150.7 grams.
- Alternatively, you can use Loops & Threads Heathered Tweed yarn held double, measuring 535 meters per 210 grams.
- A stitch marker to maintain precise stitch counts across rows.
- Ribbon for the lacing and bow details.
Crochet Abbreviations (US Terms)
- Ch: Chain
- Sc: Single crochet stitch
- Dc: Double crochet stitch
- Sc3tog: Single crochet 3 together
- Dc3tog: Double crochet 3 together
- Sl st: Slip stitch
- St(s): Stitch(es)
- TO: Turn over
General Working Guidelines and Structural Concepts
The Cinta Bag pattern is classified as an advanced beginner project. The construction flows sequentially: it starts with the flat bottom panel, builds up into the body, shapes the integrated handles, and finishes with decorative ribbon lacing.
- Always work with your right side facing out for all parts, ensuring that the tail from your foundation row faces left.
- A Chain 1 counts as your turning chain, while a Chain 3 counts as one double crochet stitch ($Ch 3 = 1 dc = 1 stitch$).
- The Chain 3 at the end of a row serves as the first stitch for the following double crochet row.
- In all double crochet rows, begin working from the second stitch.
- Weave in loose ends as your work progresses to keep the project clean.
- If you use a soft yarn, consider adding a fabric lining to prevent the bag from stretching out excessively under weight.
Understanding the Loop Stitch Technique
The unique vertical loop feature is similar to the traditional Jacob’s ladder stitch, with a key difference: while the Jacob’s ladder starts with double crochets, this pattern begins with single crochets.
- The stitch technique is worked in multiples of odd numbers.
- For this specific pattern, you work with multiples of 9, designating 9 stitches as one group, leaving 8 stitches between chains, and executing a chain 10 in the 9th stitch.
- If you wish to scale the bag down, you can work in multiples of 7 (7 stitches as a group, 6 stitches between chains, and a chain 10 in the 7th stitch).
- To make a larger bag, work in multiples of 11 or an even higher odd number (10 stitches between chains and a chain 10 in the 11th stitch). Adjust the number of bottom rows accordingly if you alter the stitch count.
Step-by-Step Construction Guide
Part 1: The Bottom Panel
- Foundation Row: Chain 15.
- Row 1: Work a double crochet in the 4th chain from your hook, double crochet 11, chain 3, and turn over.
- Row 2: Double crochet 12 across the row, chain 3, and turn over.
- Repeat Row 2 for 14 more times, bringing the total to 16 rows, then fasten off.
- Stitch Count: 13 stitches for each row, including the turning chain 3.
- Finished Dimensions: Approximately 8 cm by 21.5 cm.
Part 2: The Body
- Attach your yarn to the second stitch at the top left corner with the right side facing upward.
- Row 1: Insert your hook and make a chain, single crochet in the same stitch, then single crochet 4, chain 10, slip stitch into the last single crochet (the 5th single crochet), single crochet 9. Repeat this sequence 8 more times for a total of 9 groups, then chain 10, slip stitch into the last single crochet, single crochet 4, slip stitch, chain 3, and turn over.
- Stitch Count: 90 stitches for each body row, featuring 10 loop groups. Because there are no designated stitch spaces along the long edges of the bottom panel, single crochet evenly into random holes along the side, working 2 single crochets for every row.
- Row 2: Double crochet 89, slip stitch to the 3rd chain, chain 1, and turn over.
- Rows 3 through 16: Repeat Rows 1 and 2 seven more times for a total of 8 repeated groups of these rows (you can increase or decrease repetitions to customize the bag height). Ensure that your chain loops are aligned neatly in the same vertical columns.
- Row 17: Repeat Row 1, but omit the chains for 4 columns in the center, slip stitch, and fasten off. The written instruction for this row is: Single crochet 5, chain 10, slip stitch into the last single crochet, single crochet 27, chain 10, slip stitch into the last single crochet, single crochet 9 (repeated 2 more times for a total of 3), single crochet 18, chain 10, slip stitch into the last single crochet, single crochet 9, chain 10, slip stitch into the last single crochet, single crochet 4, slip stitch, and fasten off.
- Finished Body Size: Approximately 18 cm by 29 cm.
Part 3: Shaping the Handle
- With the right side facing up, locate the 3rd stitch in the same column as the chains counting from the left, turn over so the wrong side faces up, and begin the handle.
- Row 1: Insert hook, chain 3, double crochet 36, chain 1, and turn over (total 37 stitches).
- Row 2: Sc3tog, single crochet 7, chain 10, slip stitch into the last single crochet, single crochet 9. Repeat this 1 more time, then chain 10, slip stitch into the last single crochet, single crochet 6, sc3tog, chain 3, and turn over (total 33 stitches).
- Row 3: Dc3tog (using chain 3 and 2 unfinished double crochets), double crochet 27, dc3tog, chain 1, and turn over (total 29 stitches).
- Row 4: Sc3tog, single crochet 3, chain 10, slip stitch into the last single crochet, single crochet 9. Repeat this 1 more time, chain 10, slip stitch into the last single crochet, single crochet 2, sc3tog, chain 3, and turn over (total 25 stitches).
- Row 5: Dc3tog, double crochet 19, dc3tog, chain 1, and turn over (total 21 stitches).
- Row 6: Sc3tog, single crochet 8, chain 10, slip stitch into the last single crochet, single crochet 7, sc3tog, chain 3, and turn over (total 17 stitches).
- Row 7: Dc3tog, double crochet 11, dc3tog, chain 1, and turn over (total 13 stitches).
- Row 8: Sc3tog, single crochet 4, chain 10, slip stitch into the last single crochet, single crochet 3, sc3tog, chain 3, and turn over (total 9 stitches).
- Row 9: Double crochet 8, chain 1, and turn over (9 stitches).
- Row 10: Single crochet 5, chain 10, slip stitch into the last single crochet, single crochet 4, chain 3, and turn over (9 stitches).
- Rows 11 through 12: Repeat rows 9 and 10 until you reach your desired handle length (the designer repeated this 7 times after rows 9 and 10).
- Rows 25 and 26: Crochet 2 final rows of double crochet (Row 25: Double crochet 8, chain 3, and turn over; Row 26: Double crochet 8 and fasten off).
- Repeat this entire handle sequence for the second side of the bag.
Part 4: Assembly and Joining
- Once both handle sections are complete, roll up all the chain loops neatly.
- Position the wrong sides facing up and single crochet, slip stitch, or sew the handles together securely. Be sure to include the last 2 chains from both handles when connecting them.
- Do not cut off the yarn; instead, chain 1 and single crochet evenly across the edges for both sides.
- Fasten off after finishing one side, then attach the yarn to the opposite side where the handles connect, chain 1, single crochet across, and combine the chains.
Part 5: Adding the Ribbon Finishing Touch
- Transform your bag by weaving ribbons through the vertical chain loops. You can experiment with different ribbon colors, textures, widths, scrap fabrics, or lace trims to match your personal style.
- Tie lovely bows at the base to complete your handmade Cinta Bag.
Conclusion
The Cinta Bag offers an exceptionally rewarding crochet experience, resulting in a chic, romantic accessory that is sure to turn heads. Be sure to share photos of your completed creation online and tag the designer. Happy crocheting!