Craft a Charming Statement Piece with the Valentina Urban Bag Crochet Pattern
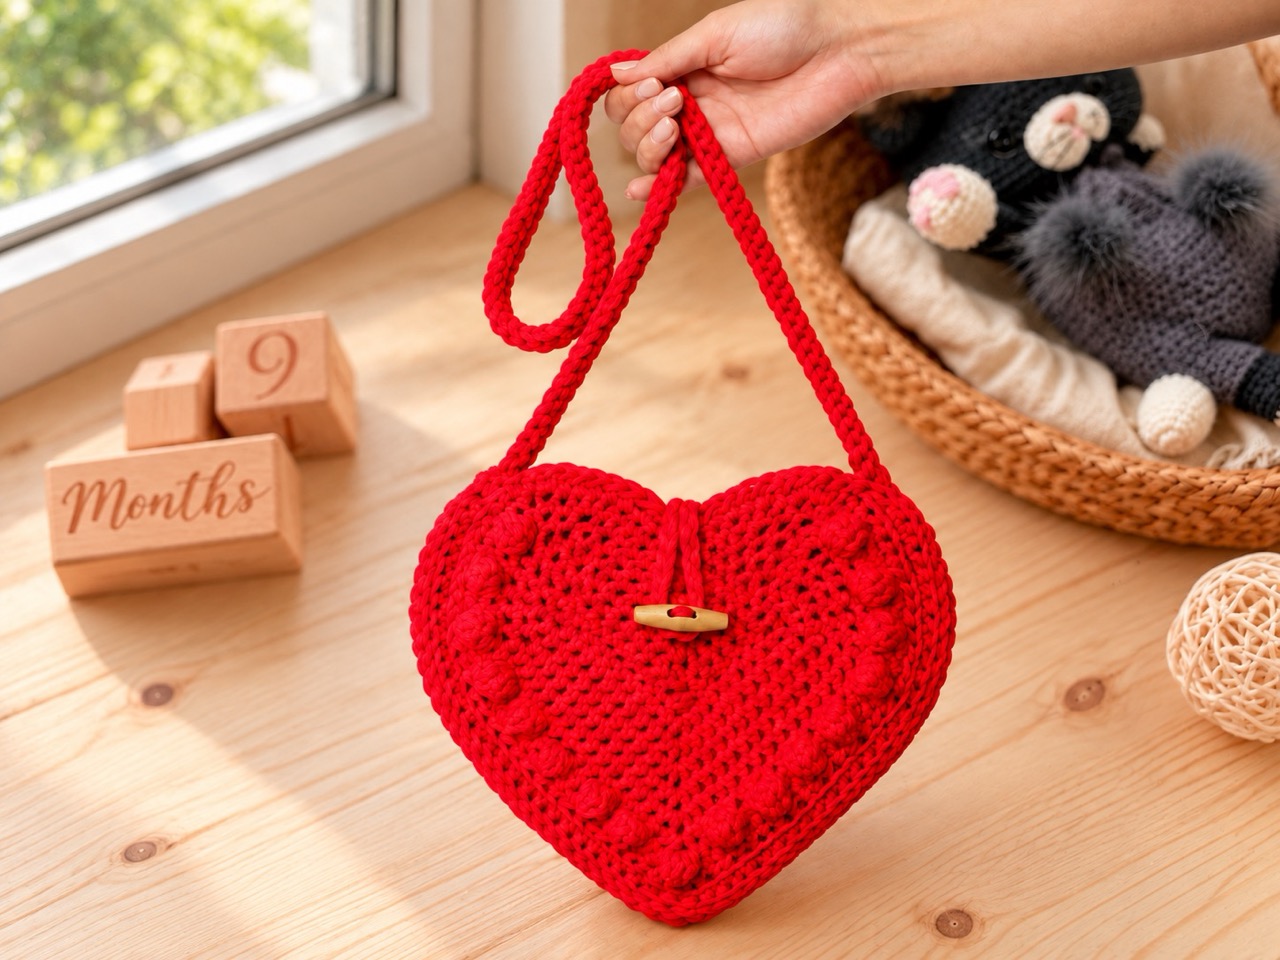
Infused with romantic flair and modern urban utility, the Valentina Urban Bag (also known as the Urban Bag) heart-shaped accessory that effortlessly combines fashion and functionality. Featuring textured bobble stitches, a clean structural shape, and a sturdy double-stranded strap, this pattern offers an engaging project for intermediate crocheters looking to craft a unique handmade handbag. Whether you are creating a thoughtful gift for a loved one or adding a bold statement piece to your own wardrobe, this comprehensive guide will walk you through every step of the creation process.
Project Overview and Specifications
- Contact & Support: For pattern assistance, you can reach out via email at
[email protected]. - Copyright Terms: This pattern is available for personal use only. Finished products may be sold, provided you credit April Miller as the author with a link back to her shop.
- Finished Dimensions: Using bulky yarn (such as Bernat Maker Fashion) and a K/10.5 (6.5mm) crochet hook, the finished bag measures approximately 8 inches by 10 inches (20 cm by 25 cm).
- Customization: You can easily adapt the size by experimenting with different yarn weights and appropriately matched hook sizes.
Essential Materials and Tools Checklist
To ensure your Valentina bag maintains a professional structure and durability, gather the following supplies before you begin:
- Yarn: Approximately 400 to 450 yards of bulky-weight yarn.
- Crochet Hook: A crochet hook sized appropriately for your chosen bulky yarn.
- Pro-Tip for Compact Stitches: The designer suggests going down a hook size smaller than normally required for your yarn. This keeps your stitches tight, firm, and compact, minimizing gaps and creating a smooth, polished surface.
- Notions: A single button for the closure and a tapestry needle for weaving in ends.
Comprehensive Crochet Abbreviations Guide
- Ch: Chain
- SC: Single crochet
- HDC: Half double crochet
- DC: Double crochet
- St(s): Stitch(es)
- Rnd: Round
- SlSt(s): Slip stitch(es)
- RS / WS: Right side, Wrong side
Mastering the Special Bobble Stitch
The pattern incorporates charming decorative bobbles to outline the heart shape. To make a Bobble Stitch, you will work 4 uncompleted double crochet stitches into the same designated stitch:
- Yarn over (YO) and insert hook into the target stitch.
- Yarn over and pull through the stitch, then yarn over and pull through the first two loops on your hook to make an incomplete double crochet (leaving 2 loops on your hook).
- Repeat this process three more times until you have 5 loops resting on your hook.
- Yarn over and pull through the first 4 loops on the hook (leaving 2 loops).
- Yarn over and pull through the remaining 2 loops to finalize your bobble.
Important Construction Notes
- Working Side: All rounds are worked with the Wrong Side (WS) facing you.
- Panel Structure: The bag is constructed from two identical heart-shaped panels that are later assembled together on the Right Side (RS).
- Notation Style: Numbers in parentheses
( )indicate the exact stitch count you should achieve at the end of each round. Brackets[ ]paired with a multiplier show how many times a sequence should be repeated.
Step-by-Step Construction Guide: Heart Panels
Each bag requires you to crochet two identical parts following Rounds 1 through 9.
Setting the Foundation and Early Rounds
- Begin: Chain 18.
- Round 1: With the front of the chain facing you and working in the top loop of the chain: work 2SC in the 2nd chain from the hook, SCx7, work 3SC (working through both loops here prevents a stretched-out hole in the center), SCx7, 3SC in the last chain to round the corner, SCx7, 3SC in the last chain to round the corner, SCx7. Rotate to work along the opposite side of the chain: SCx6, then work an SC2tog going through the next chain and the 3rd chain along (skipping the middle opposite side of the 3SC), and SCx7 bringing you to the opposite side of the initial 2SC stitches. Slip stitch into the first SC to join (total 36 stitches). Do not turn.
- Round 2: Ch 1, 2SCx2, SCx8, 3SC, SCx8, 2SCx3, SCx5, SC2tog going through the next and 3rd stitch along (skipping the middle previous SC2tog stitch), SCx5, 2SC, and slip stitch into the first SC to join (total 42 stitches).
- Round 3: Ch 1, 2SC, SC, 2SC, SCx10, 3SC, SCx10, 2SC, SC, 2SC, SC, 2SC, SCx4, SC2tog going through the next and 3rd stitch along, SCx8, SCx4, 2SC, SC, and slip stitch into the first SC to join (total 48 stitches).
Expanding the Heart Shape (Rounds 4 to 7)
- Round 4: Ch 1, SCx2, 2SC, SCx2, 2SC, SCx10, 3SC, SCx10, 2SC, SCx2, 2SC, SCx2, 2SC, SCx5, SC2tog going through the next and 3rd stitch along, SCx5, 2SC, and slip stitch to join (total 54 stitches).
- Round 5: Ch 1, SC, 2SC, SCx3, 2SC, SCx13, 3SC, SCx13, 2SC, SCx3, 2SC, SCx3, 2SC, SCx3, SC2tog going through the next and 3rd stitch along, SCx3, 2SC, SCx2, and slip stitch to join (total 60 stitches).
- Round 6: Ch 1, 2SC, SCx2, 2SC, SCx2, 2SC, SCx15, 3SC, SCx15, 2SC, SCx2, 2SC, SCx2, 2SC, SCx2, 2SC, SCx3, SC2tog going through the next and 3rd stitch along, SCx3, 2SC, SCx2, and slip stitch to join (total 68 stitches).
- Round 7: Ch 1, SC, [Bobble in next st, SCx2] 8 times, in the next stitch at the exact middle work: (SC, Bobble, SC), then work [SCx2, Bobble in next st] 8 times, SC, 2SC, SC, 2SC, SCx4, SC2tog going through the next and 3rd stitch along, SCx4, 2SC, SC, 2SC, and slip stitch to join (total 72 stitches).
Finalizing the Panel Edges (Rounds 8 and 9)
- Round 8: Ch 1, [HDC, 2HDC] 3 times, HDCx20, 3HDC, HDCx20, [2HDC, HDC] 3 times, 2HDC, 2HDC, HDCx6, SC2tog going through the next and 3rd stitch along, HDCx6, 2HDC, 2HDC, and slip stitch into the first HDC to join (total 82 stitches).
- Round 9: Note that this round is worked only in the v-shaped portion, leaving the top opening of the bag unworked. Ch 1, work (SC in the 1st loop of HDC) 30 times, in the next stitch at the point of the heart make (SC, ch 1, SC) in the 1st loop of HDC, then work (SC in the 1st loop of HDC) 30 times. Cut your yarn for the first panel.
- Important: Crochet a second identical part in the exact same manner, but do not cut the yarn at the end of Round 9.
Assembly and Strap Construction
With both panels completed, it is time to assemble your Valentina bag and create the strap.
- Joining Panels: Place the two panel pieces on top of each other with the Right Side (RS) facing outward, ensuring the stitches of Round 9 match up perfectly. Working in the inner loops of each part, make slip stitches in each SC along Round 9 through both layers to join them securely. At the sharp point of the heart, work a slip stitch, chain 1, and work another slip stitch all within the chain-1 space from Round 9. Keep the top opening (Round 8) completely open.
- Creating the Strap: When you reach the end of the joining process, do not cut your working yarn. Add a second strand of yarn so that you are holding two strands together, and make a chain 50 inches (125 cm) long (or adjust to your preferred length). Turn and make a slip stitch in the back bump of the 2nd chain from the hook and in each chain down to the end. Cut your yarn leaving a 10-inch (20 cm) tail and securely sew the end of the strap to the opposite side of the bag.
Adding the Closure and Professional Blocking Tips
- Buttonhole Loop: Attach your yarn to the middle of the round opening at the back panel of the bag, crochet a 5-inch (12 cm) chain loop, and slip stitch back into the initial point to form a secure loop. Sew your button onto the corresponding front part of the bag.
- Blocking for Crisp Curves: To help the bag hold its shape and accentuate its clean heart curves, the designer recommends blocking. Cut a piece of rigid cardboard in the exact shape and size of the bag and insert it inside. Spray both sides of the bag with Spray Starch, suspend the bag, and allow it to dry completely.
Frequently Asked Questions (FAQ)
Can I use a different yarn weight for this pattern?
Yes! While bulky yarn is recommended, you can customize the bag to any size by using alternative yarn weights paired with an appropriately sized hook.
How do I minimize gaps in the stitches?
To keep your stitches compact and firm, the designer suggests using a hook size one step smaller than what is normally recommended for your yarn.
Should I turn my work after each round?
No, all rounds are worked with the Wrong Side facing you, and you do not turn your work between rounds.
Conclusion
Creating the Valentina Urban Bag is a rewarding journey that yields a stunning, romantic accessory packed with texture and personality. Once you have woven in all your loose ends, your handmade bag is ready to wear or gift. Enjoy showing off your new creation!