Crochet Kittens Pattern Mini Cats That Pop Out of Eggshells
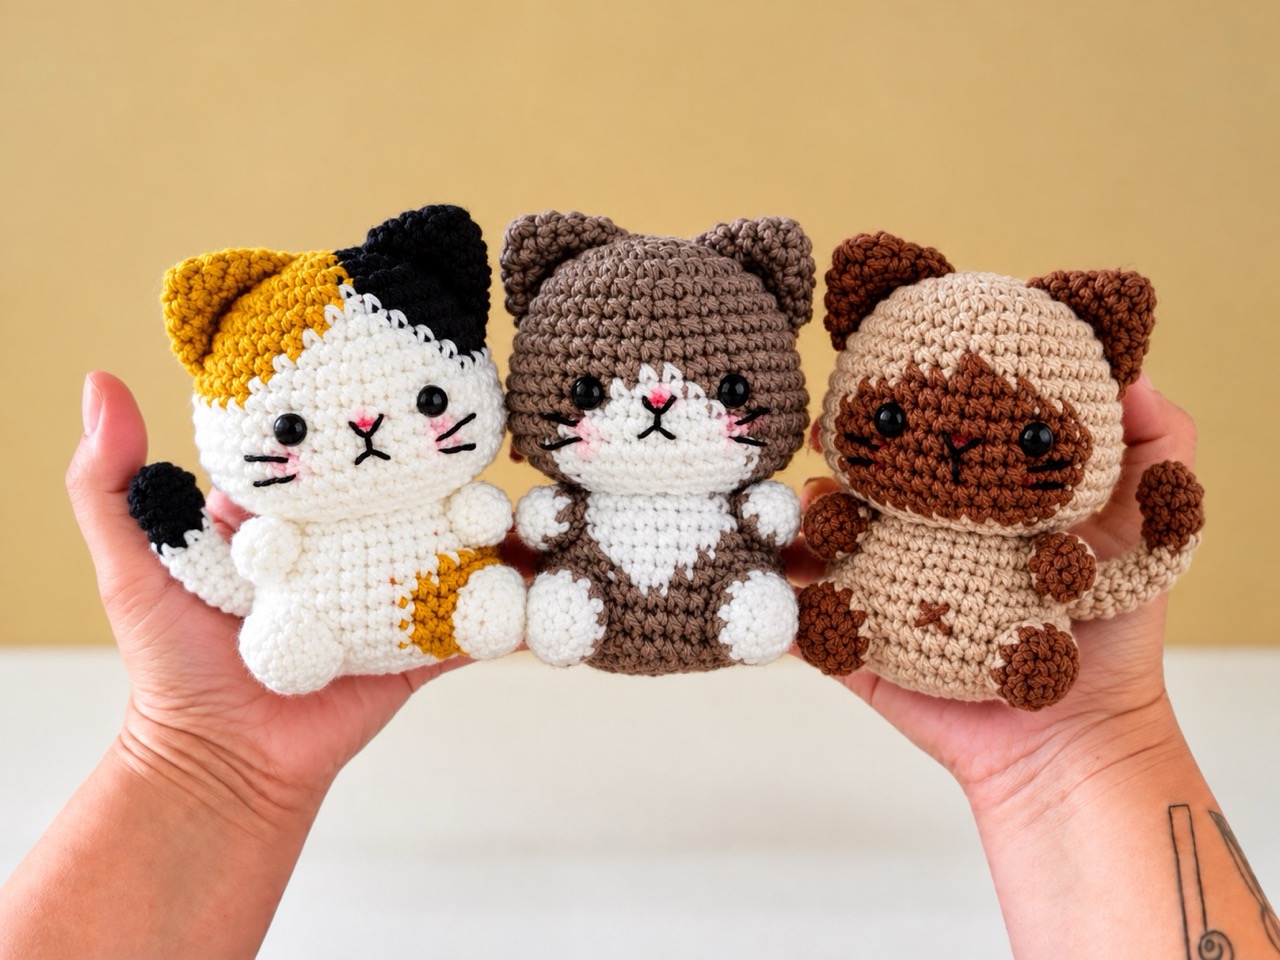
There’s something magical about a tiny kitten curled up inside an eggshell. It’s like a little surprise waiting to be discovered. This crochet hatching kittens pattern gives you exactly that — a collection of adorable mini cats, each one nestled inside its own crocheted egg. The cats are small enough to fit in your palm, soft enough to cuddle, and detailed enough to make you smile every time you look at them. Whether you make a white kitten, a calico, a gray and white cat, or a Siamese, you’ll end up with a set of tiny friends who look like they just hatched into the world.
Below is a complete guide to the Hatching Kittens pattern. You’ll find the materials, abbreviations, step-by-step instructions for the cats and eggshells, plus assembly notes, tips, and answers to common questions.
Jump to a Section
- Why This Crochet Hatching Kittens Pattern Stands Out
- What You Need Before You Start
- Abbreviations and Special Stitches
- How to Crochet the Eggshell
- How to Crochet the White Kitten
- How to Crochet the Calico Kitten
- How to Crochet the Gray and White Kitten
- How to Crochet the Siamese Kitten
- How to Add the Tail
- Putting Your Crochet Hatching Kittens Together
- Tips for a Neater Crochet Hatching Kittens Pattern
- FAQ About the Crochet Hatching Kittens Pattern
- Your Next Stitch
Why This Crochet Hatching Kittens Pattern Stands Out
Plenty of amigurumi cat patterns exist, but this one has a few qualities that make it especially charming.
- Finished size: Varies by yarn weight — 15 cm (5.5 in) with jumbo yarn, 10 cm (4 in) with super bulky blanket yarn, or 7 cm (2.75 in) with super bulky chenille yarn.
- Skill level: Intermediate beginner. You need to know magic ring (or chain 2 start), single crochet, increase, decrease, and bobble stitches.
- Yarn options: Works with #7 Jumbo, #6 Super Bulky blanket, or #6 Super Bulky chenille.
- Eyes: Safety eyes in 12 mm, 10 mm, or 7 mm depending on the yarn weight.
- Accessories: A wooden button and a small bell for each kitten.
- Construction: Head and body are crocheted in one piece. The tail is added directly into the body. The eggshell is made in two parts and joined.
- Four cat variations: White kitten, calico kitten, gray and white kitten, and Siamese kitten.
- Special technique: The pattern uses the X-shaped (yarn under) single crochet for a tighter, neater fabric.
If you’ve been searching for a crochet hatching kittens pattern that feels approachable and looks adorable, this one is a wonderful choice.
What You Need Before You Start
Gather your supplies first. The pattern works with three different yarn weights, so choose the one that matches the size you want.
Yarn and Hook Options
For 15 cm (5.5 in) kittens:
- Yarn: #7 Jumbo (James C Brett Flutterby Huggable, Premier Parfait XL, Himalaya Dolphin Big)
- Hook: 8.0 mm
- Safety eyes: 12 mm black or 14 mm glitter
- Yarn quantity: About 60g per kitten
- Hook for eggshell: 9.0 mm
For 10 cm (4 in) kittens:
- Yarn: #6 Super Bulky blanket (Bernat Blanket, Bernat Baby Blanket, Premier Basix Chenille)
- Hook: 5.5–6.0 mm
- Safety eyes: 10 mm black or 12 mm glitter
- Yarn quantity: About 25g per kitten
- Hook for eggshell: 6.0–6.5 mm
For 7 cm (2.75 in) kittens:
- Yarn: #6 Super Bulky chenille (Premier Parfait Chunky, Himalaya Dolphin Baby, Hobbii Toucan/Honey Bunny)
- Hook: 4.0–4.5 mm
- Safety eyes: 7 mm black
- Yarn quantity: About 12g per kitten
- Hook for eggshell: 4.5–5.0 mm
Other Materials
- Fiberfill stuffing.
- Yarn needle.
- Stitch marker.
- Scissors.
- Pink yarn for nose and whiskers.
- Blue yarn for eye highlights (optional).
- Small bell (6 mm or 8 mm depending on size).
- 18 mm wooden button for the eggshell.
Abbreviations and Special Stitches
- Rnd — round
- st, sts — stitch, stitches
- Ch — chain stitch
- slst — slip stitch
- sc — single crochet stitch
- hdc — half double crochet stitch
- dc — double crochet stitch
- Tr — treble/triple crochet stitch
- (..) * repeat n times — repeat instructions between brackets n times
- [number] — total stitches at the end of the round
- dec — decrease (2 sc together)
- inc — increase (2 sc in one stitch)
- inc3 — crochet 3 sc in one stitch
- inc-hdc — half double crochet increase
- inc-dc — double crochet increase
- FLO — front loops only
- BLO — back loops only
- Bobble-X-dc — a bobble stitch made of X partially completed double crochet stitches
Bobble Stitch
Make X double crochet stitches in the same stitch and then yarn over, pull through all the loops on your hook. The pattern includes photo tutorials for Bobble-3-dc, Bobble-4-dc, and Bobble-5-dc.
X-Shaped (Yarn Under) Single Crochet
The designer uses the yarn under single crochet (X-shaped) technique. The pattern works with both X-shaped and V-shaped stitches, but V-shaped creates slightly bigger gaps. If you use V-shaped, go down a hook size to avoid gaps.
Invisible Single Crochet Decrease
The gap between two decrease stitches is smaller when you use the invisible decrease. The pattern includes a video link for this technique.
Chenille Yarn Tips
- Use “Chain 2 then crochet in the first chain” instead of a magic ring.
- Don’t cut chenille yarn too close — use a lighter to burn the end, then hide it inside the body.
- When joining new yarn, insert the hook through the stitch, wrap the yarn over, and pull through.
Color Change
In the last stitch before changing color, make the stitch as usual but in the final yarn over, wrap the new color around your hook and pull through all loops. Tie the tails together and continue with the new color.
Cleaner Color Change with Bobble Stitches
Tighten the yarn, tie the new color with the original, then with the new color, wrap the yarn over your hook. Insert the hook into the next stitch and make the partially completed double crochet stitches. Use the original color to yarn over and pull through all loops. Tie the tails together and push the bobble to pop to the outside.
How to Crochet the Eggshell
Use a hook slightly larger than the one used for the kittens. Work in spiral rounds.
Bottom Part of the Eggshell
- Rnd 1: 8 sc in the magic ring [8]
- Rnd 2: 8 inc [16]
- Rnd 3: (1 sc, 1 inc) * repeat 8 times [24]
- Rnd 4–8: 24 sc [24] (5 rounds)
- Rnd 9: 24 hdc, slst and fasten off [24]
Upper Part of the Eggshell
- Rnd 1: 8 sc in the magic ring [8]
- Rnd 2: 8 inc [16]
- Rnd 3: (3 sc, 1 inc) * repeat 4 times [20]
- Rnd 4: 20 sc [20]
- Rnd 5: (4 sc, 1 inc) * repeat 4 times [24]
- Rnd 6–7: 24 sc [24] (2 rounds)
- Rnd 8: 14 sc, chain 4, continue to crochet on Rnd 7: 10 sc [24]
Note: If you want a regular egg without a button, crochet Round 8 as 24 sc.
Now attach both parts of the eggshell by crocheting through both pieces. The upper part should be closer to the hook handle, while the bottom part is positioned underneath. Slip stitch into the next 4 stitches, working through both layers, then fasten off. Sew an 18 mm wooden button in the center of the bottom part of the eggshell.
Color Options for the Eggshell
- Two-colored egg: Bottom part in main color. Upper part: Rnds 1–4 in white, Rnds 5–6 in main color, Rnds 7–8 in white.
- Furry egg: Use Alize Softy Plus yarn.
How to Crochet the White Kitten
Use white yarn. Work in spiral rounds.
Head and Body
- Rnd 1: 8 sc in the magic ring [8]
- Rnd 2: 1 inc, 1 bobble-4-dc, 3 inc, 1 bobble-4-dc, 2 inc [14]
- Rnd 3–4: 14 sc [14] (2 rounds)
- Rnd 5: 3 sc, 2 inc, 1 sc, crochet in the same stitch: (1 bobble-2-dc, slst), 1 bobble-2-dc, 1 sc, 2 inc, 3 sc [19]
- Rnd 6: 1 dec, 17 sc [18]
- Rnd 7: 9 dec [9]
Place the safety eyes between Rnd 4 and Rnd 5 with 3 sts apart. Stuff the head. Embroider the nose with pink yarn between Rnd 4 and Rnd 5 with 1 stitch wide. Embroider the whiskers with pink yarn. You can embroider a small amount of blue yarn about one-third below the eyes to give the cat a more lively look.
- Rnd 8: FLO (2 sc, 1 inc) * repeat 3 times [12]
- Rnd 9: 1 inc, 3 sc, 1 inc, 2 sc, 1 inc, 3 sc, 1 inc [16]
- Rnd 10: 1 inc, 14 sc, 1 inc [18]
- Rnd 11: 1 sc, 1 inc, 15 sc, 1 inc [20]
- Rnd 12: 9 sc, 1 bobble-4-dc, 1 sc, 1 bobble-4-dc, 8 sc [20]
- Rnd 13: (3 sc, 1 dec) * repeat 4 times [16]
Stuff the body as you go.
- Rnd 14: 8 dec [8]
Fasten off, leave a long tail for sewing. Weave the yarn tail through the front loops of the last round and pull it tight to close the hole. Make a knot and hide the yarn tail inside the body.
How to Crochet the Calico Kitten
Use gold yarn to begin. Work in spiral rounds.
Head and Body
- Rnd 1: 8 sc in the magic ring [8]
Change to dark brown yarn. From Rnd 2 to Rnd 4, stitches in bold and green are crocheted with white yarn, bold and orange with gold yarn.
- Rnd 2: 1 inc, 1 bobble-4-dc, 1 inc, 1 inc, 1 inc, 1 bobble-4-dc, 2 inc [14]
- Rnd 3: 5 sc, 3 sc, 6 sc [14]
- Rnd 4: 4 sc, 5 sc, 5 sc [14]
Change to white yarn. From now, crochet all stitches in white.
- Rnd 5: 3 sc, 2 inc, 1 sc, crochet in the same stitch: (1 bobble-2-dc, slst), 1 bobble-2-dc, 1 sc, 2 inc, 3 sc [19]
- Rnd 6: 1 dec, 17 sc [18]
- Rnd 7: 9 dec [9]
Place the safety eyes between Rnd 4 and Rnd 5 with 3 sts apart. Stuff the head. Embroider the nose with pink yarn between Rnd 4 and Rnd 5 with 1 stitch wide. Embroider the whiskers with black yarn. You can embroider a small amount of blue yarn about one-third below the eyes.
- Rnd 8: FLO (2 sc, 1 inc) * repeat 3 times [12]
- Rnd 9: 1 inc, 3 sc, 1 inc, 2 sc, 1 inc, 3 sc, 1 inc [16]
- Rnd 10–12: Work as the White Kitten, incorporating dark brown and gold yarn as indicated in the pattern.
Fasten off and close as before.
How to Crochet the Gray and White Kitten
Use gray yarn. Work in spiral rounds.
Head and Body
- Rnd 1: 8 sc in the magic ring [8]
- Rnd 2: 1 inc, 1 bobble-4-dc, 3 inc, 1 bobble-4-dc, 2 inc [14]
From Rnd 3 to Rnd 8, stitches in bold and green are crocheted with white yarn.
- Rnd 3: 6 sc, 1 sc, 7 sc [14]
- Rnd 4: 5 sc, 3 sc, 6 sc [14]
- Rnd 5: 2 sc, 2 inc, 2 sc, crochet in the same stitch: (1 bobble-2-dc, slst), 1 bobble-2-dc, 2 sc, 2 inc, 2 sc [19]
- Rnd 6: 1 dec, 3 sc, 9 sc, 5 sc [18]
Place the safety eyes between Rnd 4 and Rnd 5 with 3 sts apart.
- Rnd 7: 2 dec, 5 dec, 2 dec [9]
Stuff the head. Embroider the nose with pink yarn. Embroider the whiskers with black yarn. Add blue yarn below the eyes.
- Rnd 8: FLO 2 sc, 1 inc, 2 sc, 1 inc, 2 sc, 1 inc [12]
- Rnd 9: 1 inc, 2 sc, 1 inc, 3 sc, 1 inc, 3 sc, 1 inc [16]
- Rnd 10: 1 inc, 6 sc, 2 sc, 6 sc, 1 inc [18]
- Rnd 11: 1 sc, 1 inc, 15 sc, 1 inc [20]
- Rnd 12: 9 sc, 1 bobble-4-dc in white, 1 sc, 1 bobble-4-dc in white, 8 sc [20]
- Rnd 13: (3 sc, 1 dec) * repeat 4 times [16]
- Rnd 14: 8 dec [8]
Fasten off and close as before.
How to Crochet the Siamese Kitten
Use beige yarn. Work in spiral rounds.
Head and Body
- Rnd 1: 8 sc in the magic ring [8]
From Rnd 2 to Rnd 6, stitches in bold and orange are crocheted with dark brown yarn.
- Rnd 2: 1 inc, 1 bobble-4-dc in dark brown, 3 inc, 1 bobble-4-dc in dark brown, 2 inc [14]
- Rnd 3: 5 sc, 3 sc, 6 sc [14]
- Rnd 4: 4 sc, 5 sc, 5 sc [14]
- Rnd 5: 2 sc, 2 inc, 2 sc, crochet in the same stitch: (1 bobble-2-dc, slst), 1 bobble-2-dc, 2 sc, 2 inc, 2 sc [19]
- Rnd 6: 1 dec, 5 sc, 6 sc, 6 sc [18]
- Rnd 7: 9 dec [9]
Place the safety eyes between Rnd 5 and Rnd 6 with 3 sts apart. Stuff the head. Embroider the nose with pink yarn between Rnd 5 and Rnd 6 with 1 stitch wide. Embroider the whiskers with black yarn. Add blue yarn below the eyes.
- Rnd 8: FLO (2 sc, 1 inc) * repeat 3 times [12]
- Rnd 9: 1 inc, 3 sc, 1 inc, 2 sc, 1 inc, 3 sc, 1 inc [16]
- Rnd 10: 1 inc, 14 sc, 1 inc [18]
Continue with Rnds 11–14 as the White Kitten.
How to Add the Tail
Attach new yarn on Rnd 12 in the middle of the back. Crochet with the body upside down. Pull up a loop on your hook, chain 10, start to crochet into the second chain from the hook: 1 hdc, 1 sc, 7 slst, slst on the body. Fasten off and weave the yarn tails.
Putting Your Crochet Hatching Kittens Together
- Stuff the head and body firmly but not too tightly.
- Close the body using the front loops of the last round.
- Add the tail directly into the body as described.
- Embroider the nose and whiskers before attaching the head to the eggshell.
- Add the bell around the neck with a small piece of yarn.
- Place the kitten inside the eggshell. The eggshell is designed so the kitten sits inside.
- Secure the kitten if desired, or leave it removable so you can take it in and out.
- Sew the wooden button to the center of the bottom part of the eggshell.
Tips for a Neater Crochet Hatching Kittens Pattern
- Choose your yarn weight first. The finished size depends entirely on the yarn and hook you use.
- Use a stitch marker. Continuous rounds make it easy to lose your place.
- Count your stitches. The color changes and bobble stitches depend on accurate counts.
- Stuff as you go. It’s easier to shape the head and body before closing.
- Use the X-shaped single crochet. It creates a tighter fabric with fewer gaps.
- Work the bobble stitches carefully. They give the kittens their distinctive ears.
- Don’t cut chenille yarn too close. Burn the ends with a lighter and hide them inside.
- Embroider the face before attaching the tail. It’s easier to reach the front.
- Try different color combinations. The pattern works with any colors you like.
- Make a set. The kittens look adorable together in their eggshells.
FAQ About the Crochet Hatching Kittens Pattern
What skill level is this crochet hatching kittens pattern?
It’s intermediate beginner. You need to know magic ring (or chain 2 start), single crochet, increase, decrease, and bobble stitches.
How big are the finished kittens?
The size depends on your yarn:
- 15 cm (5.5 in) with #7 Jumbo yarn and an 8.0 mm hook
- 10 cm (4 in) with #6 Super Bulky blanket yarn and a 5.5–6.0 mm hook
- 7 cm (2.75 in) with #6 Super Bulky chenille yarn and a 4.0–4.5 mm hook
What yarn is used for this crochet hatching kittens pattern?
The pattern works with #7 Jumbo, #6 Super Bulky blanket, or #6 Super Bulky chenille yarn. Recommended brands include James C Brett Flutterby Huggable, Premier Parfait XL, Himalaya Dolphin Big, Bernat Blanket, Bernat Baby Blanket, Premier Basix Chenille, Premier Parfait Chunky, Himalaya Dolphin Baby, and Hobbii Toucan/Honey Bunny.
What size safety eyes do the kittens need?
- 12 mm black or 14 mm glitter for the 15 cm size
- 10 mm black or 12 mm glitter for the 10 cm size
- 7 mm black for the 7 cm size
How do I make the eggshell?
The eggshell is made in two parts — a bottom and an upper part — and then joined by crocheting through both layers. Full instructions are in the pattern.
Can I sell the finished kittens?
Yes. The designer allows you to sell finished products made from this pattern as long as you bought the pattern and the toys are handmade by you.
Where can I find the original crochet hatching kittens pattern?
This article is based on the Hatching Kittens pattern. You can find her on her website (greenfrogcrochet.com), Instagram (greenfrog.crochet), Facebook (Green Frog Crochet), Ravelry, and Etsy.
Your Next Stitch
This crochet hatching kittens pattern is one of those projects that brings a little joy to every stitch. Whether you make the white kitten, the calico, the gray and white cat, or the Siamese, you’ll end up with a tiny friend who looks like it just hatched into the world. They’re small enough to make in an evening, detailed enough to feel rewarding, and cute enough that you’ll want to make the whole litter.
So gather your chenille yarn, pick your hook, and start with that first chain. If you get stuck on the bobble stitches or the eggshell assembly, come back to this guide and work through it step by step. And when your hatching kittens are finished, share them , post a photo, and show off your work. Your next project might be exactly what someone else needs to see.
Happy crocheting!