Crochet Mushroom Sweethearts Pattern 3 Amigurumi Caps, Hearts, Sweet Details
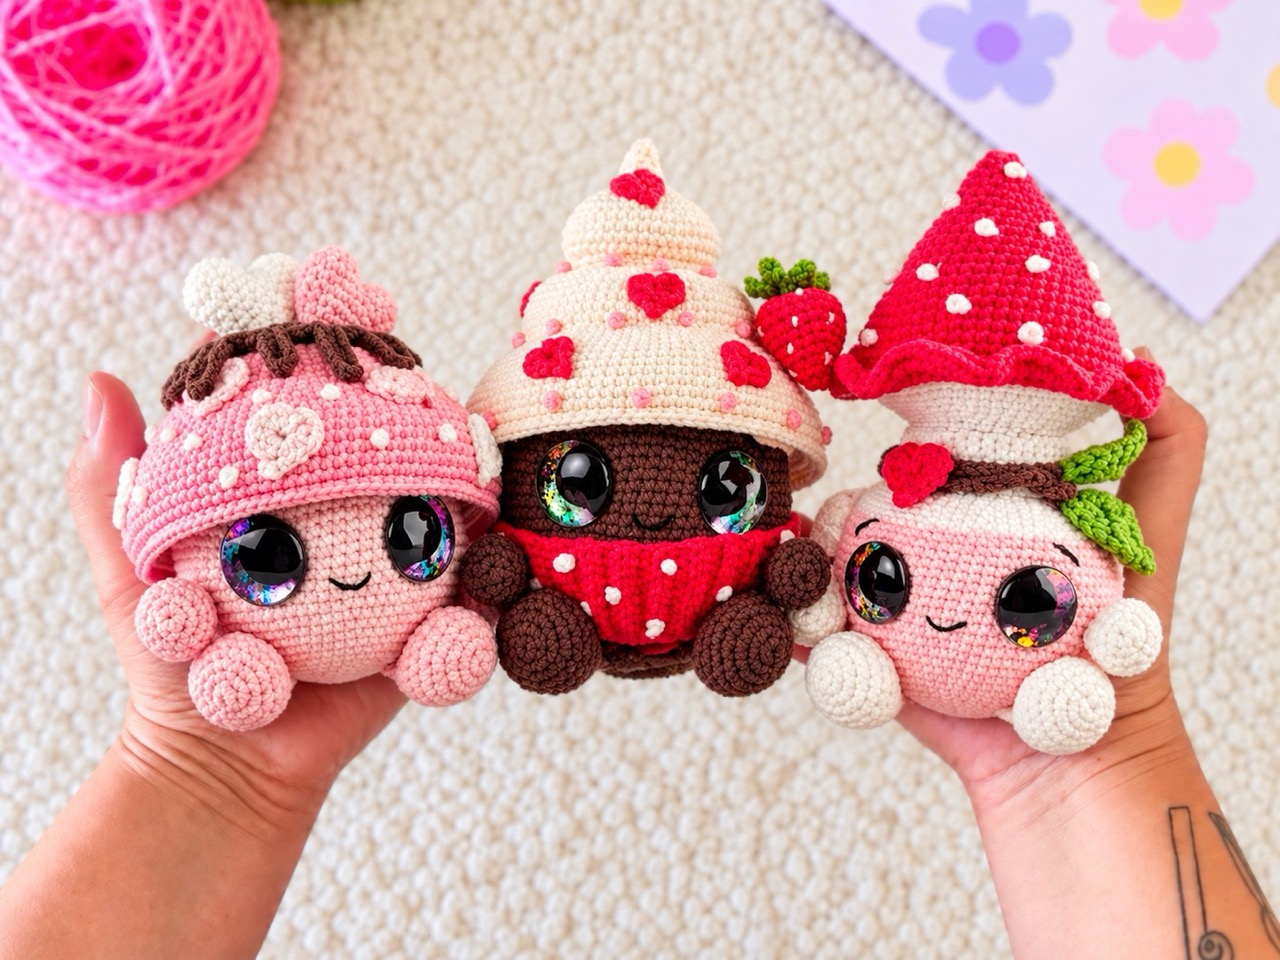
There’s something irresistibly cozy about a tiny mushroom with a smiling face. Maybe it’s the round little body, the oversized cap, or the way it looks like it just popped out of a fairy tale. This crochet mushroom sweethearts pattern gives you three different mushroom characters to make: a Mushroom Potion with a bottle-shaped body, a Mushroom Cupcake with a whipped topping cap and strawberry, and a Love Mushroom with a chocolate-drizzled cap and heart decorations. Each one is about 10 cm tall, uses sport weight cotton yarn, and comes together with simple single crochet shaping, French knots, and a few charming accessories.
Below is a complete guide to the Mushroom Sweethearts pattern. You’ll find the materials, abbreviations, step-by-step instructions for all three mushrooms, plus assembly notes, tips, and answers to common questions.
Jump to a Section
- Why This Crochet Mushroom Sweethearts Pattern Stands Out
- What You Need Before You Start
- Abbreviations and Special Stitches
- How to Crochet the Mushroom Potion
- How to Crochet the Mushroom Cupcake
- How to Crochet the Love Mushroom
- How to Make the Arms and Legs
- How to Make the Caps and Accessories
- Putting Your Crochet Mushroom Sweethearts Together
- Tips for a Neater Crochet Mushroom Sweethearts Pattern
- FAQ About the Crochet Mushroom Sweethearts Pattern
- Your Next Stitch
Why This Crochet Mushroom Sweethearts Pattern Stands Out
Plenty of amigurumi mushroom patterns exist, but this collection has a few qualities that make it especially charming.
- Finished size: About 10 cm / 4 inches tall when using sport weight yarn and a 2 mm hook.
- Skill level: Intermediate. You need to know magic ring, single crochet, increase, decrease, color changes, and basic embroidery.
- Yarn: Sport weight (No. 2) cotton yarn — Alize Cotton Gold and YarnArt Jeans.
- Eyes: 20 mm safety eyes with colorful colorways (Pixie, Rosewood, Nebula).
- Three characters: Mushroom Potion (bottle-shaped), Mushroom Cupcake (with whipped cap and strawberry), and Love Mushroom (with chocolate topping and hearts).
- Details: French knots, picot stitches, embroidered faces, and tiny accessories.
- Construction: Body, arms, legs, and caps are made separately and sewn together.
- Video support: The pattern includes QR codes and links for French knots and other techniques.
What You Need Before You Start
Gather your supplies first. The pattern uses specific yarns and tools for the best results.
Yarn and Hook
- Sport weight (No. 2) — Alize Cotton Gold:
- Light cream (62), Powder pink (393), Cream (01), Nude (401), Pink (265)
- Sport weight (No. 2) — YarnArt Jeans:
- Red (26), Green (69), Brown (70), Beige (05)
- Hook: 2 mm.
- Yarn needle.
- Stitch marker.
- Pins.
- Scissors.
- Stuffing.
- Safety eyes: 20 mm in colorways Pixie, Rosewood, or Nebula (you may need bigger or smaller depending on your yarn).
General Advice
- Make sure your tension is tight so no stuffing shows through.
- Work in continuous spirals unless otherwise stated. Use a stitch marker at the end of each round.
- The designer recommends the yarn under/yarn over method for neat X-shaped stitches.
- Stuff firmly but not so much that the stitches stretch.
- Turn your project right side out — the neat X stitches should be on the outside.
Abbreviations and Special Stitches
- Ch — chain stitch
- St — stitch
- Sl st — slip stitch
- Inc — increase
- Dec — invisible decrease
- 3 sc tog — crochet a decrease with three stitches
- (….) x … — repeat instructions in brackets
- [..] — total number of stitches in the row
- F.O. — fasten off
- MR — magic ring
- Rnd — round
- Sc — single crochet
- FLO — front loops only
- BLO — back loops only
- Hdc — half double crochet
- Hdc inc — half double crochet increase
- Dc — double crochet
- Dc inc — double crochet increase
French Knot
A decorative embroidery stitch used to add small dots. The pattern includes a QR code and video guide.
Picot Stitch
Ch 2, sl st into the 2nd ch from hook. Used for leaf tips and heart details.
How to Crochet the Mushroom Potion
The Mushroom Potion has a bottle-shaped body with a rolled lip at the neck, a mushroom cap, arms, legs, and a cord with leaves and a heart.
Body
Start with Powder Pink yarn. Work in a continuous spiral.
- Rnd 1: 6 sc in MR [6]
- Rnd 2: (inc) x 6 [12]
- Rnd 3: (sc, inc) x 6 [18]
- Rnd 4: (2 sc, inc) x 6 [24]
- Rnd 5: sc, inc, (3 sc, inc) x 5, 2 sc [30]
- Rnd 6: (4 sc, inc) x 6 [36]
- Rnd 7: 2 sc, inc, (5 sc, inc) x 5, 3 sc [42]
- Rnd 8: (6 sc, inc) x 6 [48]
- Rnd 9: 3 sc, inc, (7 sc, inc) x 5, 4 sc [54]
- Rnd 10: (8 sc, inc) x 6 [60]
- Rnd 11: 4 sc, inc, (9 sc, inc) x 5, 5 sc [66]
- Rnd 12: (10 sc, inc) x 6 [72]
- Rnd 13–17: 72 sc (5 rounds) [72]
Insert safety eyes between rounds 17 and 18, leaving 12 stitches between the posts and 7–8 stitches between the eyes. If using large safety eyes, crochet holes in round 18: ch 2, skip 2 sts, 12 sc, ch 2, skip 2 sts.
- Rnd 18–24: 72 sc (7 rounds) [72]
Change to Light Cream yarn. Cut and F.O. Powder Pink.
- Rnd 25: (10 sc, dec) x 6 [66]
Insert the safety eyes at this point if you haven’t already.
- Rnd 26: 4 sc, dec, (9 sc, dec) x 5, 5 sc [60]
- Rnd 27: (8 sc, dec) x 6 [54]
- Rnd 28: 3 sc, dec, (7 sc, dec) x 5, 4 sc [48]
- Rnd 29: (6 sc, dec) x 6 [42]
- Rnd 30: 2 sc, dec, (5 sc, dec) x 5, 3 sc [36]
- Rnd 31: (4 sc, dec) x 6 [30]
Begin stuffing firmly and keep stuffing as you go.
- Rnd 32–39: 30 sc (8 rounds) [30]
- Rnd 40: FLO: (4 sc, inc) x 6 [36]
- Rnd 41–43: 36 sc (3 rounds) [36]
F.O. and weave in the tail. Roll down the edge created by rounds 41–43 over the lower part of the neck to create the lip of the bottle.
Arms (Make 2)
Work with Light Cream yarn in a continuous spiral.
- Rnd 1: 6 sc in MR [6]
- Rnd 2: (inc) x 6 [12]
- Rnd 3: (sc, inc) x 6 [18]
- Rnd 4–5: 18 sc (2 rounds) [18]
- Rnd 6: (4 sc, dec) x 3 [15]
- Rnd 7: (3 sc, dec) x 3 [12]
Stuff lightly up to this point. Do not stuff beyond.
- Rnd 8–10: 12 sc (3 rounds) [12]
Flatten at the last round and crochet 5–6 sc through both sides together to close. F.O. and leave a long tail for sewing.
Legs (Make 2)
Work with Light Cream yarn in a continuous spiral.
- Rnd 1: 6 sc in MR [6]
- Rnd 2: (inc) x 6 [12]
- Rnd 3: (sc, inc) x 6 [18]
- Rnd 4: (2 sc, inc) x 6 [24]
- Rnd 5–7: 24 sc (3 rounds) [24]
- Rnd 8: 6 sc, dec, (sc, dec) x 2, 2 sc, dec, 6 sc [20]
- Rnd 9: 6 sc, (dec) x 4, 6 sc [16]
- Rnd 10: (2 sc, dec) x 4 [12]
Stuff up to this point. Do not stuff anymore.
- Rnd 11–12: 12 sc (2 rounds) [12]
Crochet more or undo a couple of stitches if needed so you end at the side of the bump. Flatten and crochet 5–6 sc through both sides. F.O. and leave a long tail.
Mushroom Stalk
Work with Beige yarn in a continuous spiral.
- Rnd 1: 6 sc in MR [6]
- Rnd 2: (inc) x 6 [12]
- Rnd 3: (sc, inc) x 6 [18]
- Rnd 4: (2 sc, inc) x 6 [24]
- Rnd 5: (7 sc, inc) x 3 [27]
- Rnd 6–9: 27 sc (4 rounds) [27]
- Rnd 10: BLO: 27 sc [27]
- Rnd 11: 27 sc [27]
- Rnd 12: (2 sc, inc) x 9 [36]
- Rnd 13: 2 sc, inc, (5 sc, inc) x 5, 3 sc [42]
- Rnd 14: (6 sc, inc) x 6 [48]
- Rnd 15: 3 sc, inc, (7 sc, inc) x 5, 4 sc [54]
- Rnd 16: (8 sc, inc) x 6 [60]
- Rnd 17: 4 sc, inc, (9 sc, inc) x 5, 5 sc [66]
F.O. and weave in the tail. Hold the stalk with the open side up and attach Beige yarn to the first free front loop left after round 10. Crochet 1 sc in each free front loop around. F.O. and weave in.
Mushroom Cap
Work with Red yarn in a continuous spiral.
- Rnd 1: 6 sc in MR [6]
- Rnd 2: (sc, inc) x 3 [9]
- Rnd 3: (2 sc, inc) x 3 [12]
- Rnd 4: (3 sc, inc) x 3 [15]
- Rnd 5: (4 sc, inc) x 3 [18]
- Rnd 6: (5 sc, inc) x 3 [21]
- Rnd 7: (6 sc, inc) x 3 [24]
- Rnd 8: (7 sc, inc) x 3 [27]
- Rnd 9: (8 sc, inc) x 3 [30]
- Rnd 10: (9 sc, inc) x 3 [33]
- Rnd 11: (10 sc, inc) x 3 [36]
- Rnd 12: (11 sc, inc) x 3 [39]
- Rnd 13: (12 sc, inc) x 3 [42]
- Rnd 14: (13 sc, inc) x 3 [45]
- Rnd 15: (14 sc, inc) x 3 [48]
- Rnd 16: (15 sc, inc) x 3 [51]
- Rnd 17: (16 sc, inc) x 3 [54]
- Rnd 18: (17 sc, inc) x 3 [57]
- Rnd 19: (18 sc, inc) x 3 [60]
- Rnd 20: (19 sc, inc) x 3 [63]
- Rnd 21: (20 sc, inc) x 3 [66]
Embroider French knots over the surface of the cap using Light Cream yarn. Place the cap over the stalk and crochet the next round through the last rounds of the cap and stalk together.
- Rnd 22: 66 sc (stuff lightly at 2/3 into the round) [66]
- Rnd 23: (inc) x 66 [132]
F.O. and weave in the tail.
Cord, Leaves, and Heart
Leaves (Make 2): Work with Green yarn.
- Ch 6. From the 2nd chain from hook: sc, hdc, 2 dc, 5 dc in the last ch. Continue on the underside: 2 dc, hdc, sc, picot st, sl st into the 1st sc. F.O.
String: Work with Brown yarn.
- Ch 80 (leave both beginning and end tails). Use the tails to knot the string to the leaves.
Heart: Work with Red yarn.
- Make a magic ring and crochet all into the ring: 3 dc, 3 hdc, picot st, 3 hdc, 3 dc, sl st into the ring. Keep the tails for knotting to the vine.
Assembly
Place the legs on the bottom of the body, three rounds to either side of the magic ring. Sew them on, then arrange them to “hug” the body and anchor the tops so they don’t dangle. Place the arms about two rounds above the legs, with the front of the arms sitting on top of the legs. Sew and anchor. Embroider the face details: mouth between the lower part of the eyes (three-stitch wide line, then wrap the middle to curve it), and eyebrows diagonally above the outer half of the eyes. Place the cap in the neck of the bottle. Wrap the string two times around the neck and knot it with the leaves at the side. Knot the heart around the string on the opposite side.
How to Crochet the Mushroom Cupcake
The Mushroom Cupcake has a brown body, a whipped cream cap with hearts and a strawberry, and a red wrapping around the lower body.
Body
Work with Brown yarn in a continuous spiral.
- Rnd 1–17: Work as Mushroom Potion Body through round 17 [72]
Insert safety eyes between rounds 17 and 18, leaving 12 stitches between the posts and 6–8 stitches between the eyes.
- Rnd 18–24: 72 sc (7 rounds) [72]
- Rnd 25: (10 sc, dec) x 6 [66]
- Rnd 26: 4 sc, dec, (9 sc, dec) x 5, 5 sc [60]
- Rnd 27: (8 sc, dec) x 6 [54]
- Rnd 28: 3 sc, dec, (7 sc, dec) x 5, 4 sc [48]
- Rnd 29: (6 sc, dec) x 6 [42]
- Rnd 30: 2 sc, dec, (5 sc, dec) x 5, 3 sc [36]
- Rnd 31: (4 sc, dec) x 6 [30]
Begin stuffing firmly.
- Rnd 32: 2 sc, dec, (3 sc, dec) x 5, 1 sc [24]
- Rnd 33: (2 sc, dec) x 6 [18]
- Rnd 34: (sc, dec) x 6 [12]
- Rnd 35: (dec) x 6 [6]
Close the hole and weave in the tail.
Arms (Make 2) and Legs (Make 2)
Work as Mushroom Potion Arms and Legs, but use Brown yarn.
Mushroom Cap
Work with Cream yarn in a continuous spiral.
- Rnd 1: 4 sc in MR [4]
- Rnd 2: (sc, inc) x 2 [6]
- Rnd 3: (sc, inc) x 3 [9]
- Rnd 4: 9 sc [9]
- Rnd 5: (2 sc, inc) x 3 [12]
- Rnd 6: (3 sc, inc) x 3 [15]
- Rnd 7: (4 sc, inc) x 3 [18]
- Rnd 8: (2 sc, inc) x 6 [24]
- Rnd 9: (3 sc, inc) x 6 [30]
- Rnd 10: (4 sc, inc) x 6 [36]
- Rnd 11: (5 sc, inc) x 6 [42]
- Rnd 12–15: 42 sc (4 rounds) [42]
- Rnd 16: (dec) x 21 [21]
- Rnd 17: (inc) x 21 [42]
- Rnd 18: (5 sc, inc) x 7 [49]
- Rnd 19: (6 sc, inc) x 7 [56]
- Rnd 20: (7 sc, inc) x 7 [63]
- Rnd 21–25: 63 sc (5 rounds) [63]
- Rnd 26: (sc, dec) x 21 [42]
- Rnd 27: (inc) x 42 [84]
- Rnd 28: 84 sc [84]
- Rnd 29: (11 sc, inc) x 7 [91]
- Rnd 30–38: 91 sc (9 rounds) [91]
- Rnd 39: FLO: 91 sc [91]
Sl st, F.O., weave in. Turn the cap upside down, attach Cream yarn to a back loop from round 38 and crochet clockwise:
- Rnd 1: 91 sc [91]
- Rnd 2: (11 sc, dec) x 7 [84]
- Rnd 3: (12 sc, dec) x 6 [78]
- Rnd 4: (11 sc, dec) x 6 [72]
- Rnd 5: (22 sc, dec) x 3 [69]
Sl st, F.O., leave a long tail for sewing. Embroider French knots with Pink yarn around the bottom of the cap (about 7 stitches apart), the middle section (about 6 stitches apart), and under the peak (about 5 stitches apart). Stuff the upper part of the cap but leave the lower part unstuffed.
Hearts (Make 10)
Work with Red yarn.
- Make a magic ring and crochet all into the ring: 3 hdc, 2 sc, picot st, 2 sc, 3 hdc, sl st into the ring. F.O. and leave a tail for sewing.
Wrapping
Work with Red yarn in a continuous spiral.
- Rnd 1–9: Work as Mushroom Cupcake Body through round 9 [54]
From here, work in turning rows around round 9:
- Row 1: Ch 10 [10]
- Row 2: BLO: 9 hdc down the chain, skip 1 st on round 9 and sc into the next stitch, turn [9]
- Row 3: BLO: 9 hdc up row 2, ch 1 to turn [9]
Repeat rows 2–3 all around the base circle. When you reach the end, align the beginning and end rows and crochet or sew them together by slip stitching down through both sides. F.O. and leave a long tail. Embroider French knots with Light Cream yarn all over the wrapping.
Strawberry
Work with Red yarn in a continuous spiral.
- Rnd 1: 6 sc in MR [6]
- Rnd 2: (sc, inc) x 3 [9]
- Rnd 3: (2 sc, inc) x 3 [12]
- Rnd 4: (3 sc, inc) x 3 [15]
- Rnd 5: (4 sc, inc) x 3 [18]
- Rnd 6: (5 sc, inc) x 3 [21]
- Rnd 7: (6 sc, inc) x 3 [24]
- Rnd 8–9: 24 sc (2 rounds) [24]
- Rnd 10: (2 sc, dec) x 6 [18]
- Rnd 11: (sc, dec) x 6 [12]
- Rnd 12: (dec) x 6 [6]
Close the hole. Embroider speckles with Cream yarn using small vertical lines.
Top Leaf: Work with Green yarn.
- Rnd 1: 6 sc in MR
- Rnd 2: (sc, ch 3, 2 sc down the chain) x 6
Sl st, F.O., leave a tail. Sew the leaf to the top of the strawberry.
Assembly
Embroider the face details as for the Mushroom Potion. Place the body in the wrapping with the wrapping reaching right up under the eyes. Secure with the tail. Sew legs and arms as for the Mushroom Potion. Sew the ten hearts to the cap: 5 around the center line of the bottom section, 4 around the middle section, and 1 to the peak. Place the cap on top of the head with the brim a few rounds above the eyes. Push the back of the cap slightly lower than the front. Pin and sew all around. Sew the strawberry to the cap.
How to Crochet the Love Mushroom
The Love Mushroom has a nude body, pink cap with hearts, and a chocolate topping with drips.
Body
Work with Nude yarn in a continuous spiral.
- Rnd 1–17: Work as Mushroom Potion Body through round 17 [72]
Insert safety eyes between rounds 17 and 18. Work rounds 18–35 as for the Mushroom Cupcake Body.
Arms and Legs
Work as Mushroom Potion Arms and Legs, but use Powder Pink yarn.
Cap
Work with Pink yarn in a continuous spiral.
- Rnd 1: 6 sc in MR [6]
- Rnd 2: (inc) x 6 [12]
- Rnd 3: (sc, inc) x 6 [18]
- Rnd 4: (2 sc, inc) x 6 [24]
- Rnd 5: sc, inc, (3 sc, inc) x 5, 2 sc [30]
- Rnd 6: (4 sc, inc) x 6 [36]
- Rnd 7: 36 sc [36]
- Rnd 8: 2 sc, inc, (5 sc, inc) x 5, 3 sc [42]
- Rnd 9: (6 sc, inc) x 6 [48]
- Rnd 10: 48 sc [48]
- Rnd 11: 3 sc, inc, (7 sc, inc) x 5, 4 sc [54]
- Rnd 12: (8 sc, inc) x 6 [60]
- Rnd 13: 60 sc [60]
- Rnd 14: 4 sc, inc, (9 sc, inc) x 5, 5 sc [66]
- Rnd 15: (10 sc, inc) x 6 [72]
- Rnd 16: 72 sc [72]
- Rnd 17: 5 sc, inc, (11 sc, inc) x 5, 6 sc [78]
- Rnd 18: (12 sc, inc) x 6 [84]
- Rnd 19: 84 sc [84]
- Rnd 20: 6 sc, inc, (13 sc, inc) x 5, 7 sc [90]
- Rnd 21: (14 sc, inc) x 6 [96]
- Rnd 22–27: 96 sc (6 rounds) [96]
- Rnd 28: FLO: 96 sc [96]
Sl st, F.O., weave in. Turn the cap upside down, attach Nude yarn to a back loop from round 28 and crochet clockwise:
- Rnd 1: 96 sc [96]
- Rnd 2: (6 sc, dec) x 12 [84]
- Rnd 3: (12 sc, dec) x 6 [78]
- Rnd 4: (11 sc, dec) x 6 [72]
- Rnd 5: (22 sc, dec) x 3 [69]
F.O. and leave a long tail for sewing.
Hearts (Make 9)
Make 3 each with Light Cream, Nude, and Powder Pink yarn.
- Make a magic ring and crochet all into the ring: 3 dc, 3 hdc, picot st, 3 hdc, 3 dc, sl st into the ring. Leave a tail for sewing. Sew the hearts to the cap randomly, but not too close to the top quarter.
Chocolate Topping
Work with Brown yarn in a continuous spiral.
- Rnd 1: 6 sc in MR [6]
- Rnd 2: (inc) x 6 [12]
- Rnd 3: (sc, inc) x 6 [18]
- Rnd 4: (2 sc, inc) x 6 [24]
- Rnd 5: sc, inc, (3 sc, inc) x 5, 2 sc [30]
- Rnd 6: (4 sc, inc) x 6 [36]
- Rnd 7: 36 sc [36]
- Rnd 8: 2 sc, inc, (5 sc, inc) x 5, 3 sc [42]
Now crochet the topping drips by alternating between the main circle and chains:
- Ch 6, 5 hdc down the chain, 4 sc on the base circle, ch 9, 8 hdc down the chain, 3 sc on the base circle, ch 7, 6 hdc down the chain, on the base circle: 2 sc, 2 hdc, 2 dc, hdc, sc, ch 12, 11 hdc down the chain, 3 sc on the base circle, ch 6, 5 hdc down the chain, 4 sc on the base circle, ch 4, 3 hdc down the chain, 3 sc on the base circle, ch 7, 6 hdc down the chain, 3 sc on the base circle, ch 10, 9 hdc down the chain, on the base circle: 2 sc, 2 hdc, 2 dc, hdc, sc, ch 5, 4 hdc down the chain, 3 sc on the base circle, ch 8, 7 hdc down the chain, 3 sc on the base circle.
F.O. and leave a long tail for sewing. Place the topping on top of the cap and pin the drips in place. Sew all around, anchoring the drips at the lowest point. Embroider French knots with Light Cream yarn all over the surface of the cap, between the hearts and topping drips.
Two Hearts (Make 2 — One Powder Pink, One Light Cream)
Begin each heart by making 2 bumps.
- Bump 1: 6 sc in MR [6], (inc) x 6 [12], 12 sc [12]. F.O.
- Bump 2: Work same as Bump 1, but do not cut the yarn. Attach Bump 2 to Bump 1 with a sc. Continue:
- Rnd 4: 12 sc around first bump, 12 sc around second bump [24]
- Rnd 5: (2 sc, dec) x 6 [18]
- Rnd 6: 18 sc [18]
- Rnd 7: (4 sc, dec) x 3 [15]
- Rnd 8: (3 sc, dec) x 3 [12]
Add stuffing.
- Rnd 9: (2 sc, dec) x 3 [9]
F.O. and leave a long tail for sewing.
Assembly
Embroider the face details. Place the legs on the bottom of the body, three rounds to either side of the magic ring. Sew and anchor. Place the arms about two rounds above the legs. Sew and anchor. Sew the two hearts to the top of the cap, one next to the other. Place the cap on top of the head with the brim a few rounds above the eyes. If using sport weight yarn, no need to stuff the cap. Push the back of the cap slightly lower than the front. Pin and sew all around. Push down on the cap so it arranges itself around the head.
Putting Your Crochet Mushroom Sweethearts Together
- Sew the legs to the bottom of the body, three rounds to either side of the magic ring.
- Anchor the legs so they hug the body and don’t dangle.
- Sew the arms about two rounds above the legs, with the front of the arms on top of the legs.
- Embroider the face — mouth and eyebrows.
- Add the cap — place it on the head and sew all around.
- Add accessories — wrapping, hearts, strawberry, leaves, heart, or cord depending on the mushroom.
- Weave in all ends and hide them inside the body.
Tips for a Neater Crochet Mushroom Sweethearts Pattern
- Use a stitch marker. Continuous spirals make it easy to lose your place.
- Count your stitches. The shaping and color changes depend on accurate counts.
- Stuff as you go. It’s easier to shape the body and cap before closing.
- Use the yarn under method. It creates tighter, neater X-shaped stitches.
- Work French knots carefully. They add charm to the caps and wrapping.
- Pin before sewing. Placement makes a big difference for the arms, legs, and cap.
- Anchor the limbs. A few extra stitches keep them from dangling.
- Take your time with the chocolate topping. The drips are random, so have fun with them.
- Use matching yarn for sewing. It hides the seams better.
FAQ About the Crochet Mushroom Sweethearts Pattern
What skill level is this crochet mushroom sweethearts pattern?
It’s intermediate. You need to know magic ring, single crochet, increase, decrease, color changes, and basic embroidery.
How big are the finished mushrooms?
About 10 cm / 4 inches tall when using sport weight yarn and a 2 mm hook.
What yarn is used for this crochet mushroom sweethearts pattern?
The pattern uses sport weight (No. 2) cotton yarn — Alize Cotton Gold and YarnArt Jeans. Colors include light cream, powder pink, cream, nude, pink, red, green, brown, and beige.
What size safety eyes do the mushrooms need?
20 mm safety eyes in colorways Pixie, Rosewood, or Nebula. You may need bigger or smaller depending on your yarn.
How many mushrooms are included in this pattern?
Three: Mushroom Potion, Mushroom Cupcake, and Love Mushroom.
Your Next Stitch
This crochet mushroom sweethearts pattern is one of those projects that brings a little magic to every stitch. Whether you make the Mushroom Potion with its bottle-shaped body and cord, the Mushroom Cupcake with its whipped cap and strawberry, or the Love Mushroom with its chocolate topping and hearts, you’ll end up with a 10 cm friend who looks like it just popped out of a storybook.
So gather your sport weight yarn, pick up your 2 mm hook, and start with that first magic ring. If you get stuck on the French knots or the chocolate drips, come back to this guide and work through it step by step. And when your mushroom sweethearts are finished, share them , post a photo, and show off your work. Your next project might be exactly what someone else needs to see.
Happy crocheting!