Crochet Little Dragon Rattle Toy Pattern Craft a Charming Baby Heirloom
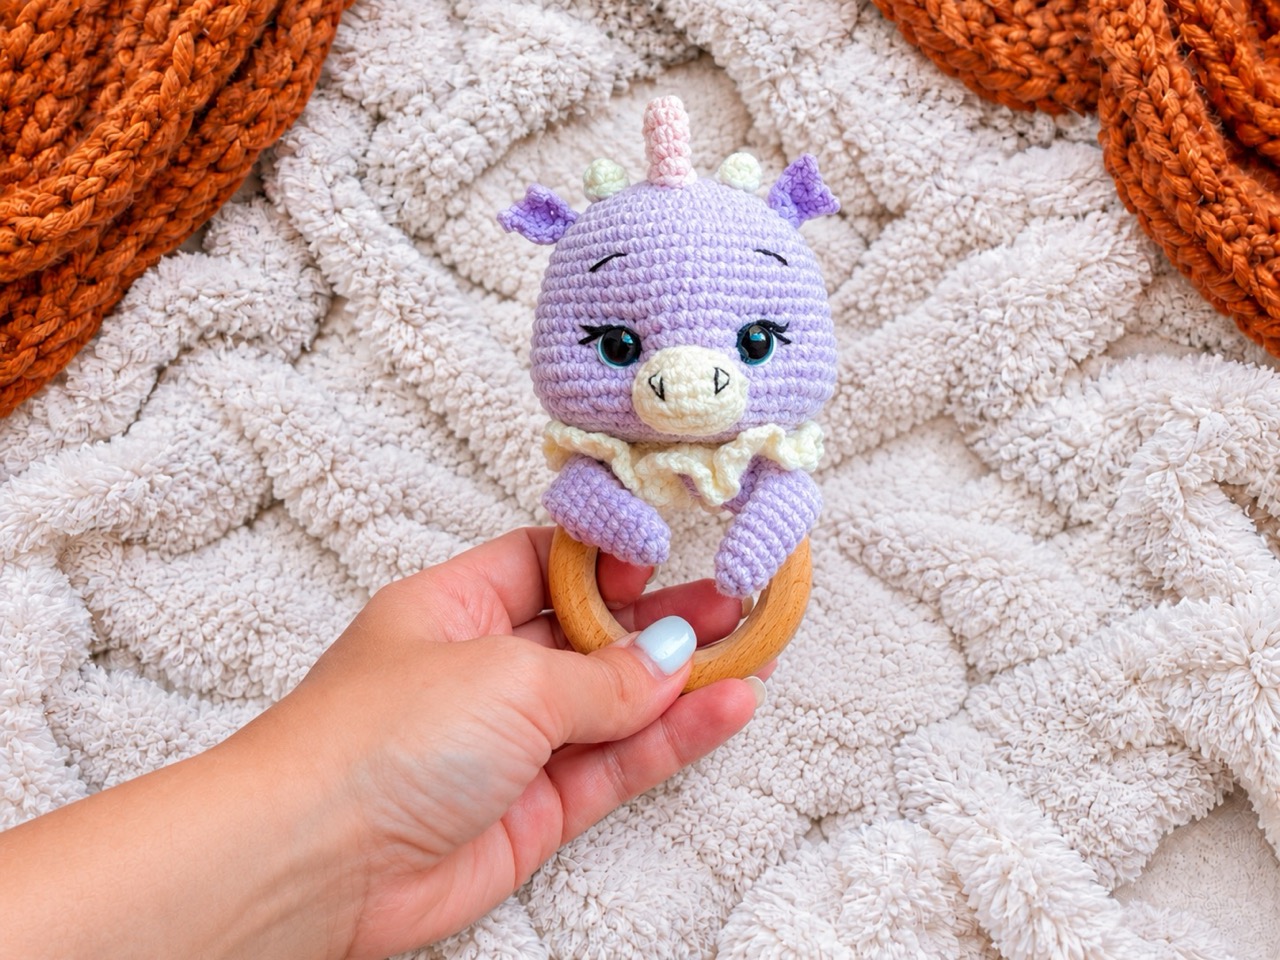
Handmade baby toys offer a uniquely personal and comforting touch for newborns, the Ronnie the Little Dragon Rattle Toy is an adorable, interactive crochet pattern that combines a soft, squeezable amigurumi dragon head with a tactile wooden teething ring.
Project Overview and Specifications
- Designer Credit: Created by Yana Lebedeva, who shares patterns under the handle
@mimi.toys.98. - Terminology: The pattern is written using standard US crochet terminology.
- Design Variations: The tutorial features options for a ruffled neck collar or alternative wing attachments, allowing you to customize your dragon’s appearance.
Essential Materials and Tools Checklist
Gathering the correct hardware and yarn weights ensures a safe and durable baby toy:
- Yarn: YarnArt Jeans yarn, utilizing main color No. 89 and additional accent shades No. 03, 74, 75, and 88.
- Crochet Hook: A 2 mm crochet hook (size B), with Clover hooks recommended by the designer.
- Safety Eyes: 8 mm to 9 mm safety eyes (9 mm is used in the original sample).
- Hardware & Inserts: A wooden ring with a 60 mm diameter and an internal rattle insert.
- Notions: Hollowfiber stuffing material, a sewing needle, scissors, and black and white thread for facial embroidery.
Core Crochet Abbreviations (US Terminology)
- MR: Magic Ring
- sc: Single crochet
- inc: Increase (2 sc into one stitch)
- dec: Decrease (2 sc crocheted together)
- ch: Chain
- dc: Double crochet
- hdc: Half-double crochet
- sl st: Slip stitch
Step-by-Step Construction Guide
1. The Head and Rattle Insert
- Start with the main color using a magic ring of 6 sc, expanding outward through regular increase rounds up to 64 stitches.
- Shape the head downward through decrease rounds, inserting the safety eyes between the 17th and 18th rounds.
- Begin stuffing the head with hollowfiber and place the rattle securely inside, making sure to pack the cheeks tightly before closing.
2. Neck Collar and Muzzle
- Neck Collar: Crocheted using milk-colored yarn through the front loops of round 27, featuring double crochets and chain loops to create a ruffled ruff. Alternatively, you can craft it as a separate piece and sew it on later.
- Muzzle: Worked in an oval spiral foundation using milk-colored yarn, shaped with increases and finished with slip stitches for a neat contour.
3. Horns, Spikes, and Arms
- Horns & Arms: Small cylindrical pieces worked in spiral rounds without heavy stuffing, flattened and closed at the edges for easy attachment.
- Spikes: Multi-colored dorsal spikes crafted using pink, yellow, and blue yarn shades, expanding up to 15 stitches without stuffing.
- Wings (Optional): Worked back-and-forth in rows using decreasing stitch counts to form a tapered wing shape.
4. Ring Collar and Final Assembly
- Ring Collar: Crochet a flat rectangular strip of single crochets (starting from 22 chains) that wraps tightly around the 60 mm wooden ring.
- Securing the Head: Sew the bottom of the head directly onto the center of the ring collar.
- Attaching Features: Position and sew the arms to the sides, while pinning and securing the ears, horns, and spikes to the top of the head.
Professional Finishing and Facial Sculpting
- Eye Sculpting: Use dental floss (such as Oral-B) or matching yarn to sculpt the eye sockets, pulling the thread through specific reference points on the head to create deep, expressive contours.
- Facial Embroidery: Use split black thread (2 of 4 strands) for delicate eyelashes and eyebrows, and full-thickness thread to embroider triangular nostrils on the muzzle. Add white thread highlights beneath the safety eyes.
Frequently Asked Questions (FAQ)
What size wooden ring is recommended for this rattle?
The pattern is designed for a wooden teething ring with a diameter of 60 mm.
How do you achieve the sculpted look around the dragon’s eyes?
Facial sculpting is done by running dental floss or matching yarn through targeted anchor points on the head to pull the fabric inward, creating realistic depth.
Can I add wings to the dragon design?
Yes, you can choose to omit the neck collar and attach crocheted wings to the back of the toy for a flying dragon variation.
Conclusion
Crocheting Ronnie the Little Dragon is a delightful project that results in a cherished, handmade baby toy. When you finish your creation, be sure to share photos of your completed rattle )!