Crochet Pattern Mini Cow 4 Adorable Amigurumi Cows
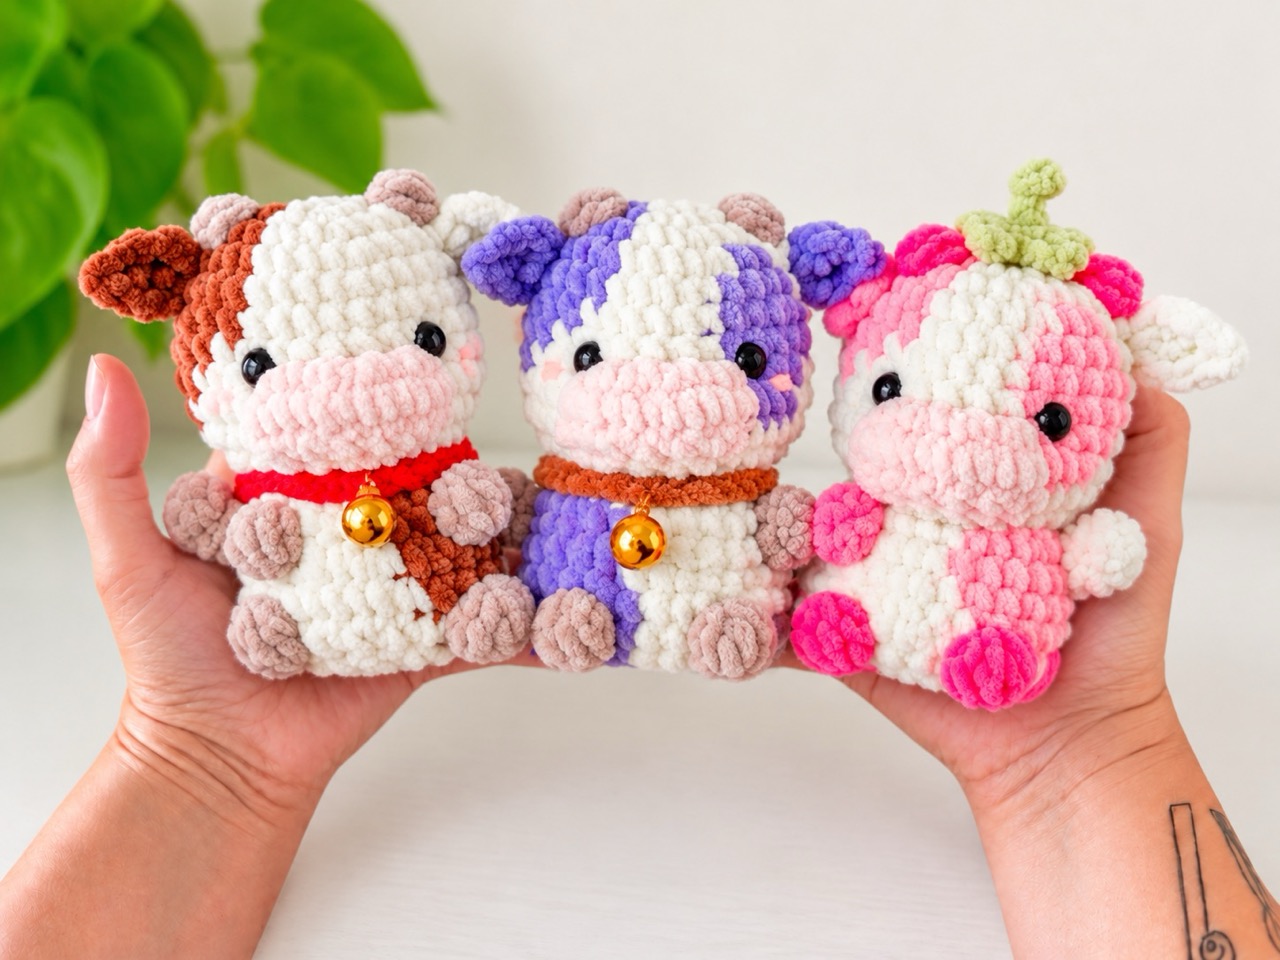
There’s something about a tiny handmade cow that makes you smile. Maybe it’s the little snout, the floppy ears, or the way they look like they just wandered in from a sunny meadow. This crochet pattern mini cow gives you four different versions of the same adorable design: a classic White & Brown cow, a shaggy Scottish Highland cow, a Purple cow with a brown collar, and a Strawberry cow with a leafy top. Each one stands about 5 inches tall, uses super bulky chenille yarn, and works up quickly enough to make a whole herd before the season ends.
Below is a complete guide to the Mini Cow pattern. You’ll find the materials, abbreviations, step-by-step instructions for all four versions, plus assembly notes, tips, and answers to common questions.
Jump to a Section
- Why This Crochet Pattern Mini Cow Stands Out
- What You Need Before You Start
- Abbreviations and Special Stitches
- How to Crochet the White & Brown Mini Cow
- How to Crochet the Scottish Mini Cow
- How to Crochet the Purple Mini Cow
- How to Crochet the Strawberry Mini Cow
- How to Make the Ears, Hair, and Tail
- How to Make the Collar and Cheeks
- Putting Your Crochet Pattern Mini Cow Together
- Tips for a Neater Crochet Pattern Mini Cow
- FAQ About the Crochet Pattern Mini Cow
- Your Next Stitch
Why This Crochet Pattern Mini Cow Stands Out
Plenty of amigurumi cow patterns exist, but this collection has a few qualities that make it especially charming.
- Finished size: About 5 inches tall when using super bulky chenille yarn and a 4.0 mm hook.
- Skill level: Intermediate beginner. You need to know magic ring (or starting ring), single crochet, increase, decrease, color changes, and bobble stitches.
- Yarn: Super bulky chenille yarn (100g/120m), such as Katia Bambi, Himalaya Dolphin Baby, Premier Parfait Chunky, or Hobbii Honey Bunny.
- Hook: 4.0 mm main hook.
- Eyes: 10 mm black safety eyes (2 per cow).
- Four versions: White & Brown, Scottish, Purple, and Strawberry.
- Details: Bobble stitch ears, fluffy hair for the Scottish cow, a strawberry leaf topper, and a collar with a bell.
- Construction: Head and body are crocheted in one piece. Ears, hair, tail, and collar are added directly into the body or sewn on.
- Special technique: The pattern uses the starting ring method (ch 2, sc 8 in the second chain) and invisible decrease for neat shaping.
If you’ve been searching for a crochet pattern mini cow that feels approachable and looks adorable, this one is a wonderful choice.
What You Need Before You Start
Gather your supplies first. The pattern uses specific yarn amounts for each version.
Yarn for the White & Brown Version
- Super Bulky Chenille:
- Cream: 20 grams
- Brown: 12 grams
- Beige: 10 grams
- Light Peach: 8 grams
- Red: 2 grams
Yarn for the Scottish Version
- Super Bulky Chenille:
- Brown: 30 grams
- Beige: 10 grams
- Light Peach: 8 grams
- Peach: 2 grams
Yarn for the Purple Version
- Super Bulky Chenille:
- Purple: 15 grams
- Cream: 15 grams
- Beige: 10 grams
- Light Peach: 8 grams
- Brown: 2 grams
- Peach: 2 grams
Yarn for the Strawberry Version
- Super Bulky Chenille:
- Cream: 15 grams
- Light Pink: 15 grams
- Pink: 10 grams
- Light Peach: 8 grams
- Light Green: 8 grams
Other Materials
- Main crochet hook: 4.0 mm.
- Fiberfill stuffing.
- Black safety eyes: 10 mm (2 per cow).
- Scissors and yarn needle.
- Stitch marker.
- Small bell or cowbell for the collar.
- Blush or peach pastel for the cheeks.
- Optional: finer cotton yarn for sewing parts together (chenille frays easily).
Notes on Chenille Yarn
Chenille yarn is soft but tricky. The pattern recommends working with a 4.0 mm hook. If you crochet tightly, you may need a 5.0 mm hook. If you need to remove a round, do it carefully because chenille frays easily. When sewing parts together, use a finer, resistant cotton yarn in a similar color — it’s much easier to work with. Choose a sewing needle with a large hole to minimize yarn damage.
Abbreviations and Special Stitches
- ch — chain stitch
- sc — single crochet stitch
- dc — double crochet stitch
- hdc — half double crochet stitch
- trc — triple crochet stitch
- slst — slip stitch
- sk — skip
- inc — increase (2 sc into the same stitch)
- dec — invisible decrease (2 sc together in 1 stitch)
- trx — triple stitch (3 “x” stitches into the same stitch)
- Rnd/s — round/rounds
- st/sts — stitch/stitches
- BLO — back loop only
- FLO — front loop only
- TLO — third loop only
- […]…x — work instructions between brackets and repeat as many times as indicated
- {…+…} — work instructions between curly brackets into the same stitch
- […] — total number of stitches at the end of a round/row
- Bobble dc x — a bobble stitch made of “x” double crochet stitches
Starting Ring
Instead of a magic ring, this pattern uses a starting ring: Ch 2, sc 8 in 2nd ch from hook. You can substitute a magic ring with sc 8 if you prefer.
Invisible SC Decrease
Insert hook into the front loop of the first stitch of the decrease, insert the hook into the front loop of the next stitch, yarn over and draw through both loops on hook, yarn over and draw through last two loops on hook.
Invisible Fasten Off
Skip next stitch. Insert the needle into both loops of next stitch, pull yarn through. Insert the needle through the back loop of the starting stitch and tighten just enough so the join looks like a regular stitch.
Color Change
Work the last stitch with the first color until only two loops remain on the hook. With the new color, yarn over and pull through the two remaining loops. The next stitch is the first stitch in the new color.
Bobble dc 5
Yarn over, insert hook into the indicated stitch, yarn over and draw through. You now have three loops. Yarn over and pull through the first two loops. Repeat four more times in the same stitch. You should have 6 loops on the hook. Yarn over and draw through all 6 loops.
Bobble dc 5 with a New Color
Make the color change in the stitch before starting the bobble. Do the bobble stitch. Take the old color to make the last yarn over and draw through all loops. Continue with the old color.
How to Crochet the White & Brown Mini Cow
Head and Body
With cream yarn, ch 2, sc 8 in second ch from hook.
- Rnd 1: [inc] 2x, brown color, [inc] 2x, cream color, [inc] 4x (16 sts)
- Rnd 2: [sc 1, inc] 2x, brown color, sc 1, inc, beige color, bobble dc 4, brown color, inc, sc 1, cream color, inc, [sc 1, inc] 2x, beige color, bobble dc 4, cream color, inc (24 sts)
- Rnd 3: sc 1, inc, sc 3, inc, brown color, sc 3, inc, sc 3, inc (first sc of this increase in brown, second in cream), cream color, [sc 3, inc] 2x, sc 2 (30 sts)
- Rnds 4–5: sc 8, brown color, sc 9, cream color, sc 13 (30 sts)
- Rnd 6: sc 8, brown color, sc 8, cream color, sc 14 (30 sts)
- Rnd 7: sc 9, brown color, sc 6, cream color, sc 4, light peach color, FLO [tr sc] 4x, cream color, sc 7 (38 sts)
- Rnd 8: sc 10, brown color, sc 4, cream color, sc 5, light peach color, sc 12, cream color, sc 7 (38 sts)
- Rnd 9: sc 19, light peach color, [dec] 6x, cream color, sc 7 (32 sts)
- Rnd 10: FLO [sc 2, dec] 8x (24 sts)
- Rnd 11: [sc 1, dec] 8x (16 sts)
Insert the 10 mm safety eyes between rounds 6 and 7. The first eye goes between stitches 18 and 19, the second eye between stitches 24 and 25. Stuff the head and snout.
- Rnd 12: FLO [sc 1, inc] 5x, sc 1, inc (first sc in cream, second in brown), brown color, [sc 1, inc] 2x (24 sts)
- Rnd 13: sc 14, beige color, bobble dc 5, cream color, sc 2, brown color, sc 2, beige color, bobble dc 5, brown color, sc 4 (24 sts)
- Rnd 14: sc 15, [inc] 3x, brown color, inc, sc 4, cream color, sc 1 (28 sts)
- Rnd 15: sc 22, brown color, sc 4, cream color, sc 2 (28 sts)
- Rnd 16: sc 13, beige color, bobble dc 5, cream color, sc 1, [dec] 4x, sc 1, beige color, bobble dc 5, cream color, sc 3 (24 sts)
- Rnd 17: FLO [sc 1, dec] 8x (16 sts)
- Rnd 18: [dec] 8x (8 sts)
Stuff the body. Close using the front loops of the last stitches. Fasten off.
How to Crochet the Scottish Mini Cow
Head and Body
With brown yarn, ch 2, sc 8 in second ch from hook.
- Rnd 1: [inc] 8x (16 sts)
- Rnd 2: [sc 1, inc] 3x, beige color, bobble dc 4, brown color, inc, [sc 1, inc] 3x, beige color, bobble dc 5, brown color, inc (24 sts)
- Rnd 3: [sc 1, inc, sc 2] 6x (30 sts)
- Rnds 4–6: sc 30 (30 sts)
- Rnd 7: sc 19, light peach color, FLO [tr sc] 4x, brown color, sc 7 (38 sts)
- Rnd 8: sc 19, light peach color, sc 12, brown color, sc 7 (38 sts)
- Rnd 9: sc 19, light peach color, [dec] 6x, brown color, sc 7 (32 sts)
- Rnd 10: FLO [sc 2, dec] 8x (24 sts)
- Rnd 11: [sc 1, dec] 8x (16 sts)
Insert the 10 mm safety eyes between rounds 6 and 7. Stuff the head and snout.
- Rnd 12: FLO [sc 1, inc] 8x (24 sts)
- Rnd 13: sc 14, beige color, bobble dc 5, brown color, sc 4, beige color, bobble dc 5, brown color, sc 4 (24 sts)
- Rnd 14: sc 15, [inc] 4x, sc 5 (28 sts)
- Rnd 15: sc 28 (28 sts)
- Rnd 16: sc 13, beige color, bobble dc 5, brown color, sc 1, [dec] 4x, sc 1, beige color, bobble dc 5, brown color, sc 3 (24 sts)
- Rnd 17: FLO [sc 1, dec] 8x (16 sts)
- Rnd 18: [dec] 8x (8 sts)
Stuff the body. Close using the front loops of the last stitches. Fasten off.
How to Crochet the Purple Mini Cow
Head and Body
With cream yarn, ch 2, sc 8 in second ch from hook.
- Rnd 1: [inc] 2x, purple color, [inc] 2x, cream color, [inc] 4x (16 sts)
- Rnd 2: [sc 1, inc] 2x, purple color, sc 1, inc, beige color, bobble dc 4, purple color, inc, sc 1, cream color, inc, [sc 1, inc] 2x, beige color, bobble dc 4, cream color, inc (24 sts)
- Rnd 3: sc 1, inc, sc 3, inc, purple color, sc 3, inc, sc 3, inc (first sc in purple, second in cream), cream color, sc 3, inc, purple color, sc 2, cream color, sc 1, inc, sc 2 (30 sts)
- Rnd 4: sc 8, purple color, sc 9, cream color, sc 5, purple color, sc 4, cream color, sc 4 (30 sts)
- Rnd 5: sc 8, purple color, sc 8, cream color, sc 6, purple color, sc 5, cream color, sc 3 (30 sts)
- Rnd 6: sc 8, purple color, sc 7, cream color, sc 7, purple color, sc 5, cream color, sc 3 (30 sts)
- Rnd 7: sc 9, purple color, sc 5, cream color, sc 4, light peach color, FLO [tr sc] 4x, purple color, sc 4, cream color, sc 4 (38 sts)
- Rnd 8: sc 10, purple color, sc 3, cream color, sc 5, light peach color, sc 12, purple color, sc 3, cream color, sc 5 (38 sts)
- Rnd 9: sc 18, light peach color, [dec] 6x, cream color, sc 8 (38 sts)
- Rnd 10: FLO [sc 2, dec] 8x (24 sts)
- Rnd 11: [sc 1, dec] 8x (16 sts)
Insert the 10 mm safety eyes between rounds 6 and 7. Stuff the head and snout.
- Rnd 12: FLO purple color, [sc 1, inc] 5x, sc 1, cream color, inc, [sc 1, inc] 2x (24 sts)
- Rnd 13: purple color, sc 16, cream color, sc 8 (24 sts)
- Rnd 14: purple color, sc 17, cream color, sc 6, purple color, sc 1 (24 sts)
- Rnd 15: sc 18, cream color, sc 4, purple color, sc 2 (24 sts)
- Rnd 16: sc 11, beige color, bobble dc 5, purple color, sc 3, beige color, bobble dc 5, purple color, sc 2, beige color, bobble dc 5, purple color, sc 3, beige color, bobble dc 5, purple color, sc 1 (24 sts)
- Rnd 17: FLO [sc 1, dec] 8x (16 sts)
- Rnd 18: [dec] 8x (8 sts)
Stuff the body. Close using the front loops of the last stitches. Fasten off.
How to Crochet the Strawberry Mini Cow
Head and Body
With cream yarn, ch 2, sc 8 in second ch from hook.
- Rnd 1: [inc] 2x, light pink color, [inc] 2x, cream color, [inc] 4x (16 sts)
- Rnd 2: [sc 1, inc] 2x, light pink color, sc 1, inc, pink color, bobble dc 4, light pink color, inc, sc 1, cream color, inc, [sc 1, inc] 2x, pink color, bobble dc 4, cream color, inc (24 sts)
- Rnd 3: sc 1, inc, sc 3, inc, light pink color, sc 3, inc, sc 3, inc (first sc in light pink, second in cream), cream color, sc 3, inc, light pink color, sc 2, cream color, sc 1, inc, sc 2 (30 sts)
- Rnd 4: sc 8, light pink color, sc 9, cream color, sc 5, light pink color, sc 4, cream color, sc 4 (30 sts)
- Rnd 5: sc 8, light pink color, sc 8, cream color, sc 6, light pink color, sc 5, cream color, sc 3 (30 sts)
- Rnd 6: sc 8, light pink color, sc 7, cream color, sc 7, light pink color, sc 5, cream color, sc 3 (30 sts)
- Rnd 7: sc 9, light pink color, sc 5, cream color, sc 4, light peach color, FLO [tr sc] 4x, light pink color, sc 4, cream color, sc 4 (38 sts)
- Rnd 8: sc 10, light pink color, sc 3, cream color, sc 5, light peach color, sc 12, light pink color, sc 3, cream color, sc 5 (38 sts)
- Rnd 9: sc 18, light peach color, [dec] 6x, cream color, sc 8 (38 sts)
- Rnd 10: FLO [sc 2, dec] 8x (24 sts)
- Rnd 11: [sc 1, dec] 8x (16 sts)
Insert the 10 mm safety eyes between rounds 6 and 7. Stuff the head and snout.
- Rnd 12: FLO [sc 1, inc] 5x, sc 1, light pink color, inc, [sc 1, inc] 2x (24 sts)
- Rnd 13: cream color, sc 16, light pink color, sc 8 (24 sts)
- Rnd 14: cream color, sc 17, light pink color, sc 6, cream color, sc 1 (24 sts)
- Rnd 15: sc 18, light pink color, sc 4, cream color, sc 2 (24 sts)
- Rnd 16: sc 11, pink color, bobble dc 5, cream color, sc 3, pink color, bobble dc 5, cream color, sc 2, pink color, bobble dc 5, cream color, sc 3, pink color, bobble dc 5, cream color, sc 1 (24 sts)
- Rnd 17: FLO [sc 1, dec] 8x (16 sts)
- Rnd 18: [dec] 8x (8 sts)
Stuff the body. Close using the front loops of the last stitches. Fasten off.
Strawberry Leaf
Work with light green yarn.
- Rnd 1: [ch 3, slst 1 in 2nd ch from hook, sc 1] 4x, slst 1 in first ch. Pass the yarn through all the sc and pull tightly to close the hole in the center. Do not fasten off.
- Insert your hook into the center of the leaf, yarn over, and draw the yarn through the stitch. Work: ch 3, slst 1 in 2nd ch from hook, slst 1, slst 1 into the center of the leaf. Fasten off. Glue the leaf to the top of the cow’s head.
How to Make the Ears, Hair, and Tail
Left Ear
Work between rounds 3 and 4, in the 14th stitch. Place the cow with its snout facing you and legs to the left.
Attach new yarn in the 14th st between rounds 3 and 4.
- Step 1: {ch 2 + dc 1 + ch 2 + slst 1 in 2nd ch from hook + dc 1 + ch 2 + slst 1} to the same st (10 sts)
Secure the tails and hide them inside the body.
Right Ear
Work between rounds 3 and 4, in the 28th stitch. Place the cow with its snout facing you and legs to the right.
Attach new yarn in the 28th st between rounds 3 and 4.
- Step 1: {ch 2 + dc 1 + ch 2 + slst 1 in 2nd ch from hook + dc 1 + ch 2 + slst 1} to the same st (10 sts)
Secure the tails and hide them inside the body.
Hair (Scottish Version)
Work from stitches 8 to 13 between rounds 1 and 2. Place the snout facing you.
Attach new brown yarn at the 13th st between rounds 1 and 2.
- Step 1: ch 7, slst 1 in 2nd ch from hook, slst 5 (13 sts)
Jump to the 12th st between rounds 1 and 2.
- Step 2: slst 1, ch 7, slst 1 in 2nd ch from hook, slst 5 (14 sts)
Jump to the 10th st between rounds 1 and 2.
- Step 3: slst 1, ch 7, slst 1 in 2nd ch from hook, slst 5 (14 sts)
Jump to the 9th st between rounds 1 and 2.
- Step 4: slst 1, ch 7, slst 1 in 2nd ch from hook, slst 5 (14 sts)
Jump to the 8th st between rounds 1 and 2.
- Step 5: slst 1. Fasten off (1 st)
Tail
Place the cow’s head facing you. Attach new yarn on the 5th sc between rounds 16 and 17 of the body.
- Step 1: ch 4, slst 1 (in 6th sc between rounds 16 and 17) (5 sts)
Secure the tails and hide them inside the body.
How to Make the Collar and Cheeks
Collar
With red yarn (or brown for the Purple version), ch 24.
Insert a small bell or cowbell into the collar.
Place the collar around the cow’s neck (make sure you don’t twist the chains) and slst 1 into the first ch to join the beginning and end. Fasten off.
Cheeks
Make the cheeks under the eyes with a little blush and a soft brush. For the Scottish version, use peach yarn and your needle to add 2 small stitches under each eye (2 sts long). Place them between rounds 7 and 8, one st outward from each eye.
Putting Your Crochet Pattern Mini Cow Together
- Stuff the head and body firmly but not too tightly.
- Close the body using the front loops of the last stitches.
- Add the ears directly into the head as described.
- Add the hair if making the Scottish version.
- Add the tail directly into the body.
- Add the collar around the neck with the bell.
- Add the cheeks with blush or peach yarn.
- Add the strawberry leaf if making the Strawberry version.
- Weave in all ends and hide them inside the body.
Tips for a Neater Crochet Pattern Mini Cow
- Use a stitch marker. Continuous rounds make it easy to lose your place.
- Count your stitches. The color changes and bobble stitches depend on accurate counts.
- Stuff as you go. It’s easier to shape the head and body before closing.
- Use cotton yarn for sewing. Chenille frays easily, so a finer cotton yarn makes assembly much easier.
- Choose the right needle. A needle with a large hole minimizes yarn damage.
- Work carefully with chenille. If you need to undo a round, do it slowly.
- Match your hook to your tension. If you crochet tightly, use a 5.0 mm hook instead of 4.0 mm.
- Add the ears before closing the body. It’s much harder to reach afterward.
- Embroider the cheeks before attaching the collar. It’s easier to see the face without the collar in the way.
- Try different color combinations. The pattern works with any colors you like.
FAQ About the Crochet Pattern Mini Cow
What skill level is this crochet pattern mini cow?
It’s intermediate beginner. You need to know magic ring (or starting ring), single crochet, increase, decrease, color changes, and bobble stitches.
How big is the finished mini cow?
About 5 inches tall when using super bulky chenille yarn and a 4.0 mm hook.
What yarn is used for this crochet pattern mini cow?
The pattern uses super bulky chenille yarn (100g/120m), such as Katia Bambi, Himalaya Dolphin Baby, Premier Parfait Chunky, or Hobbii Honey Bunny.
What size safety eyes do the cows need?
10 mm black safety eyes (2 per cow).
How many versions are included in this pattern?
Four: White & Brown, Scottish, Purple, and Strawberry.
Can I make this cow without safety eyes?
Yes. The pattern notes that safety eyes are not recommended for children under 3 years of age. In that case, embroider the eyes with black yarn.
Where do I place the eyes?
Insert the safety eyes between rounds 6 and 7. The first eye goes between stitches 18 and 19, the second eye between stitches 24 and 25.
How do I make the ears?
The ears are worked directly into the head between rounds 3 and 4. The left ear is in the 14th stitch, the right ear in the 28th stitch. Full instructions are in the pattern.
How do I make the Scottish cow’s hair?
The hair is made by attaching yarn at stitches 8–13 between rounds 1 and 2 and working chains and slip stitches to create fluffy strands. Full instructions are in the pattern.
Your Next Stitch
This crochet pattern mini cow is one of those projects that brings a little joy to every stitch. Whether you make the classic White & Brown cow, the shaggy Scottish Highland, the Purple cow with its brown collar, or the Strawberry cow with its leafy top, you’ll end up with a 5-inch friend who looks like it just wandered in from a sunny meadow.
So gather your chenille yarn, pick your hook, and start with that first chain. If you get stuck on the bobble stitches or the hair, come back to this guide and work through it step by step. And when your mini cows are finished, share them , post a photo, and show off your work. Your next project might be exactly what someone else needs to see.
Happy crocheting!