Crochet Pattern Kiwi Bird Amigurumi With a Kiwi Slice Hat
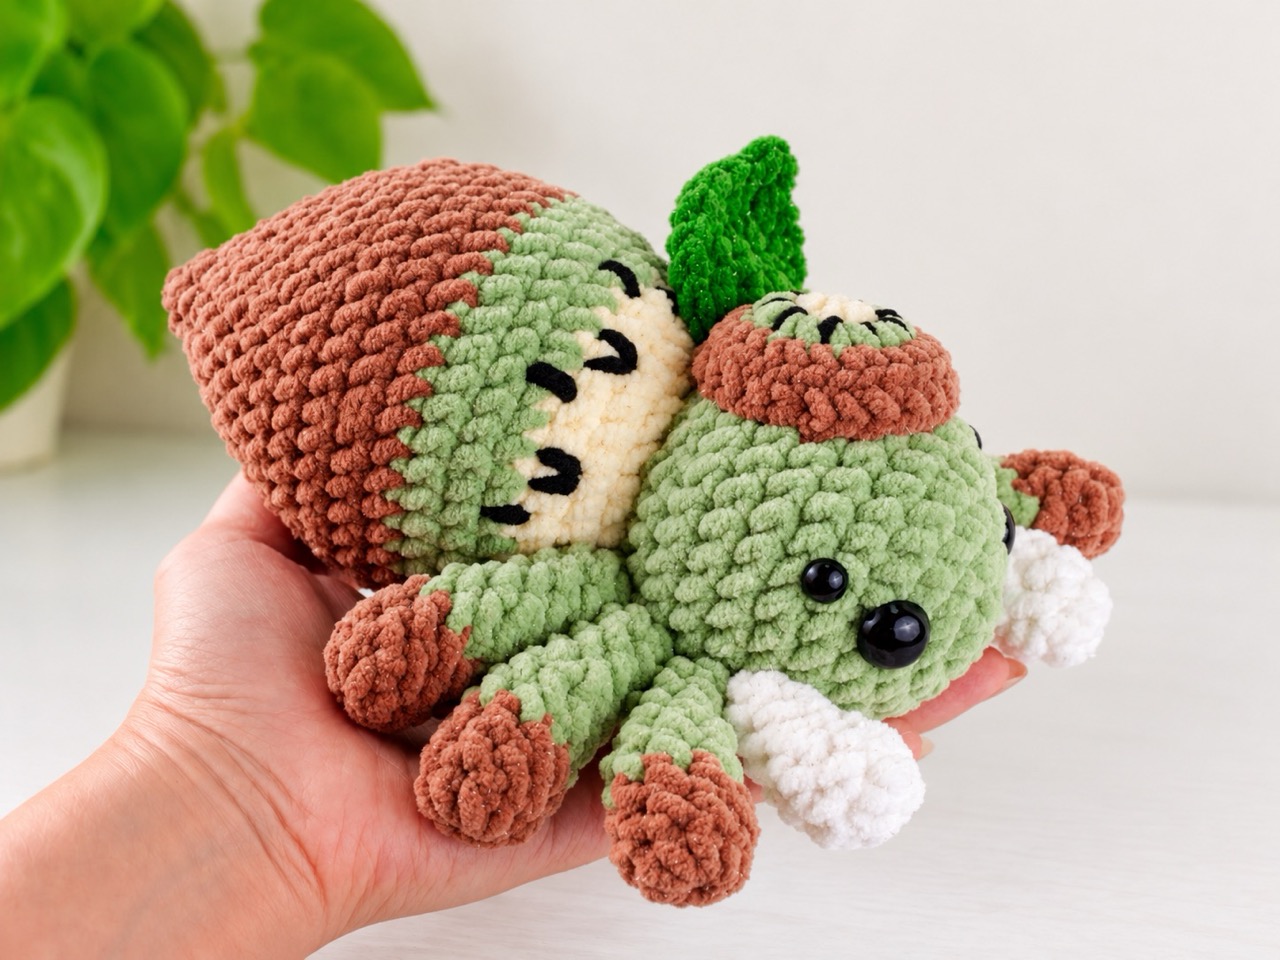
There’s something irresistibly whimsical about a tiny bird wearing a slice of fruit on its head. This crochet pattern kiwi bird . The finished amigurumi is about 20 cm long and 18 cm wide — a huggable size that’s big enough to display but small enough to sit in your palm. With its soft green body, brown beak, and a little kiwi slice hat complete with a leaf, it’s the kind of project that makes you smile every time you look at it. Whether you’re a fan of kiwi birds, love fruit-themed amigurumi, or just want a unique handmade friend, this pattern delivers.
Below is a complete guide to the Kiwi Bird pattern. You’ll find the materials, abbreviations, step-by-step instructions for the body, legs, kiwi slice, and leaf, plus assembly notes, tips, and answers to common questions.
Jump to a Section
- Why This Crochet Pattern Kiwi Bird Stands Out
- What You Need Before You Start
- Abbreviations and Special Stitches
- How to Crochet the Kiwi Bird Body
- How to Crochet the Legs
- How to Crochet the Kiwi Slice
- How to Crochet the Leaf
- Putting Your Crochet Pattern Kiwi Bird Together
- Tips for a Neater Crochet Pattern Kiwi Bird
- FAQ About the Crochet Pattern Kiwi Bird
- Your Next Stitch
Why This Crochet Pattern Kiwi Bird Stands Out
Plenty of amigurumi bird patterns exist, but this kiwi bird has a few qualities that make it especially charming.
- Finished size: Approximately 20 x 18 cm (7.8 x 7.02 inches).
- Skill level: ★ ★ ★ ★ ★ (Intermediate — requires color changes, embroidery, and assembly).
- Yarn: One skein of each color required (green, light yellow, brown, dark pink, pink, white, dark green, and black for embroidery).
- Eyes: 14 mm safety eyes (and optional 8 mm eyes for extra detail).
- Construction: Head and body are crocheted in one piece. Legs are made separately. The kiwi slice and leaf are added as accessories.
- Details: Embroidered back patterns, a kiwi slice hat, and a leaf.
- Personal use: The pattern is for personal use only, but you can sell finished items with credit to the designer.
If you’ve been searching for a crochet pattern kiwi bird that feels approachable and looks adorable, this one is a wonderful choice.
What You Need Before You Start
Gather your supplies first. The pattern uses several colors and requires basic amigurumi skills.
Yarn and Hook
- Green yarn — for the head, body, and upper legs.
- Light yellow yarn — for the middle section of the body and the kiwi slice center.
- Brown yarn — for the lower body, beak, and leg tips.
- Dark pink yarn — for the leg bottoms.
- Pink yarn — for the upper legs.
- White yarn — for two of the legs.
- Dark green yarn — for the leaf.
- Black yarn — for embroidery (back patterns, kiwi seeds).
- Hook: Size suitable for your yarn (the pattern doesn’t specify, but a 3.0–4.0 mm hook works well with worsted weight).
- Safety eyes: 14 mm (and optional 8 mm).
- Fiberfill stuffing.
- Yarn needle.
- Stitch marker.
- Scissors.
Abbreviations and Special Stitches
- MR — Magic Ring
- st(s) — Stitch(es)
- sl st — Slip stitch
- ch — Chain
- SC — Single crochet
- INC — Increase
- DEC — Decrease
- tch — Chain and turn
- HDC — Half double crochet
- HDC INC — 2 HDC in one stitch
Note on Ending Rounds
The designer recommends finishing each round with a slip stitch and chain one to ensure the best shape. This pattern uses joined rounds, not continuous spirals. Mark the first stitch of each round with a stitch marker.
How to Crochet the Kiwi Bird Body
Begin with green yarn. Work in joined rounds.
- R1: 8 SC in a MR (8)
- R2: 8 INC (16)
- R3: (SC, INC) 8 times (24)
- R4: (3 SC, INC) 6 times (30)
- R5–9: 30 SC (30) — 5 rounds total
- R10: (3 SC, DEC) 6 times (24)
- R11: (SC, DEC) 8 times (16)
Change to light yellow yarn.
- R12: (SC, INC) 8 times (24)
- R13: (SC, INC, SC) 8 times (32)
- R14: 32 SC (32)
Attach safety eyes:
- 14 mm eyes: between R2 and R3, 8 SC between them.
- 8 mm eyes: between R4 and R5, positioned slightly above the 14 mm eyes.
Change to green yarn.
- R15: (3 SC, INC) 8 times (40)
- Stuffing
- R16–17: 40 SC (40) — 2 rounds total
Change to brown yarn.
- R18–20: 40 SC (40) — 3 rounds total
- R21: (4 SC, DEC, 4 SC) 4 times (36)
- R22: (7 SC, DEC) 4 times (32)
- R23: (3 SC, DEC, 3 SC) 4 times (28)
- R24: (5 SC, DEC) 4 times (24)
- R25: (2 SC, DEC, 2 SC) 4 times (20)
- R26: (3 SC, DEC) 4 times (16)
- R27: (SC, DEC, SC) 4 times (12)
- R28: (SC, DEC) 4 times (8)
- R29: 4 DEC (4)
- Stuffing
Weave in the ends and cut.
Embroidery the Back Details
Using black yarn:
- The “I” patterns onto R15, 4 stitches apart.
- The “V” patterns onto R14, 3 stitches apart.
How to Crochet the Legs
Part 1 (Make 6)
Begin with dark pink yarn.
- R1: 8 SC in a MR (8)
- R2–3: 8 SC (8) — 2 rounds total
- Stuff only this section
Change to pink yarn.
- R4: 2 sl st, 4 SC, 2 sl st (8)
- R5: 8 SC (8)
- R6: (SC, DEC, SC) 2 times (6)
- R7–9: 6 SC (6) — 3 rounds total
Cut the yarn, leaving a long tail for sewing.
Part 2 (Make 2)
Use white yarn.
- R1: 8 SC in a MR (8)
- R2: 8 SC (8)
- R3: 2 sl st, 4 SC, 2 sl st (8)
- R4: (SC, DEC, SC) 2 times (6)
- R5–6: 6 SC (6) — 2 rounds total
- Stuffing
Cut the yarn, leaving a long tail for sewing.
How to Crochet the Kiwi Slice
Begin with light yellow yarn.
- R1: 8 SC in a MR (8)
Change to green yarn.
- R2: 8 INC (16)
Change to brown yarn.
- R3: (SC, INC) 8 times (24)
- R4: BLO in all sts, 24 SC (24)
Cut the yarn, leaving a long tail for sewing.
Embroider the “1” patterns onto R2 using black yarn, placing them between each INC apart.
How to Crochet the Leaf
Use dark green yarn.
Make 5 CH, begin in the 2nd CH from the hook (work on both sides of the chain):
- R1: INC, 2 SC, 4 SC in one st, 2 SC, INC (12)
- R2: SC, HDC INC, 2 HDC, 2 HDC INC, (2 CH, turn, SC), 2 HDC INC, 2 HDC, HDC INC, SC (19)
Cut the yarn, leaving a long tail for sewing.
Putting Your Crochet Pattern Kiwi Bird Together
- Sew the legs: On each side, sew three Part 1 legs and one Part 2 leg, placing them approximately 2 stitches away from the large eye.
- Sew the kiwi slice: Sew the kiwi slice on top of the head, slightly off-center to the side of your choice. Stuff it while sewing.
- Attach the leaf: Sew the leaf behind the kiwi slice.
- Weave in all ends and hide them inside the body.
- Shape the bird and adjust the legs so it sits nicely.
Tips for a Neater Crochet Pattern Kiwi Bird
- Use a stitch marker. Joined rounds can be tricky to track without one.
- Count your stitches. The pattern changes counts frequently.
- Stuff as you go. It’s easier to shape the head and body before closing.
- Embroider the back patterns before stuffing. It’s easier to reach the back when the piece is flat.
- Sew the legs securely. They’re a focal point, so use a few extra stitches.
- Position the kiwi slice carefully. It should sit on top of the head like a little hat.
- Use matching yarn for sewing. It hides the seams better.
- Take your time with the leaf. The shaping is simple but needs careful counting.
FAQ About the Crochet Pattern Kiwi Bird
What skill level is this crochet pattern kiwi bird?
It’s rated ★ ★ ★ ★ ★ (intermediate). You need to know magic ring, single crochet, increase, decrease, color changes, and basic embroidery.
How big is the finished crochet pattern kiwi bird?
It’s approximately 20 x 18 cm (7.8 x 7.02 inches).
What yarn is used for this crochet pattern kiwi bird?
The pattern uses one skein of each color: green, light yellow, brown, dark pink, pink, white, dark green, and black for embroidery. Any worsted weight yarn works well.
What size safety eyes do I need?
The pattern uses 14 mm safety eyes, with optional 8 mm eyes for extra detail.
How do I make the kiwi slice?
The kiwi slice is made with light yellow, green, and brown yarn in joined rounds, with black embroidery for the seeds. Full instructions are in the pattern.
Your Next Stitch
This crochet pattern kiwi bird is one of those projects that brings a little joy to every stitch. It’s soft, it’s whimsical, and it has a tiny kiwi slice hat that makes it instantly lovable. Whether you make it for yourself, a friend, or a fellow fruit lover, you’ll end up with a 20 cm friend who looks like it just waddled out of a storybook.
So gather your yarn, pick your hook, and start with that first magic ring. If you get stuck on the legs or the kiwi slice, come back to this guide and work through it step by step. And when your kiwi bird is finished, share it , post a photo, and show off your work. Your next project might be exactly what someone else needs to see.
Happy crocheting!