Crochet Dragon Pattern Make a Majestic Amigurumi
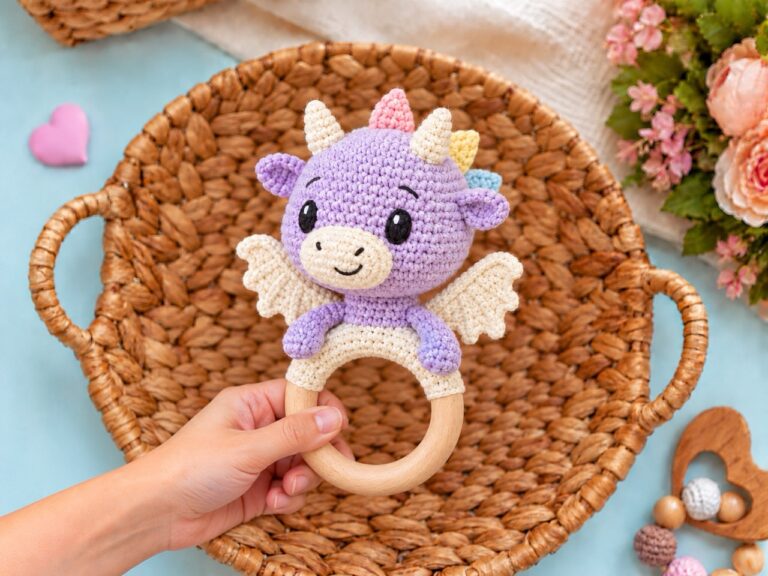
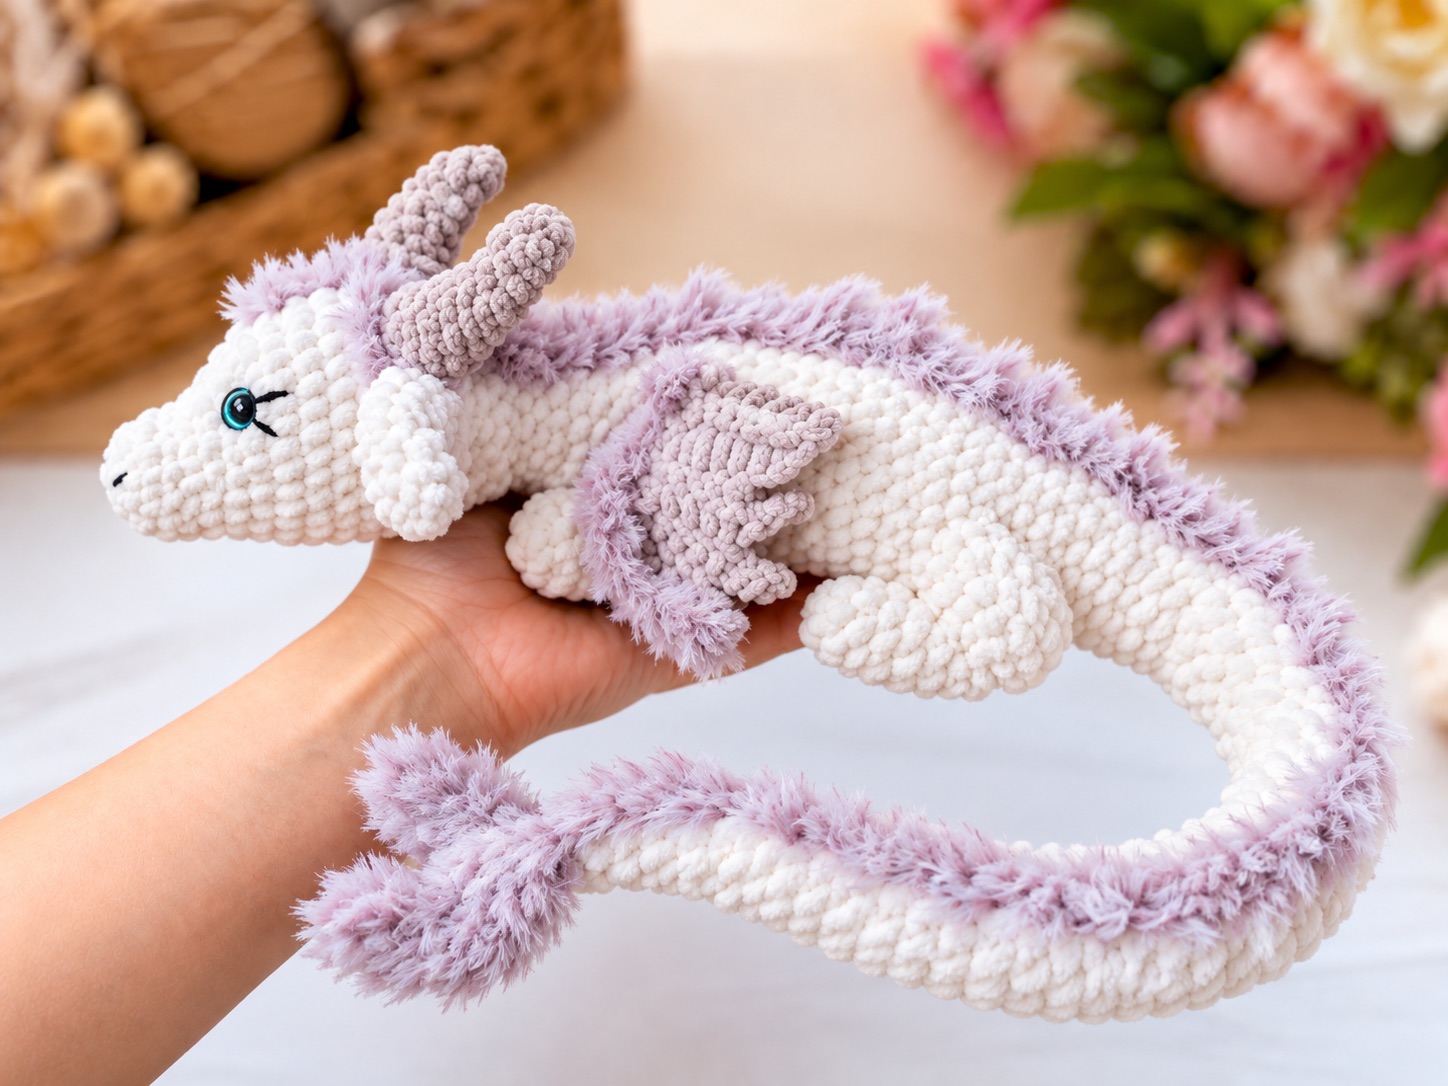
There’s something magical about a handmade dragon. It’s not just a toy — it’s a companion, a guardian, and a little piece of fantasy you can hold in your hands. This original crochet dragon pattern uses blanket yarn and straightforward shaping. With the suggested yarn, hook, and gauge, aim for approximately 3 feet (91 cm) from nose to tail fan; your finished length will depend on your tension.
The body begins at the tail tip and ends at the neck. The head, muzzle, limbs, ears, horns, wings, and tail fan are made separately and sewn on.
Jump to a Section
- What You Need Before You Start
- Abbreviations and Notes
- How to Crochet the Dragon Body and Tail
- How to Crochet the Head and Muzzle
- How to Crochet the Ears and Horns
- How to Crochet the Arms, Thighs, and Feet
- How to Crochet the Wings
- How to Crochet the Tail Fan
- Putting Your Dragon Together
- Finishing Touches and Tips
- FAQ
What You Need Before You Start
- Color A: Approximately 600–900 g of white or another main-color #6 blanket/chenille yarn.
- Color B: Approximately 100–180 g of tan or another contrasting blanket yarn for the horns, wings, and tail fan.
- Optional Color C: A small amount of non-shedding textured or contrasting yarn for a back stripe.
- Hook: 5.5 mm, or the size that produces a firm fabric without visible stuffing.
- Other supplies: Fiberfill, yarn needle, scissors, stitch markers, pins, and black yarn or embroidery thread for facial details.
- Optional eyes: Safety eyes appropriate to your fabric. Use embroidered eyes instead for a toy intended for a young child.
A useful starting gauge is approximately 10 single crochet stitches and 11 rounds per 10 cm (4 inches). Gauge is especially important for a long toy: measure the body as you work rather than relying on the round count alone. The body and tail should measure roughly 65–70 cm (26–28 inches) before attaching the head and tail fan.
Abbreviations and Notes
- MR — magic ring
- ch — chain
- sc — single crochet
- hdc — half double crochet
- sl st — slip stitch
- inc — 2 sc in one stitch
- dec — decrease over 2 stitches; an invisible decrease works well
- FO — fasten off
- × N — repeat N times
- [N] — stitches at the end of a round or row
Use US crochet terms. Work rounds in a continuous spiral and move your marker after each round. Unless a section says otherwise, do not join or turn. If a magic ring is difficult with chenille, chain 2 and work the first round into the second chain from the hook.
How to Crochet the Dragon Body and Tail
Use Color A. Begin at the narrow tail tip and work toward the neck. Add small amounts of stuffing as the tube grows. Keep the tail flexible; stuff the wider torso more firmly.
- Rnd 1: 6 sc in MR [6]
- Rnds 2–4: 6 sc [6]
- Rnd 5: (2 sc, inc) × 2 [8]
- Rnds 6–8: 8 sc [8]
- Rnd 9: (3 sc, inc) × 2 [10]
- Rnds 10–12: 10 sc [10]
- Rnd 13: (4 sc, inc) × 2 [12]
- Rnds 14–17: 12 sc [12]
- Rnd 18: (3 sc, inc) × 3 [15]
- Rnds 19–22: 15 sc [15]
- Rnd 23: (4 sc, inc) × 3 [18]
- Rnds 24–27: 18 sc [18]
- Rnd 28: (2 sc, inc) × 6 [24]
- Rnds 29–32: 24 sc [24]
- Rnd 33: (3 sc, inc) × 6 [30]
- Rnds 34–37: 30 sc [30]
- Rnd 38: (4 sc, inc) × 6 [36]
- Rnds 39–42: 36 sc [36]
- Rnd 43: (5 sc, inc) × 6 [42]
- Rnds 44–49: 42 sc [42]
- Rnd 50: (6 sc, inc) × 6 [48]
- Rnds 51–59: 48 sc [48]
- Rnd 60: (6 sc, dec) × 6 [42]
- Rnds 61–62: 42 sc [42]
- Rnd 63: (5 sc, dec) × 6 [36]
- Rnds 64–65: 36 sc [36]
- Rnd 66: (4 sc, dec) × 6 [30]
- Rnds 67–68: 30 sc [30]
- Rnd 69: (3 sc, dec) × 6 [24]
- Rnds 70–71: 24 sc [24]
- Rnd 72: (2 sc, dec) × 6 [18]
- Rnds 73–74: 18 sc [18]
Finish stuffing, leaving the 18-stitch neck opening accessible. FO with a long tail for sewing.
If the body is shorter than your target, add a few plain rounds in the 18-, 24-, or 30-stitch tail sections before continuing. Make a note of the added rounds so you can shift the assembly placements by the same amount.
How to Crochet the Head and Muzzle
Head
Use Color A. Begin at the crown and work toward the neck.
- Rnd 1: 6 sc in MR [6]
- Rnd 2: 6 inc [12]
- Rnd 3: (sc, inc) × 6 [18]
- Rnd 4: (2 sc, inc) × 6 [24]
- Rnd 5: (3 sc, inc) × 6 [30]
- Rnd 6: (4 sc, inc) × 6 [36]
- Rnd 7: (5 sc, inc) × 6 [42]
- Rnd 8: (6 sc, inc) × 6 [48]
- Rnds 9–15: 48 sc [48]
- Rnd 16: (6 sc, dec) × 6 [42]
- Rnd 17: 42 sc [42]
- Rnd 18: (5 sc, dec) × 6 [36]
- Rnd 19: (4 sc, dec) × 6 [30]
- Rnd 20: (3 sc, dec) × 6 [24]
- Rnd 21: (2 sc, dec) × 6 [18]
If using safety eyes, try placing them between rounds 11 and 12, approximately 9–10 stitches apart. Pin the muzzle in place first to check the expression, then secure the eye backs while the head is still open. Stuff the head evenly. FO, leaving the 18-stitch opening and a long sewing tail.
Muzzle
Use Color A. Work around both sides of the starting chain to form an oval.
- Rnd 1: Ch 6. Starting in the second chain from the hook, 4 sc, 3 sc in the last chain; continue along the other side with 3 sc, inc [12]
- Rnd 2: Inc, 3 sc, 3 inc, 3 sc, 2 inc [18]
- Rnd 3: (2 sc, inc) × 6 [24]
- Rnds 4–6: 24 sc [24]
FO with a long sewing tail. Leave the opening unclosed. When attaching it, add a little stuffing and sew its edge to the front of the head across approximately rounds 12–18. Embroider two nostrils and, if you like, a short curved mouth.
How to Crochet the Ears and Horns
Ears — Make 2
Use Color A. Do not stuff.
- Rnd 1: 4 sc in MR [4]
- Rnd 2: (sc, inc) × 2 [6]
- Rnd 3: (2 sc, inc) × 2 [8]
- Rnd 4: (3 sc, inc) × 2 [10]
- Rnd 5: (4 sc, inc) × 2 [12]
- Rnds 6–7: 12 sc [12]
- Rnd 8: (5 sc, inc) × 2 [14]
- Rnds 9–10: 14 sc [14]
- Rnd 11: (5 sc, dec) × 2 [12]
- Rnds 12–13: 12 sc [12]
Flatten the opening and crochet 6 sc through both layers. FO with a long sewing tail. Fold each base slightly when attaching it so the ear has a gentle curve.
Horns — Make 2
Use Color B.
- Rnd 1: 4 sc in MR [4]
- Rnd 2: 4 sc [4]
- Rnd 3: (sc, inc) × 2 [6]
- Rnd 4: 6 sc [6]
- Rnd 5: (2 sc, inc) × 2 [8]
- Rnd 6: 8 sc [8]
- Rnd 7: (3 sc, inc) × 2 [10]
- Rnds 8–9: 10 sc [10]
FO with a long sewing tail. Add a little stuffing at the base, leaving the tip pointed.
How to Crochet the Arms, Thighs, and Feet
Front Arms — Make 2
Use Color A.
- Rnd 1: 6 sc in MR [6]
- Rnd 2: 6 inc [12]
- Rnd 3: (sc, inc) × 6 [18]
- Rnds 4–5: 18 sc [18]
- Rnd 6: (sc, dec) × 6 [12]
- Rnds 7–16: 12 sc [12]
Stuff the paw and lower arm. Leave the upper arm lightly stuffed so it can rest against the body. Flatten the opening and crochet 6 sc through both layers. FO with a long sewing tail.
Hind Thighs — Make 2
Use Color A.
- Rnd 1: 6 sc in MR [6]
- Rnd 2: 6 inc [12]
- Rnd 3: (sc, inc) × 6 [18]
- Rnd 4: (2 sc, inc) × 6 [24]
- Rnds 5–7: 24 sc [24]
- Rnd 8: (2 sc, dec) × 6 [18]
- Rnd 9: 18 sc [18]
- Rnd 10: (sc, dec) × 6 [12]
- Rnd 11: 12 sc [12]
Stuff lightly. FO, leaving the opening and a long sewing tail.
Hind Feet — Make 2
Use Color A.
- Rnd 1: 6 sc in MR [6]
- Rnd 2: 6 inc [12]
- Rnd 3: (sc, inc) × 6 [18]
- Rnds 4–5: 18 sc [18]
- Rnd 6: (sc, dec) × 6 [12]
- Rnds 7–10: 12 sc [12]
Stuff lightly. Flatten the opening and crochet 6 sc through both layers. FO with a long sewing tail. The wider ends form the toes; a few short embroidered lines can define them.
How to Crochet the Wings
Make 2 with Color B. Work in turning rows. The turning chain does not count as a stitch.
- Foundation: Ch 3.
- Row 1: Starting in the second chain from the hook, 2 sc; ch 1, turn [2]
- Row 2: Inc in each stitch; ch 1, turn [4]
- Row 3: Inc, 2 sc, inc; ch 1, turn [6]
- Row 4: Inc, 4 sc, inc; ch 1, turn [8]
- Row 5: Inc, 6 sc, inc; ch 1, turn [10]
- Row 6: Inc, 8 sc, inc; ch 1, turn [12]
- Row 7: Inc, 10 sc, inc; ch 1, turn [14]
- Row 8: Inc, 12 sc, inc; ch 1, turn [16]
- Row 9: 16 sc [16]. FO.
For the scalloped edge, attach Color B at the first stitch of row 9. Across its 16 stitches work (sl st in next stitch, skip next stitch, 5 hdc in next stitch, skip next stitch) × 4. Sl st into the side edge at the corner. FO with a long tail for sewing. Leave the wings flat and unstuffed.
How to Crochet the Tail Fan
The tail fan has one broad center blade and two smaller side blades. Use Color B and do not stuff them.
Center Blade — Make 1
- Rnd 1: 6 sc in MR [6]
- Rnd 2: 6 inc [12]
- Rnd 3: (sc, inc) × 6 [18]
- Rnds 4–5: 18 sc [18]
- Rnd 6: (sc, dec) × 6 [12]
Flatten and crochet 6 sc through both layers. FO with a sewing tail.
Side Blades — Make 2
- Rnd 1: 6 sc in MR [6]
- Rnd 2: 6 inc [12]
- Rnds 3–4: 12 sc [12]
Flatten and crochet 6 sc through both layers. FO with sewing tails.
Putting Your Dragon Together
Pin all the pieces before sewing and view the dragon from above and from both sides. The round placements are guides; adjust them if you added body rounds or want a different pose.
- Finish the head. Sew the lightly stuffed muzzle across approximately head rounds 12–18. Add the nostrils, mouth, and any embroidered eye details.
- Add ears and horns. Sew the folded ear bases along the upper sides of the head around rounds 5–9. Place the horns just above and behind them.
- Join head and body. Align the head with the wider torso and sew the two 18-stitch openings together, stitch for stitch. Add stuffing at the join before closing the last few stitches.
- Attach the hind thighs. Position them on opposite sides of the broad body around body rounds 49–58. Sew firmly, adding a little stuffing before closing each seam.
- Attach the feet. Sew a foot to the forward, lower edge of each thigh, with the toes pointing slightly outward.
- Attach the front arms. Sew them to the upper body near rounds 66–71 so they angle gently forward.
- Attach the wings. Sew one sloping edge of each wing to the upper sides of the back around body rounds 59–69. Leave the scalloped edges free to drape.
- Add the tail fan. Sew the center blade at the tail tip around body rounds 1–5. Attach the smaller blades on either side around rounds 5–10, spreading them into a fan rather than stacking them.
Finishing Touches and Tips
For an optional dorsal stripe, work loose surface slip stitches with Color C along the center of the back from about body round 12 to round 71, then continue a short distance onto the head. Keep the stitches relaxed so the body does not pucker. A smooth contrasting yarn is fine if you prefer to skip fuzzy fibers.
- Check the length early. Measuring the body before sewing on the head is the easiest way to approach the 3-foot target.
- Stuff in stages. Small additions keep the narrow tail smooth; firmer stuffing supports the torso and neck.
- Check symmetry with pins. Wings and thighs have a big effect on how the long body sits.
- Sew through substantial fabric. Make several passes at each limb and wing attachment so it holds up when the dragon is lifted.
- Choose details for the recipient. For a young child, embroider the eyes and avoid loose or shedding embellishments. This stuffed toy is not suitable for an infant’s sleep space.
FAQ
How big will Dragon be?
The target is approximately 3 feet (91 cm) from nose to tail fan at the suggested gauge. Yarn, hook, tension, stuffing, and any added body rounds will change the result.
How much yarn do I need?
Allow roughly 600–900 g of main-color blanket yarn and 100–180 g of contrast yarn. Have extra main yarn available if you plan to lengthen the body.
Is this suitable for a beginner?
The stitches are basic amigurumi stitches, but the long body, flat wing edging, and assembly make it a better project for someone comfortable counting rounds and sewing pieces securely.
Can I leave off the textured back stripe?
Yes. It is decorative and does not affect the construction.
Can I make the dragon smaller?
Yes. Use a lighter yarn and a hook that still produces a gap-free fabric. The stitch counts can remain the same, but the finished length will decrease.
Your Next Stitch
Start at the tail tip, and let winni grow a little at a time. Once the rounded head, draped wings, and fanned tail are in place, you’ll have a soft dragon with plenty of room for your own color choices and expression. Happy crocheting!