Crochet Dragon Rattle Pattern: Ronnie the Little Lavender Dragon
There’s something magical about a tiny crochet dragon. The rounded cheeks, little horns, colorful spikes, and embroidered face give a simple handful of yarn its own personality.
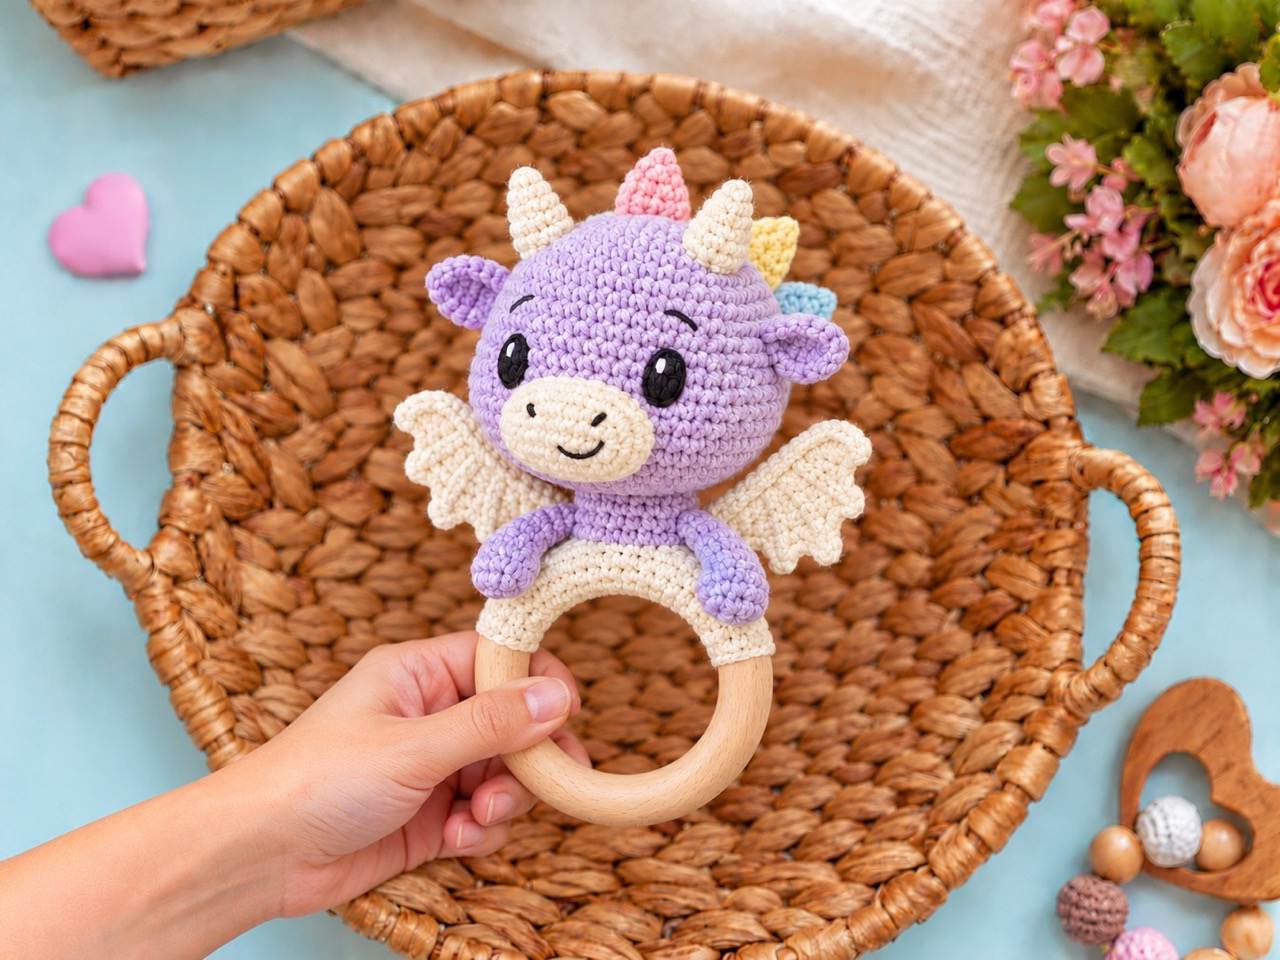
This crochet dragon rattle pattern creates Ronnie, a compact lavender dragon attached to a 60 mm wooden ring. Ronnie has a cream muzzle, tapered arms, three flat dorsal spikes, and optional scalloped wings.
The finished project is designed to measure approximately 14–16 cm / 5.5–6.3 inches tall, from the horn tips to the bottom of the ring. The head has a closed neck base that is sewn securely to a fitted crochet ring cover.
Below you’ll find the complete materials list, abbreviations, instructions for every component, assembly directions, tips, and answers to common questions.
Jump to a Section
- Why Make This Crochet Dragon Rattle?
- What You Need Before You Start
- Abbreviations and Pattern Notes
- How to Crochet the Dragon Head
- How to Crochet the Muzzle
- How to Crochet the Horns and Spikes
- How to Crochet the Ears and Paws
- How to Crochet Optional Wings
- How to Cover the Wooden Ring
- Face and Assembly
- Tips for a Neater Dragon Rattle
- FAQ About the Crochet Dragon Rattle Pattern
- Your Next Stitch
Why Make This Crochet Dragon Rattle?
Ronnie combines familiar amigurumi techniques with a few small details that give the dragon character.
- Compact size: Approximately 14–16 cm tall, including the horns and ring.
- Rounded face: Cheek increases create a softly shaped head.
- Embroidered features: The eyes, nostrils, mouth, and optional eyebrows are stitched.
- Closed neck base: The head is completely closed before attachment to the ring cover.
- Colorful spikes: Each spike consists of two flat triangular panels.
- Optional wings: Ribbed turning rows form wings with scalloped outer edges.
- Fitted ring cover: Adjust the row count to suit your wooden ring’s thickness.
- Skill level: Intermediate.
What You Need Before You Start
Yarn and Colors
Use sport-weight cotton or cotton-blend yarn of similar thickness throughout.
- Color A — Lavender: Head, ears, and arms; approximately 70–90 m.
- Color B — Cream: Muzzle, horns, ring cover, and optional wings; approximately 25–35 m.
- Color C — Blush pink: One dorsal spike; approximately 3–5 m.
- Color D — Pale yellow: One dorsal spike; approximately 3–5 m.
- Color E — Soft blue: One dorsal spike; approximately 3–5 m.
You will also need fine black or dark brown cotton yarn for the face and a small amount of white embroidery yarn for optional eye highlights.
Tools and Notions
- 2 mm crochet hook, adjusted if necessary to achieve firm fabric.
- One smooth, one-piece wooden ring, 60 mm outside diameter.
- Polyester stuffing.
- Optional factory-sealed rattle insert.
- Strong matching cotton yarn for assembly.
- Tapestry needle.
- Stitch markers.
- Pins.
- Scissors.
This version uses embroidered facial features.
If adding sound, use an intact, factory-sealed rattle insert. Do not put loose beads or pellets inside the head.
Gauge and Finished Size
Aim for approximately:
28 sc and 34 rounds per 10 cm in firm single crochet.
At this tension, the stuffed head should measure approximately 7–7.5 cm across at its widest point.
The intended overall height is 14–16 cm, measured from the horn tips to the bottom of the ring. Yarn, tension, stuffing, and assembly position will affect the result.
The ring cover must fit the actual thickness of the wooden bar. Its row count can be adjusted without changing the dragon’s shaping.
Abbreviations and Pattern Notes
US Crochet Abbreviations
- MR: Magic ring.
- ch: Chain.
- sc: Single crochet.
- hdc: Half double crochet.
- sl st: Slip stitch.
- inc: Work 2 sc in the next stitch.
- dec: Invisible single crochet decrease over the next 2 stitches.
- BLO: Back loops only.
- FO: Fasten off.
- Rnd: Round.
- (…) × number: Repeat the instructions the stated number of times.
- [number]: Stitch count after completing the round or row.
Working Notes
- Work in continuous rounds unless instructed otherwise.
- Mark the first stitch of each round.
- Work through both loops unless specified.
- Turning chains and joining slip stitches do not count as stitches.
- Stuff with small tufts to keep the surface smooth.
- Use strong matching cotton yarn for sewing.
- When a round specifies BLO, work any decreases through the back loops of the next two stitches.
The head begins at the crown and continues into a short neck.
When Round 30 is worked in BLO, the unused front loops belong to Round 29. These loops provide a guide for attaching the closed neck base to the ring cover.
How to Crochet the Dragon Head
Use Color A.
Begin at the crown. Treat the beginning-of-round marker as the back of the head.
- Rnd 1: 6 sc in MR. [6]
- Rnd 2: 6 inc. [12]
- Rnd 3: (sc, inc) × 6. [18]
- Rnd 4: (2 sc, inc) × 6. [24]
- Rnd 5: (3 sc, inc) × 6. [30]
- Rnd 6: (4 sc, inc) × 6. [36]
- Rnd 7: (5 sc, inc) × 6. [42]
- Rnd 8: (6 sc, inc) × 6. [48]
- Rnd 9: (7 sc, inc) × 6. [54]
- Rnd 10: (8 sc, inc) × 6. [60]
- Rnds 11–14: 60 sc in each round. [60]
Shape the Cheeks
- Rnd 15: 12 sc, 2 inc, 32 sc, 2 inc, 12 sc. [64]
- Rnds 16–18: 64 sc in each round. [64]
The 32 stitches between the two increase groups form the central front section.
Mark and Embroider the Eyes
Center the eyes across the front, with their centers approximately 9 stitch columns apart.
Place them between Rounds 14 and 15.
Embroider each eye as a small filled oval, approximately 5–6 mm wide and 6–7 mm high. Use several closely placed stitches and keep the tension gentle.
If desired, add one tiny white highlight near the outer upper corner of each eye.
Secure the embroidery ends inside the head while the opening is still wide.
Continue crocheting:
- Rnd 19: 12 sc, 2 dec, 32 sc, 2 dec, 12 sc. [60]
- Rnd 20: (8 sc, dec) × 6. [54]
- Rnd 21: (7 sc, dec) × 6. [48]
- Rnd 22: (6 sc, dec) × 6. [42]
Begin stuffing the crown and cheeks.
If using a rattle insert, place it near the center of the head and surround it with stuffing so it does not press directly against the crochet fabric.
- Rnd 23: (5 sc, dec) × 6. [36]
- Rnd 24: (4 sc, dec) × 6. [30]
- Rnd 25: (3 sc, dec) × 6. [24]
- Rnd 26: (2 sc, dec) × 6. [18]
Finish shaping the head. Keep the cheeks softly rounded.
Crochet the Short Neck
- Rnd 27: 18 sc. [18]
- Rnd 28: 18 sc. [18]
- Rnd 29: 18 sc. [18]
Add a small amount of stuffing to the neck so it supports the head without becoming hard.
- Rnd 30: BLO: (sc, dec) × 6. [12]
- Rnd 31: 6 dec. [6]
FO, leaving a long sewing tail.
Pass the tail through the front loops of the remaining 6 stitches and pull closed.
Leave the unused front loops of Round 29 accessible for assembly.
How to Crochet the Muzzle
Use Color B.
Ch 5. Work around both sides of the foundation chain.
- Rnd 1: Starting in the second chain from the hook, work 2 sc in that chain, sc in the next 2 chains, 3 sc in the last chain. Continue along the opposite side: sc in the next 2 chains, sc in the final chain. [10]
- Rnd 2: 2 inc, 2 sc, 3 inc, 2 sc, inc. [16]
- Rnd 3: 16 sc. [16]
- Rnd 4: 16 sc. [16]
Sl st in the next stitch and FO, leaving a sewing tail.
Embroider the Muzzle
Hold the muzzle horizontally.
With fine dark yarn:
- Embroider two short diagonal nostrils across the upper half, leaving approximately 4 stitches between them.
- Add a small curved smile across the lower center.
Secure the embroidery on the inside.
Attach the Muzzle
Pin it beneath the eyes, approximately across head Rounds 17–22.
Keep its long axis horizontal.
Sew around most of its edge. Add a thin layer of stuffing before closing the final section.
The muzzle should project gently while remaining oval.
How to Crochet the Horns and Spikes
Horns — Make Two
Use Color B.
Begin at the narrow tip.
- Rnd 1: 4 sc in MR. [4]
- Rnd 2: 4 sc. [4]
- Rnd 3: (sc, inc) × 2. [6]
- Rnd 4: 6 sc. [6]
- Rnd 5: (sc, inc) × 3. [9]
- Rnd 6: 9 sc. [9]
- Rnd 7: (2 sc, inc) × 3. [12]
- Rnd 8: 12 sc. [12]
FO, leaving a sewing tail.
Add a tiny wisp of stuffing to the lower portion. Keep the tip narrow.
Leave the 12-stitch opening open for sewing.
Pin the horns symmetrically to the upper sides of the crown, approximately around head Rounds 4–8. Leave room between them for the upper dorsal spike.
Dorsal Spikes — Make Three
Make:
- One blush pink spike.
- One pale yellow spike.
- One soft blue spike.
Each finished spike consists of two matching flat triangles. Make six triangle panels altogether.
Triangle Panel
Ch 2.
- Row 1: Sc in the second chain from the hook. [1]
- Row 2: Ch 1, turn, inc. [2]
- Row 3: Ch 1, turn, inc in each stitch. [4]
- Row 4: Ch 1, turn, inc, 2 sc, inc. [6]
- Row 5: Ch 1, turn, 6 sc. [6]
FO.
Leave a long sewing tail on one panel of each matching pair.
Join Each Spike
Place two matching panels together with their wrong sides facing each other.
Whipstitch around the two sloping edges, joining them at the pointed tip.
Leave the two six-stitch base edges open.
Do not stuff.
Flatten the base so the corresponding stitches of the two panels align into six pairs.
Position the Spikes
Arrange the three spikes along the center back of the head, running from the crown toward the neck.
Approximate center positions are:
- Upper spike: Near head Round 5.
- Middle spike: Near head Round 13.
- Lower spike: Near head Round 21.
Align each base in the crown-to-neck direction. Adjust the spacing to suit the curve of the stuffed head.
Sew through both panel bases and the head fabric, using all six stitch pairs for each spike.
How to Crochet the Ears and Paws
Ears — Make Two
Use Color A.
Begin at the outer tip.
- Rnd 1: 4 sc in MR. [4]
- Rnd 2: 4 inc. [8]
- Rnd 3: (sc, inc) × 4. [12]
- Rnd 4: 12 sc. [12]
- Rnd 5: (2 sc, dec) × 3. [9]
- Rnd 6: (sc, dec) × 3. [6]
Do not stuff.
Flatten the opening and work 3 sc through both layers to close.
FO, leaving a sewing tail.
Shape each ear into a shallow cup.
Pin the bases to the sides of the head, approximately around Rounds 11–13, slightly behind the eye line. Angle the tips outward.
Arms and Paws — Make Two
Use Color A.
Begin at the rounded paw.
- Rnd 1: 6 sc in MR. [6]
- Rnd 2: (sc, inc) × 3. [9]
- Rnd 3: (2 sc, inc) × 3. [12]
- Rnd 4: 12 sc. [12]
- Rnd 5: 12 sc. [12]
- Rnd 6: (2 sc, dec) × 3. [9]
- Rnds 7–11: 9 sc in each round. [9]
- Rnd 12: (sc, dec) × 3. [6]
Put a tiny amount of stuffing in the paw only. Leave the upper arm unstuffed.
Flatten the opening and work 3 sc through both layers to close.
FO, leaving a sewing tail.
The arms attach to the neck, with the paws curving forward onto the covered upper part of the ring.
How to Crochet Optional Wings
Make two in Color B or another contrasting color.
The two wings are identical. Turn one over during assembly to create a mirrored pair.
Ch 3.
- Row 1: Starting in the second chain from the hook, 2 sc. [2]
- Row 2: Ch 1, turn, BLO: inc, sc. [3]
- Row 3: Ch 1, turn, BLO: 2 sc, inc. [4]
- Row 4: Ch 1, turn, BLO: inc, 3 sc. [5]
- Row 5: Ch 1, turn, BLO: 4 sc, inc. [6]
- Row 6: Ch 1, turn, BLO: inc, 5 sc. [7]
- Row 7: Ch 1, turn, BLO: 6 sc, inc. [8]
- Row 8: Ch 1, turn, BLO: inc, 7 sc. [9]
- Row 9: Ch 1, turn, BLO: 8 sc, inc. [10]
Scalloped Outer Edge
Work this edging through both loops.
- Ch 1 and turn.
- Repeat the following five times: sl st in the next stitch; work sc, hdc, sc together in the next stitch.
This uses all 10 stitches and creates five small scallops.
FO, leaving a sewing tail.
Weave the tail along the straight edge toward the narrow foundation end.
Do not stuff.
The first two rows form the wing root. Sew these to the back of the lower head, approximately around Rounds 23–26, one on each side of the centerline.
Let the wider scalloped edges spread outward and upward.
How to Cover the Wooden Ring
Use Color B.
The cover is a rectangle. Its stitches run along the upper arc of the ring, while its rows wrap around the thickness of the wooden bar.
Ch 19.
- Row 1: Starting in the second chain from the hook, 18 sc. [18]
- Row 2: Ch 1, turn, 18 sc. [18]
- Rows 3–10: Repeat Row 2. [18 per row]
Check the Fit
Wrap the rectangle around the upper section of the wooden ring.
The foundation edge and final row should meet snugly along the inner curve.
Adjust the row count to suit the bar’s thickness:
- Remove a row if the cover is loose.
- Add a row if the edges cannot meet comfortably.
For a bar approximately 8–10 mm thick, the cover will usually need around 9–12 rows, depending on tension.
Keep 18 stitches in every row.
FO, leaving a long sewing tail.
Sew the Cover Around the Ring
Center the rectangle over the top of the ring.
Wrap it around the wooden bar and sew the two long edges together along the inner curve.
Catch corresponding stitches along the foundation edge and final row.
The cover should grip the ring firmly without a bulky overlap.
Secure the sewing ends inside the cover.
Face and Assembly
Pin the main pieces before sewing. Check their placement from the front, sides, and back.
1. Finish the Face
- Check that the embroidered eyes are level.
- Sew the muzzle beneath them.
- Add two short eyebrows above the eyes if desired.
- Secure all embroidery ends.
No eye-sculpting step is required. The cheek shaping and stuffing provide the rounded expression.
2. Attach the Horns and Ears
- Pin the horns symmetrically around head Rounds 4–8.
- Sew around each complete 12-stitch horn opening.
- Pin the ears around Rounds 11–13, slightly behind the eyes.
- Sew through each closed ear base and the head fabric.
Check the placement from the front before securing the final stitches.
3. Attach the Dorsal Spikes
Sew the three spikes along the center back, leaving small gaps between their bases.
Keep the upper spike centered between the horns and the lowest spike above the neck.
Secure each spike through both panel bases.
4. Attach the Wings
If using wings:
- Place their narrow roots on either side of the lower back of the head.
- Position them approximately across Rounds 23–26.
- Turn one wing over so the pair mirrors.
- Sew the first two rows of each wing to the head with small, closely spaced stitches.
- Leave the scalloped outer edges free.
5. Sew the Head to the Ring Cover
The neck base is already closed.
- Mark the highest point of the covered ring.
- Center the closed neck base over this point.
- Pin the head so the face looks straight forward.
- Use the 18 reserved front loops of head Round 29 as a guide around the neck base.
- Sew the neck to the cover, catching the adjacent neck stitch posts as well as the cover fabric.
- Distribute the attachment around the entire base, catching both the front and back portions of the cover.
- Make a second reinforcing pass around the attachment.
The head should sit upright without rotating loosely on the cover.
6. Attach the Arms
- Sew one closed arm edge to each side of the neck, approximately around head Rounds 27–28.
- Curve the arms forward and downward.
- Rest the paws against the covered upper sides of the ring.
- Add two small anchoring stitches through each paw and the ring cover.
Keep both arms at the same height.
7. Shape and Finish Ronnie
- Distribute the stuffing evenly through the crown and cheeks.
- Check that the muzzle remains horizontal.
- Shape the horns gently with your fingers.
- Spread the wings evenly if included.
- Check that the ring cover fits closely.
- Secure all yarn tails and remove every pin.
- Inspect the head attachment and accessory seams.
Tips for a Neater Dragon Rattle
Count the Cheek-Shaping Rounds
The head increases from 60 to 64 stitches, then returns to 60 before narrowing.
Check these rounds carefully so the cheeks remain even.
Keep the Insert Centered
If using a rattle insert, position it after head Round 22 and surround it with filling before continuing the decreases.
Use Only a Little Muzzle Stuffing
A thin layer gives the muzzle dimension while preserving its oval shape.
Join Matching Spike Panels Carefully
Line up the two panels of each spike before sewing. Matching edges help the points stand neatly.
Pin the Spikes as a Group
Arrange all three before attaching the first one. This makes the spacing easier to judge along the curved back of the head.
Keep the Upper Arms Soft
Stuff only the paws. Unstuffed upper arms are easier to curve toward the ring.
Fit the Cover to the Actual Ring
The number of cover rows depends on the wooden bar’s thickness. Check the fit before fastening off.
Reinforce the Neck Attachment
Use the reserved loops as a guide, while also catching the adjacent neck posts and cover fabric. Spread the attachment around the full neck base.
FAQ About the Crochet Dragon Rattle Pattern
What skill level is this crochet dragon rattle pattern?
This is an intermediate project.
You should be comfortable with magic rings, increases, decreases, oval foundations, working in back loops, turning rows, embroidery, and sewing small components.
How big is the finished dragon rattle?
Ronnie is designed to finish approximately 14–16 cm / 5.5–6.3 inches tall, measured from the horn tips to the bottom of the 60 mm ring.
The exact size depends on yarn, gauge, stuffing, and assembly.
What yarn does this version use?
Use sport-weight cotton or cotton-blend yarn of similar thickness throughout.
The main palette is lavender, cream, blush pink, pale yellow, and soft blue.
What hook size should I use?
Start with a 2 mm hook.
Adjust if needed to achieve firm fabric at approximately 28 sc and 34 rounds per 10 cm.
Does the pattern use safety eyes?
No. This version uses embroidered eyes.
Place their centers between head Rounds 14 and 15, approximately 9 stitch columns apart.
Where does the rattle insert go?
If using one, place an intact, factory-sealed insert near the center of the head after Round 22.
Surround it with stuffing before completing the remaining head and neck rounds.
Can I omit the rattle insert?
Yes. Without the insert, the project becomes a quiet dragon ring character.
Does Ronnie require eye sculpting?
No. The cheek increases, muzzle, and embroidery create the expression. There is no sculpting diagram or tightening step.
How are the spikes made?
Each spike consists of two flat triangular panels.
Sew the matching panels together along their sloping edges, then attach both base edges to the head. Make six panels to create three finished spikes.
Can I leave off the wings?
Yes. The horns, ears, muzzle, and three colorful spikes give Ronnie a dragon appearance without wings.
Why does my ring cover need a different number of rows?
Wooden rings vary in bar thickness, and row gauge varies between crocheters.
Keep 18 stitches in each row and adjust the number of rows until the foundation edge and final row meet snugly around the bar.
Is the head left open for attachment?
No. The head continues into a short neck and closes completely at Round 31.
Use the 18 reserved front loops of Round 29 as a guide when sewing the closed base to the ring cover.
Your Next Stitch
This crochet dragon rattle pattern brings together a rounded lavender face, cream horns, colorful spikes, and a fitted wooden-ring cover. Add the scalloped wings for an extra decorative finish, or keep Ronnie simple.
Choose your colors, check your gauge, and begin at the crown. Take your time with the embroidered face, pin the head details before sewing, and fit the cover to your actual ring.
Happy crocheting!