Step-by-Step Guide to Crochet Pattern Panda
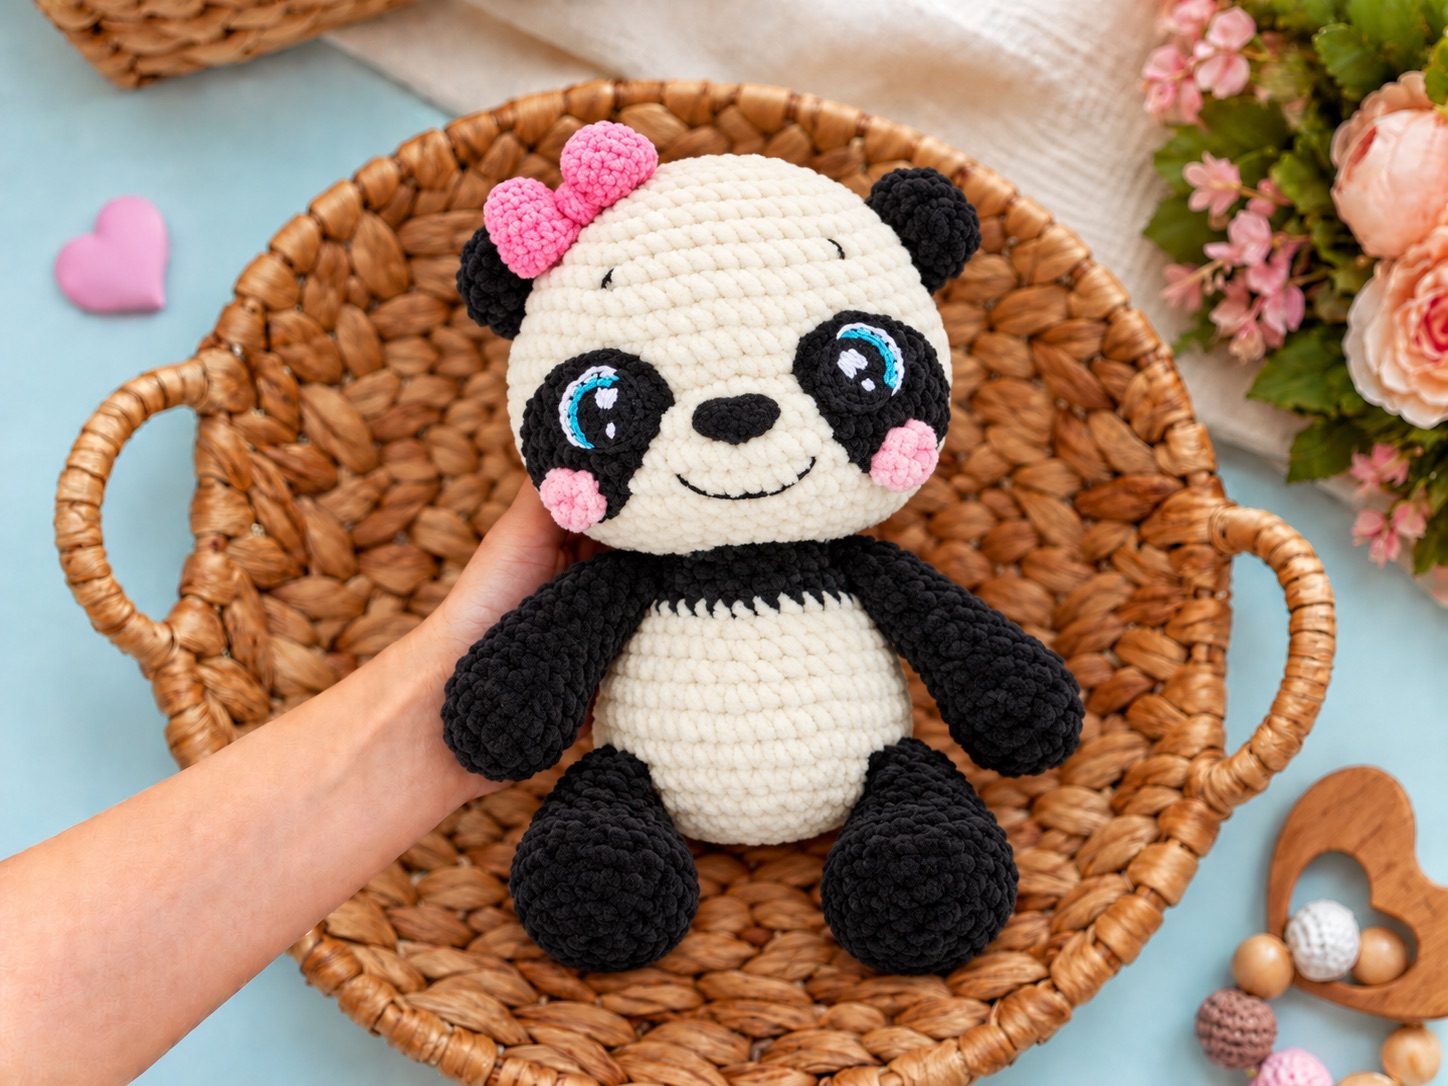
You know the feeling. You spot a tiny handmade panda online, and something in you wants to make one too. Not just any panda — one with soft cheeks, a stitched smile, movable arms, and a little green sweater that looks like it came from a miniature wardrobe. That’s exactly what this crochet pattern panda gives you. It’s rated three stars out of five, finishes around 16 cm tall, and uses simple amigurumi shaping with a few smart extras: jointed legs, embroidered facial details, and a striped sweater you crochet row by row.
Below you’ll find a complete walk-through the Panda pattern. You’ll get the material list, stitch notes, head and body rounds, limb instructions, sweater rows, assembly steps, and answers to common questions.
Jump to a Section
- Why This Crochet Pattern Panda Stands Out
- What You Need Before You Start
- Stitch Terms and Techniques
- How to Crochet the Panda Head
- Eye Patches, Muzzle, Ears, and Face Details
- How to Crochet the Panda Limbs and Body
- How to Crochet the Panda Sweater
- Putting Your Crochet Pattern Panda Together
- Helpful Tips for a Neater Crochet Panda
- FAQ About the Crochet Pattern Panda
- Your Next Stitch
Why This Crochet Pattern Panda Stands Out
This panda combines straightforward amigurumi shaping with a small garment and carefully placed facial details.
- Suggested skill level: Confident beginner to intermediate.
- Target height: Approximately 16 cm, including the ears, with the legs extended.
- Construction: Separate head, body, limbs, ears, eye patches, muzzle, and tail.
- Limb attachment: Sewn-on arms and legs with lightly stuffed upper sections.
- Face: Oval eye patches, a separate cream muzzle, and embroidered features.
- Clothing: A mint and dark green sweater with short sleeves and a sewn back seam.
- Techniques: Continuous rounds, oval foundations, increases, decreases, color changes, and simple garment construction.
The head and body finish with matching 18-stitch openings, making the neck join easy to align.
What You Need Before You Start
Yarn and Hooks
Choose fine cotton or cotton-blend yarn, approximately 160–180 m per 50 g. Use matching yarn thicknesses for all four colors.
| Color | Use | allowance |
|---|---|---|
| Cream | Head, muzzle, and lower body | 30 g |
| Black | Eye patches, ears, shoulders, limbs, and tail | 25 g |
| Mint green | Sweater stripes and cuffs | 10 g |
| Dark green | Sweater stripes and hem | 10 g |
These quantities are planning allowances, not measured consumption from a completed sample.
You will also need:
- 2.25 mm hook for the panda.
- 2.5 mm hook for the sweater, adjusted as needed for fit.
- Black and white embroidery floss.
- Optional pink embroidery floss for the cheeks.
Other Supplies
- Polyester fiberfill.
- Yarn needle.
- Scissors.
- Stitch markers.
- Sewing pins.
- Optional 6–7 mm safety eyes, or embroidery supplies for stitched eyes.
Gauge and Finished Size
For the panda, aim for approximately:
26 sc and 30 rounds = 10 cm.
For the sweater, aim for approximately:
24 sc and 28 rows = 10 cm.
These are starting targets rather than measurements from a finished sample. Yarn thickness, tension, stuffing, and assembly affect the final size.
Make the panda fabric firm enough to contain the stuffing. The sweater should have slightly more give so it sits comfortably over the body.
Stitch Terms and Techniques
This pattern uses US crochet terminology.
- MR: Magic ring.
- ch: Chain.
- sc: Single crochet.
- inc: Work 2 sc in the same stitch.
- dec: Decrease 2 stitches into 1.
- 3-sc inc: Work 3 sc in the same stitch.
- sl st: Slip stitch.
- BLO: Back loop only.
- st/sts: Stitch/stitches.
- R: Round.
- [instructions] × number: Repeat the bracketed instructions the stated number of times.
- (number): Finished stitch count.
Invisible Decrease
Use invisible decreases for the stuffed pieces:
- Insert the hook under the front loop of the next stitch.
- Insert it under the front loop of the following stitch.
- Yarn over and pull through both front loops.
- Yarn over and pull through the remaining two loops.
Changing Colors
Work the final pull-through of the last stitch with the new color. Continue the next stitch or row in that color.
Secure the ends without pulling the fabric out of shape.
General Pattern Notes
- Work the panda pieces in continuous rounds.
- Mark the first stitch of every round.
- Work the sweater body back and forth in rows.
- Work the sleeves in joined rounds without turning.
- Turning chains and joining slip stitches do not count as stitches.
- Round numbering starts again for every piece.
- Work through both loops unless instructed otherwise.
- Leave long sewing tails on pieces that will be attached later.
How to Crochet the Panda Head
Use cream. Begin at the crown and work toward the neck.
Shape the Head
- R1: 6 sc in a MR. (6)
- R2: Inc × 6. (12)
- R3: [Sc, inc] × 6. (18)
- R4: [2 sc, inc] × 6. (24)
- R5: [3 sc, inc] × 6. (30)
- R6: [4 sc, inc] × 6. (36)
- R7: [5 sc, inc] × 6. (42)
- R8: [6 sc, inc] × 6. (48)
- R9: [7 sc, inc] × 6. (54)
- R10–12: Sc around. (54) — 3 rounds.
- R13: [7 sc, dec] × 6. (48)
- R14: [6 sc, dec] × 6. (42)
- R15: [5 sc, dec] × 6. (36)
If using safety eyes, pause here. Make the eye patches and follow the placement instructions in the next section while the head opening is still accessible.
Finish the Head
- R16: [4 sc, dec] × 6. (30)
- R17: [3 sc, dec] × 6. (24)
- R18: [2 sc, dec] × 6. (18)
Stuff evenly, keeping the face smoothly rounded.
Fasten off with a long sewing tail. Leave the 18-stitch neck opening open.
Eye Patches, Muzzle, Ears, and Face Details
Eye Patches — Make 2
Use black. Work around both sides of the foundation chain.
Ch 4.
- R1: Starting in the second chain from the hook, 2 sc, 3 sc in the last chain. Along the opposite side: sc, inc in the last chain. (8)
- R2: Inc, sc, 3 inc, sc, 2 inc. (14)
- R3: Sc, inc, sc, [sc, inc] × 3, sc, [sc, inc] × 2. (20)
Sl st in the next stitch and fasten off, leaving a sewing tail.
Keep the patches flat and unstuffed.
Position the Eye Patches and Eyes
Temporarily add some stuffing to the head so you can judge the face.
Pin the patches approximately over head R7–12. Place their long axes mostly vertically, tilting their upper ends slightly outward.
Mark the eye centers:
- Between head R9 and R10.
- Approximately 7 stitch spaces apart, measured center to center.
For safety eyes, insert each post through both its patch and the head fabric. Sew down the patch edges, check the expression, then secure the backings while the head remains open.
For embroidered eyes, sew the patches on first. Embroider small black ovals with white highlights. A short white crescent along each outer edge helps distinguish the eyes from the black patches.
Muzzle
Use cream.
Ch 4.
- R1: Starting in the second chain from the hook, 2 sc, 3 sc in the last chain. Along the opposite side: sc, inc in the last chain. (8)
- R2: Inc, sc, 3 inc, sc, 2 inc. (14)
- R3: Sc around. (14)
Fasten off with a long sewing tail. Leave the base open.
Position the muzzle horizontally between and below the eye patches, approximately over head R10–13.
Sew around its open edge, adding a small pinch of stuffing before closing the seam.
Embroider the Nose and Mouth
Use black embroidery floss.
- Make a small triangular nose at the upper center of the muzzle.
- Add a short vertical stitch below the nose.
- Work two short diagonal stitches beneath it for the mouth.
Keep the embroidery tension gentle so the muzzle stays rounded.
Ears — Make 2
Use black.
- R1: 6 sc in a MR. (6)
- R2: Inc × 6. (12)
- R3: [Sc, inc] × 6. (18)
- R4–5: Sc around. (18) — 2 rounds.
- R6: [Sc, dec] × 6. (12)
Do not stuff.
Flatten the opening and work 6 sc through both layers, pairing one stitch from each side for each sc.
Fasten off with a sewing tail.
Pin the ears to the upper sides of the head. Let their bases follow a shallow curve approximately across head R4–6.
Check their position from the front before sewing.
Optional Face Details
Add short black eyebrows above the patches or two small pink stitches on each cheek.
Keep these details small so the eye patches and muzzle remain the focus of the face.
How to Crochet the Panda Limbs and Body
Forelegs — Make 2
Use black. Begin at the paw.
- R1: 6 sc in a MR. (6)
- R2: [Sc, inc] × 3. (9)
- R3: [2 sc, inc] × 3. (12)
- R4–6: Sc around. (12) — 3 rounds.
- R7: [2 sc, dec] × 3. (9)
- R8–11: Sc around. (9) — 4 rounds.
- R12: [Sc, dec] × 3. (6)
Lightly stuff the paw and lower foreleg. Leave the upper section soft.
Flatten the opening and work 3 sc through both layers.
Fasten off with a long sewing tail.
Hind Legs — Make 2
Use black. Begin with an oval sole.
Ch 5.
- R1: Starting in the second chain from the hook, 3 sc, 3 sc in the last chain. Along the opposite side: 2 sc, inc in the last chain. (10)
- R2: Inc, 2 sc, 3 inc, 2 sc, 2 inc. (16)
- R3: Sc, inc, 2 sc, [sc, inc] × 3, 2 sc, [sc, inc] × 2. (22)
- R4: Working BLO, sc around. (22)
- R5: Working through both loops, sc around. (22)
- R6: 5 sc, dec × 6, 5 sc. (16)
- R7: 4 sc, dec × 4, 4 sc. (12)
- R8–14: Sc around. (12) — 7 rounds.
- R15: [Sc, dec] × 4. (8)
Stuff the foot enough to define its shape. Add less stuffing through the leg and leave the final two rounds empty.
The clustered decreases form the top of the foot. Hold this section facing forward and upward.
Flatten the opening. If necessary, work a few positioning slip stitches to bring the working yarn to a side edge.
Work 4 sc through both layers.
Fasten off with a long sewing tail.
Body
Begin with cream, working from the bottom toward the neck.
- R1: 6 sc in a MR. (6)
- R2: Inc × 6. (12)
- R3: [Sc, inc] × 6. (18)
- R4: [2 sc, inc] × 6. (24)
- R5: [3 sc, inc] × 6. (30)
- R6: [4 sc, inc] × 6. (36)
- R7: [5 sc, inc] × 6. (42)
- R8–10: Sc around. (42) — 3 rounds.
- R11: [5 sc, dec] × 6. (36)
- R12: Sc around. (36)
Change to black during the final pull-through of the last stitch of R12.
- R13: [4 sc, dec] × 6. (30)
- R14: [3 sc, dec] × 6. (24)
- R15: [2 sc, dec] × 6. (18)
- R16: Sc around. (18)
Stuff the body evenly. Add enough filling around the shoulders to support the head while keeping the lower body soft.
Fasten off and secure the yarn end inside. Leave the 18-stitch neck opening open.
Tail
Use black.
- R1: 6 sc in a MR. (6)
- R2: [Sc, inc] × 3. (9)
- R3–4: Sc around. (9) — 2 rounds.
- R5: [Sc, dec] × 3. (6)
Add a little stuffing.
Fasten off with a long sewing tail. Thread it through the front loops of the remaining six stitches and pull closed.
Keep the remaining tail for attaching the finished ball to the body.
How to Crochet the Panda Sweater
Use the 2.5 mm hook, or the size needed for a comfortable fit.
The sweater begins at the neckline and is worked back and forth. The two row ends form its back opening. Sleeves are added around the armholes, and the back seam is sewn after dressing the panda.
Sweater Color Sequence
| Rows | Color |
|---|---|
| 1–2 | Mint |
| 3–4 | Dark green |
| 5–6 | Mint |
| 7–8 | Dark green |
| 9–10 | Mint |
| 11 | Dark green |
Change color during the final pull-through of the preceding row.
Sweater Yoke and Body
With mint, ch 21.
- Row 1: Starting in the second chain from the hook, 20 sc. (20)
- Row 2: Ch 1, turn. 3 sc, 3-sc inc, 2 sc, 3-sc inc, 6 sc, 3-sc inc, 2 sc, 3-sc inc, 3 sc. (28)
Change to dark green.
- Row 3: Ch 1, turn. 4 sc, 3-sc inc, 4 sc, 3-sc inc, 8 sc, 3-sc inc, 4 sc, 3-sc inc, 4 sc. (36)
- Row 4: Ch 1, turn. Sc across. (36)
Change to mint.
- Row 5: Ch 1, turn. 5 sc, 3-sc inc, 6 sc, 3-sc inc, 10 sc, 3-sc inc, 6 sc, 3-sc inc, 5 sc. (44)
- Row 6: Ch 1, turn. 6 sc, 3-sc inc, 8 sc, 3-sc inc, 12 sc, 3-sc inc, 8 sc, 3-sc inc, 6 sc. (52)
Change to dark green.
- Row 7: Ch 1, turn. 8 sc, ch 5, skip 10 stitches, 16 sc, ch 5, skip 10 stitches, 8 sc. (42, including the chains)
- Row 8: Ch 1, turn. 8 sc, 1 sc into each of the next 5 chains, 16 sc, 1 sc into each of the next 5 chains, 8 sc. (42)
Change to mint.
- Rows 9–10: Ch 1, turn. Sc across. (42) — 2 rows.
Change to dark green.
- Row 11: Ch 1, turn. Working BLO, sc across. (42)
Fasten off. Secure the color-change ends neatly on the inside.
Check the Sweater Fit
Before adding the sleeves, pin or sew the forelegs to the body and try the open garment around them.
Below the armholes, the full width from one open back edge to the other should measure approximately 17–18 cm, or about 1–1.5 cm more than your panda’s actual body circumference.
The back edges should meet without stretching the stitches.
If the garment is too tight or too loose, change the hook size and remake it before adding the sleeves. Keep the panda’s fabric firm; adjust the garment to fit the toy.
Sleeves — Make 2
Hold the sweater with its outside facing you.
Each armhole has 10 skipped stitches from Row 6 and the unused underside loops of the 5 underarm chains from Row 7.
Join dark green at an underarm corner.
- Sleeve R1: Ch 1. Work 10 sc across the skipped stitches and 5 sc along the underside of the chain bridge. Sl st into the first sc. (15)
- Sleeve R2: Ch 1, sc around. Sl st into the first sc. (15)
Change to mint.
- Sleeve R3: Ch 1, [3 sc, dec] × 3. Sl st into the first sc. (12)
- Sleeve R4: Ch 1, working BLO, sc around. Sl st into the first sc. (12)
Fasten off and weave in the ends.
Repeat for the second sleeve.
If a small gap remains at an underarm corner, close it with a yarn tail rather than adding stitches to the sleeve rounds.
Putting Your Crochet Pattern Panda Together
Pin the major pieces in place first. Check the panda from the front and both sides before sewing.
1. Attach the Hind Legs
Place the flattened tops of the hind legs on the lower front sides of the body, approximately across body R3–4.
Leave a small gap between them at the center front. Point the feet forward and allow the legs to extend below the body.
Sew each four-stitch top securely in place.
2. Attach the Forelegs
Position the forelegs on the sides of the black shoulder section, approximately across body R13–14.
Keep their tops level and let the paws hang downward.
Sew each three-stitch top firmly to the body.
3. Dress the Panda
Slide the forelegs through the sweater sleeves and wrap the garment around the torso.
Center the front panel on the chest. Bring the back edges together and sew from the hem to the neckline, matching corresponding row ends.
Use matching yarn for each stripe if you want the seam to blend into the garment.
Keep the neckline clear of the body’s open neck stitches.
4. Join the Head and Body
Center the face above the front of the body.
Match the 18 head stitches to the 18 body stitches. Sew through corresponding stitches around the neck.
Before closing the final gap, add a little more stuffing if the neck needs support.
Finish the seam securely and hide the tail inside.
5. Attach the Tail
Sew the tail to the center back of the lower body, approximately around body R2–3, below the sweater hem.
6. Finish the Face
Complete any remaining ear, eye patch, muzzle, or embroidery work.
Check that both eye patches tilt outward evenly and that the muzzle is centered beneath the eyes.
If desired, embroider a tiny cross on any exposed cream belly below the sweater.
7. Shape and Check the Panda
Gently distribute the filling in the limbs and smooth the face with your fingers.
Straighten the sweater stripes, check every attachment seam, and secure all yarn ends. Remove every pin and temporary marker.
Measure from the soles to the ear tips with the legs gently extended. The intended height is approximately 16 cm.
Helpful Tips for a Neater Crochet Panda
- Count after shaping rounds. Checking increases and decreases early prevents problems later.
- Mark the first stitch. Move the marker at the start of each new round.
- Use small amounts of stuffing. Several little pieces are easier to distribute evenly than one large lump.
- Keep the upper limbs soft. Light stuffing helps them hang naturally.
- Pin the patches before sewing. Their angle has a strong effect on the panda’s expression.
- Install safety-eye backings while the head is open. Pause after head R15 for access.
- Keep the muzzle lightly stuffed. Too much filling can make it project farther than intended.
- Check sweater fit before making sleeves. This is the easiest stage to adjust the hook size.
- Match stripes at the back seam. Sew corresponding row ends together.
- Keep the neckline out of the neck seam. Fold it down temporarily while attaching the head.
FAQ About the Crochet Pattern Panda
What skill level is this crochet pattern panda?
The suggested level is confident beginner to intermediate.
You should be comfortable with magic rings, single crochet, increases, decreases, working around a foundation chain, color changes, and sewing small pieces together.
How big is the finished panda?
The target height is approximately 16 cm from the soles to the ear tips, with the legs gently extended.
The seated height will be shorter. Actual size depends on yarn, gauge, stuffing, and assembly.
What yarn does this crochet panda pattern use?
Use fine cotton or cotton-blend yarn measuring approximately 160–180 m per 50 g.
Choose cream and black for the panda, plus mint and dark green for the sweater. Keep the yarn thickness consistent across colors.
What hook sizes do I need?
Start with a 2.25 mm hook for the panda and a 2.5 mm hook for the sweater.
Adjust as needed to achieve firm toy fabric and a comfortable garment fit.
Does this panda have jointed limbs?
The limbs are sewn directly to the body. Their lightly stuffed upper sections allow a soft, flexible pose.
Is the sweater removable?
As written, the sweater is sewn closed at the back after dressing the panda. It is intended to remain on the finished toy.
Where do I place the eyes?
Place the eye centers between head R9 and R10, approximately 7 stitch spaces apart, measured center to center.
Check the position with the eye patches pinned on and the head lightly stuffed.
Can I embroider the eyes?
Yes. Embroider small black oval eyes on the patches, then add white highlights and short white crescents along the outer edges.
How do I attach the head?
The head and body each finish with 18 stitches. Match those stitches and sew around the neck, adding a little stuffing through the final gap if needed.
How many stitches should each sleeve start with?
Each sleeve begins with 15 stitches: 10 across the skipped stitches and 5 along the underside of the underarm chain.
Why is my sweater too tight?
The sweater needs a slightly looser gauge than the panda. Check its width around the actual stuffed body and forelegs.
If the back edges do not meet comfortably, remake the garment with a larger hook.
Your Next Stitch
Start with the cream head, then take time to arrange the eye patches and muzzle before sewing them down. Those small placement choices give your panda its expression.
Once the pieces are joined and the green stripes are straightened, your Mint Meadow Panda is ready to display or give as a handmade gift.