Crochet Christmas Toys Pattern Penguin, Deer and Snowman Amigurumi
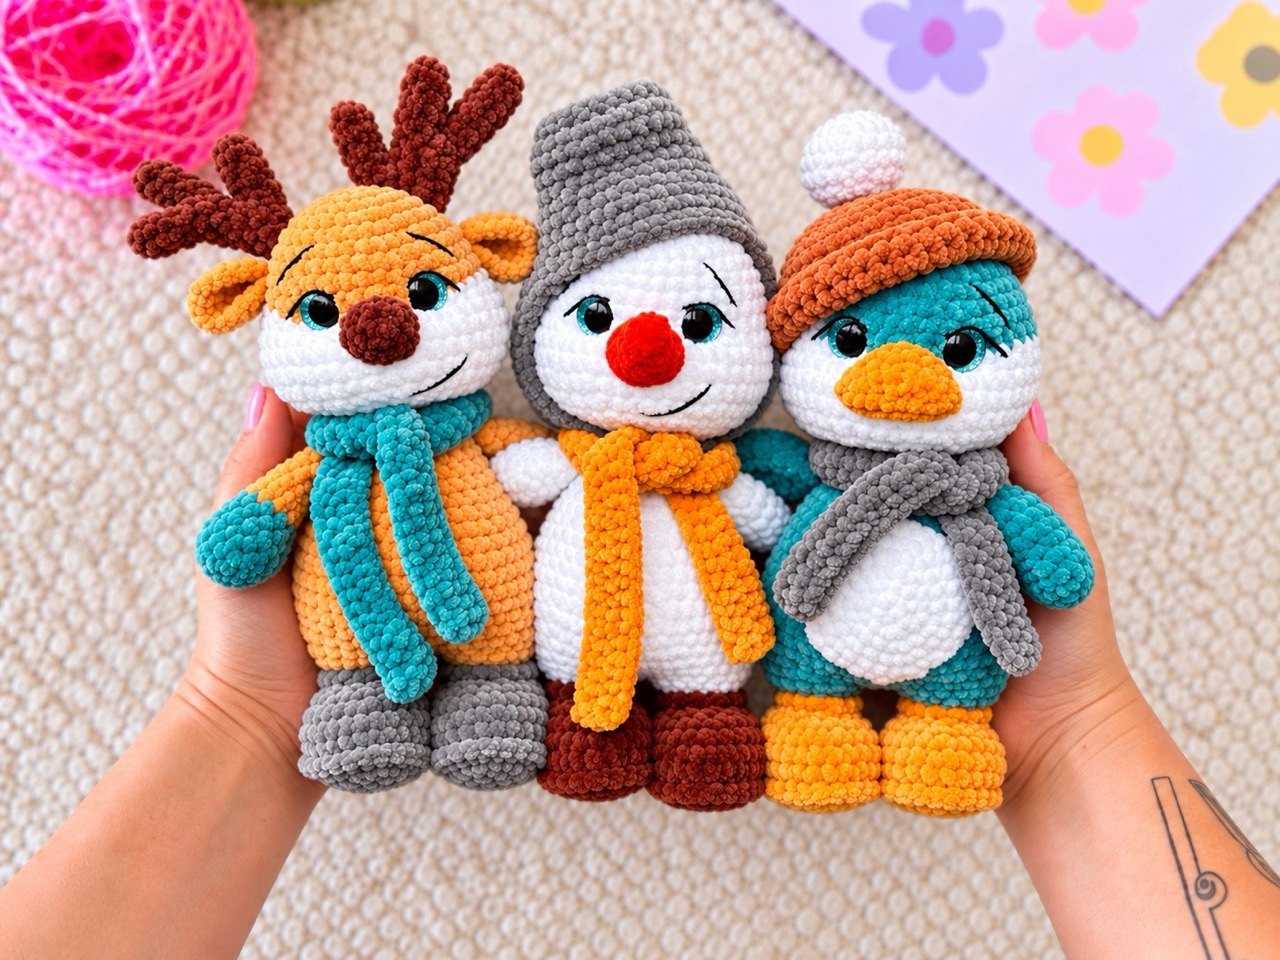
Handmade Christmas decorations often become the pieces you look forward to unpacking each winter. This crochet Christmas toys pattern creates three plush characters with their own little details: a penguin wearing earmuffs, a deer with branching antlers and a snowflake chest patch, and a snowman dressed in a top hat and bow tie.
Each character uses the same continuous head-and-body construction, with small feet sewn to the lower front. The target finished height is about 24–26 cm, including the taller accessories.
Below are the complete instructions for the shared pieces, each character’s details, assembly, and finishing.
Jump to a Section
- Why Make This Christmas Trio?
- What You Need Before You Start
- Abbreviations and Pattern Notes
- Continuous Body and Head
- Shared Feet
- Penguin Details
- Deer Details
- Snowman Details
- Assembly
- Helpful Tips
- FAQ About the Crochet Christmas Toys Pattern
- Your Next Stitch
Why Make This Christmas Trio?
The shared shape makes it easy to work through the collection while giving each character a different finish.
- Penguin: Charcoal body, ivory face and belly, coral beak and feet, teal earmuffs, and a crown tuft.
- Deer: Cinnamon body, cream muzzle and feet, flat dark-brown antlers, and a sage snowflake chest patch.
- Snowman: White body and arms, orange carrot nose, charcoal top hat, teal bow tie, and embroidered buttons.
- Construction: Each head and body is crocheted in one piece from the bottom upward.
- Faces: All facial features are embroidered or crocheted.
- Target height: Approximately 24–26 cm, depending on yarn, tension, stuffing, and accessory placement.
What You Need Before You Start
Use plush chenille yarn of similar thickness for every piece.
Yarn Colors
- Penguin: Charcoal, ivory, coral, and teal.
- Deer: Cinnamon, cream, sage green, and dark brown.
- Snowman: White, charcoal, orange, and teal.
Tools and Other Supplies
- 3.5–4 mm crochet hook, or a size that produces firm fabric with your yarn.
- Black cotton yarn for facial embroidery.
- Fine cream yarn for the deer’s snowflake.
- Fiberfill stuffing.
- Stitch marker.
- Tapestry needle.
- Pins and scissors.
Finished Size
The intended height is about 24–26 cm, including the taller details.
For the intended proportions, aim for a stuffed head-and-body piece roughly 22–24 cm high before adding the taller accessories.
Abbreviations and Pattern Notes
This pattern uses US crochet terminology.
- MR — magic ring.
- ch — chain.
- sc — single crochet.
- inc — 2 sc in one stitch.
- dec — single crochet 2 stitches together.
- sl st — slip stitch.
- BLO — back loop only.
- FLO — front loop only.
- (…) × N — repeat the instructions N times.
- [N] — stitch count at the end of the round or row.
General Notes
- Work in continuous spiral rounds unless instructed otherwise.
- Move the stitch marker after every round.
- Turning chains do not count as stitches.
- Change colors during the final pull-through of the preceding stitch.
- Leave long tails on pieces that will be sewn on.
- Stuff gradually, keeping the neck firm enough to support the head.
Continuous Body and Head
Make one for each character:
- Penguin: Charcoal.
- Deer: Cinnamon.
- Snowman: White.
Begin at the bottom of the body.
Lower Body
- Rnd 1: 6 sc in MR [6].
- Rnd 2: 6 inc [12].
- Rnd 3: (Sc, inc) × 6 [18].
- Rnd 4: (2 sc, inc) × 6 [24].
- Rnd 5: (3 sc, inc) × 6 [30].
- Rnd 6: (4 sc, inc) × 6 [36].
- Rnd 7: (5 sc, inc) × 6 [42].
- Rnd 8: (6 sc, inc) × 6 [48].
- Rnd 9: (7 sc, inc) × 6 [54].
- Rnds 10–20: 54 sc [54 per round].
- Rnd 21: (7 sc, dec) × 6 [48].
- Rnd 22: 48 sc [48].
- Rnd 23: (6 sc, dec) × 6 [42].
- Rnd 24: (5 sc, dec) × 6 [36].
- Rnd 25: (4 sc, dec) × 6 [30].
- Rnd 26: (3 sc, dec) × 6 [24].
- Rnd 27: 24 sc [24].
Stuff the lower body. Shape its base into a broad, slightly flattened surface so the toy can sit.
Do not fasten off.
Head
Continue with the same yarn.
- Rnd 28: (3 sc, inc) × 6 [30].
- Rnd 29: (4 sc, inc) × 6 [36].
- Rnd 30: (5 sc, inc) × 6 [42].
- Rnds 31–38: 42 sc [42 per round].
- Rnd 39: (5 sc, dec) × 6 [36].
- Rnd 40: 36 sc [36].
- Rnd 41: (4 sc, dec) × 6 [30].
- Rnd 42: (3 sc, dec) × 6 [24].
Stuff the neck and head. Add small amounts around the neck so it supports the head without stretching the stitches.
- Rnd 43: (2 sc, dec) × 6 [18].
- Rnd 44: (Sc, dec) × 6 [12].
- Rnd 45: 6 dec [6].
Fasten off. Thread the tail through the front loops of the remaining stitches and pull closed. Secure the yarn and hide the end.
Mark the front of the toy with a pin.
Shared Feet
Make two per character.
- Penguin: Coral.
- Deer: Cream.
- Snowman: White.
- Rnd 1: 6 sc in MR [6].
- Rnd 2: 6 inc [12].
- Rnd 3: (Sc, inc) × 6 [18].
- Rnd 4: BLO 18 sc [18].
- Rnd 5: 18 sc [18].
- Rnd 6: (Sc, dec) × 6 [12].
- Rnd 7: 12 sc [12].
Stuff lightly. Flatten the opening and crochet 6 sc through both layers. Leave a long sewing tail.
Pin the closed edges to the lower front of the body around rounds 3–7, with the rounded toes pointing forward. Check that the body’s base still rests on the table, then sew securely.
Penguin Details
Ivory Face Panel
Work in turning rows.
- Row 1: Ch 7. Starting in the second ch from the hook, 6 sc [6]. Ch 1, turn.
- Row 2: Inc, 4 sc, inc [8]. Ch 1, turn.
- Row 3: Inc, 6 sc, inc [10]. Ch 1, turn.
- Row 4: Inc, 8 sc, inc [12]. Ch 1, turn.
- Rows 5–7: 12 sc [12 per row]. Ch 1 and turn after each row.
- Row 8: Dec, 8 sc, dec [10]. Ch 1, turn.
- Row 9: Dec, 6 sc, dec [8]. Ch 1, turn.
- Row 10: Dec, 4 sc, dec [6].
Fasten off with a long tail.
Pin the panel to the head front across approximately rounds 31–39. Sew its perimeter flat against the head.
Embroider two small sleeping-eye curves across the wider middle of the panel.
Coral Beak
Begin at the tip.
- Rnd 1: 4 sc in MR [4].
- Rnd 2: 4 sc [4].
- Rnd 3: (Sc, inc) × 2 [6].
- Rnd 4: 6 sc [6].
Fasten off with a sewing tail. Add a tiny amount of filling and sew the open base beneath the eyes, with the tip pointing forward.
Ivory Belly Patch
- Rnd 1: 6 sc in MR [6].
- Rnd 2: 6 inc [12].
- Rnd 3: (Sc, inc) × 6 [18].
- Rnd 4: (2 sc, inc) × 6 [24].
- Rnd 5: (3 sc, inc) × 6 [30].
Fasten off with a long tail. Do not stuff.
Sew the patch flat to the body front, centered across approximately rounds 9–18.
Charcoal Flippers — Make 2
Begin at the rounded tip.
- Rnd 1: 4 sc in MR [4].
- Rnd 2: 4 inc [8].
- Rnd 3: (Sc, inc) × 4 [12].
- Rnds 4–6: 12 sc [12 per round].
- Rnd 7: (4 sc, dec) × 2 [10].
- Rnds 8–10: 10 sc [10 per round].
Do not stuff. Flatten the opening and crochet 5 sc through both layers. Leave a long tail.
Sew the narrow ends to the body sides around rounds 22–25, with the flippers pointing down.
Teal Earmuffs
Ear Cups — Make 2
- Rnd 1: 6 sc in MR [6].
- Rnd 2: 6 inc [12].
- Rnd 3: (Sc, inc) × 6 [18].
- Rnd 4: 18 sc [18].
- Rnd 5: (Sc, dec) × 6 [12].
Fasten off with a sewing tail.
Add a little filling and sew each open edge to a side of the head around rounds 33–38.
Earmuff Band
Ch 25. Starting in the second ch from the hook, work 24 sl st.
Fasten off with long tails. Pin the band over the crown between the ear cups. Sew both ends beneath the cups and tack the band to the head in several places.
Crown Tuft
Attach charcoal yarn at the crown.
- Ch 6.
- Starting in the second ch from the hook, work 5 sl st back along the chain.
- Sl st into an adjacent surface stitch on the crown.
Repeat twice more to make three short strands. Fasten off and secure the ends.
Penguin Tail
Work in charcoal.
- Rnd 1: 6 sc in MR [6].
- Rnd 2: (Sc, inc) × 3 [9].
- Rnd 3: (2 sc, inc) × 3 [12].
- Rnd 4: 12 sc [12].
Do not stuff. Flatten and close with 6 sc through both layers.
Sew to the center back around body rounds 5–7.
Deer Details
Cream Muzzle
Work around both sides of a foundation chain.
- Rnd 1: Ch 5. Starting in the second ch from the hook, 3 sc, then 3 sc in the last ch. Continue along the other side: 2 sc, then inc in the first ch [10].
- Rnd 2: Inc, 2 sc, 3 inc, 2 sc, 2 inc [16].
- Rnd 3: 16 sc [16].
Fasten off with a long tail.
Embroider a small dark-brown triangle near the upper center for the nose. Add a short vertical line and curved mouth beneath it.
Sew the muzzle to the head front around rounds 35–39, adding a pinch of stuffing underneath.
Embroider the eyes just above the muzzle, around rounds 34–35.
Leaf-Shaped Ears — Make 2
Work in cinnamon.
- Rnd 1: Ch 6. Starting in the second ch from the hook, 4 sc, then 3 sc in the last ch. Continue along the other side: 3 sc, then inc in the first ch [12].
- Rnd 2: Inc, 3 sc, 3 inc, 3 sc, 2 inc [18].
Fasten off with a long tail.
Pinch one narrow end and secure the fold with several stitches. Sew the pinched ends to the head sides around rounds 37–40.
Flat Branched Antlers
Make four strips in dark brown, then sew them into two pairs. Each strip has a main stem and two branches.
- Ch 9 for the main stem.
- Starting in the second ch from the hook, work 2 sl st along the stem.
- First branch: Ch 4. Starting in the second ch from the hook, work 3 sl st back along this branch. Sl st into the stem stitch at the branch base.
- Work 3 sl st into the next three unused chains of the main stem.
- Second branch: Ch 3. Starting in the second ch from the hook, work 2 sl st back along this branch. Sl st into the stem stitch at the branch base.
- Work 3 sl st into the remaining three chains of the main stem.
Fasten off with a long tail. Each strip has eight slip stitches along the original stem, with two branches extending from it.
Place two matching strips together and sew them along their stems and branches. Repeat for the second antler. Do not stuff.
Sew the lower stem ends to the crown around head rounds 40–42. Angle the branches outward and mirror the two antlers.
Sage Snowflake Chest Patch
- Rnd 1: 6 sc in MR [6].
- Rnd 2: 6 inc [12].
- Rnd 3: (Sc, inc) × 6 [18].
Fasten off with a long tail.
Using fine cream yarn, embroider three crossing lines through the center to form a six-point snowflake. Add short angled stitches near the tips.
Sew the patch flat to the body front around rounds 17–22.
Deer Arms — Make 2
Begin with cream.
- Rnd 1: 6 sc in MR [6].
- Rnd 2: 6 inc [12].
- Rnd 3: 12 sc [12].
- Rnd 4: Change to cinnamon; 12 sc [12].
- Rnd 5: (4 sc, dec) × 2 [10].
- Rnds 6–10: 10 sc [10 per round].
- Rnd 11: (3 sc, dec) × 2 [8].
Stuff the cream tips lightly. Flatten the opening and crochet 4 sc through both layers.
Sew the arms to the body sides around rounds 22–25.
Deer Tail
Work in cream.
- Rnd 1: 4 sc in MR [4].
- Rnd 2: (Sc, inc) × 2 [6].
- Rnd 3: (2 sc, inc) × 2 [8].
- Rnd 4: 8 sc [8].
Do not stuff. Flatten and close with 4 sc through both layers.
Sew to the center back around body rounds 6–8.
Snowman Details
Orange Carrot Nose
Begin at the tip.
- Rnd 1: 4 sc in MR [4].
- Rnd 2: 4 sc [4].
- Rnd 3: (Sc, inc) × 2 [6].
- Rnd 4: 6 sc [6].
- Rnd 5: (2 sc, inc) × 2 [8].
Fasten off with a long sewing tail.
Stuff lightly and sew the open base to the head front around rounds 36–38, with the point projecting forward.
Embroider two eyes around rounds 34–35 and a dotted smile beneath the carrot.
White Arms — Make 2
- Rnd 1: 6 sc in MR [6].
- Rnd 2: 6 inc [12].
- Rnds 3–4: 12 sc [12 per round].
- Rnd 5: (4 sc, dec) × 2 [10].
- Rnds 6–10: 10 sc [10 per round].
- Rnd 11: (3 sc, dec) × 2 [8].
Stuff the ends lightly. Flatten and close with 4 sc through both layers.
Sew the arms to the body sides around rounds 22–25.
Charcoal Top Hat
Begin at the closed crown.
- Rnd 1: 6 sc in MR [6].
- Rnd 2: 6 inc [12].
- Rnd 3: (Sc, inc) × 6 [18].
- Rnd 4: (2 sc, inc) × 6 [24].
- Rnd 5: (3 sc, inc) × 6 [30].
- Rnd 6: BLO 30 sc [30].
- Rnds 7–9: 30 sc [30 per round].
- Rnd 10: FLO (4 sc, inc) × 6 [36].
- Rnd 11: (5 sc, inc) × 6 [42].
Sl st into the next stitch and fasten off with a long sewing tail.
The final two rounds form the brim. Pin the hat at a slight angle on the crown and sew it in place.
Teal Hatband
Ch 31. Starting in the second ch from the hook, work 30 sl st.
Fasten off. Wrap the band around the lower hat crown above the brim. Join its ends and sew it down.
Teal Bow Tie
Work in turning rows.
- Row 1: Ch 7. Starting in the second ch from the hook, 6 sc [6]. Ch 1, turn.
- Row 2: 6 sc [6]. Ch 1, turn.
- Row 3: 6 sc [6].
Fasten off with a long tail. Pinch the rectangle at its center and wrap the yarn around it several times. Secure the wraps on the back.
Sew the bow tie to the body front around rounds 24–26.
Embroidered Buttons
With black cotton yarn, embroider three small circles down the snowman’s front, centered around body rounds 11, 16, and 21.
Fill each circle with several short satin stitches.
Assembly
- Attach the feet. Sew them to the lower front of each body with the toes pointing forward. Keep the broad body base resting on the table.
- Finish the faces. Sew on the penguin’s face panel and beak, the deer’s muzzle, or the snowman’s carrot. Add the embroidered eyes and mouths.
- Attach the arms or flippers to the upper body sides.
- Finish the penguin. Sew on the belly patch, earmuffs, crown tuft, and tail.
- Finish the deer. Attach the ears, antlers, chest patch, and tail.
- Finish the snowman. Add the top hat, hatband, bow tie, and embroidered buttons.
- Secure every end. Hide the tails inside the toys and check the attachments with a gentle pull.
Helpful Tips
- Make paired pieces together. Working both feet, arms, or flippers in one session helps keep their sizes consistent.
- Mark the front before sewing. Center the face, chest decorations, and feet around the same line.
- Stuff the base evenly. A broad base helps the toys sit without leaning.
- Support the neck with filling. Add small amounts around the narrow section before closing the head.
- Pin accessories first. Check the antlers, earmuffs, and hat from the front and both sides.
- Keep patches flat. Sew around their edges without pulling hard enough to pucker the plush fabric.
- Check the hatband fit. Slip stitches can be tighter than single crochet; adjust its chain length before sewing if needed.
FAQ About the Crochet Christmas Toys Pattern
How tall are the finished toys?
The target height is about 24–26 cm, including the crown tuft, antlers, or hat. The exact size depends on your materials and tension.
Do all three characters use the same construction?
Yes. Each uses the same continuous body-and-head pattern and a pair of small feet. The colors, face pieces, arms, and accessories create the different characters.
Do I need to sew the head to the body?
No. The body narrows at the neck, then increases again to form the head in the same continuous piece.
Are safety eyes required?
No. All three faces use embroidery, so plastic eyes are unnecessary.
Does this crochet Christmas toys pattern include scarves?
This version uses earmuffs for the penguin, a chest decoration for the deer, and a bow tie for the snowman.
How are the deer’s antlers made?
Each antler uses two matching flat branched strips sewn together. The paired layers give the antler more body without stuffing.
What skill level is this pattern?
It suits a confident beginner to intermediate crocheter who knows basic amigurumi shaping, crocheting around a chain, embroidery, and sewing small pieces.
Can I change the colors?
Yes. Keep the yarns similar in thickness so the shared pieces and accessories stay in proportion.
Your Next Stitch
Start with one shared body and head, then choose the character you want to finish first. Pin the feet and face pieces before sewing, and take a moment to check its expression from different angles.
Once the first toy is complete, the shared construction will be familiar as you work through the rest of your Christmas trio.
Happy crocheting!