Crochet Mushroom Pattern 3 Mini Sweethearts Amigurumi
There’s something irresistibly cozy about a tiny mushroom with a smiling face. Maybe it’s the rounded body, the oversized cap, or the way it looks as though it has wandered out of a storybook.
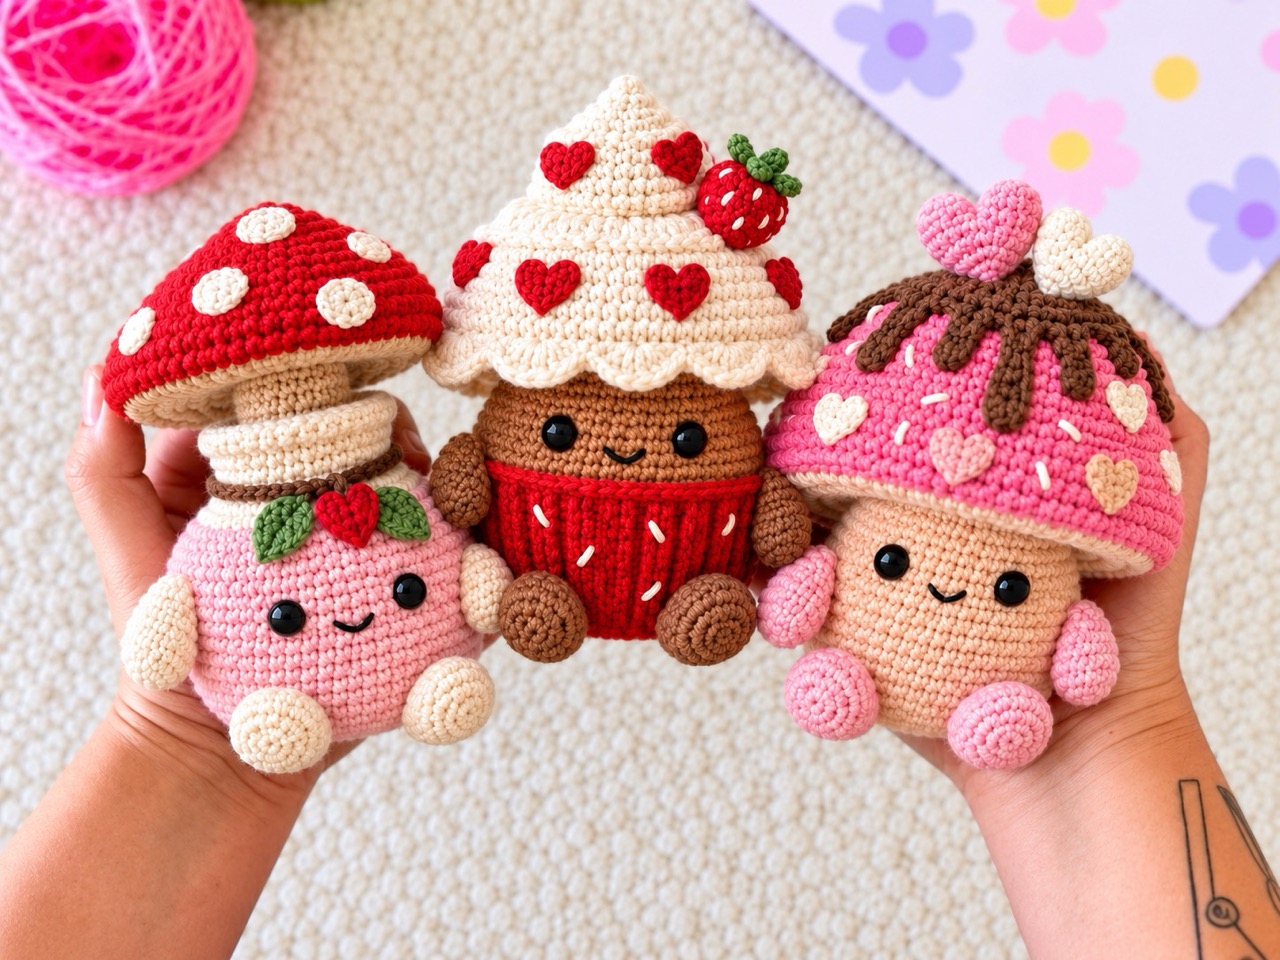
This crochet mushroom sweethearts pattern includes three characters: a Mushroom Potion with a bottle-shaped body and mushroom stopper, a Mushroom Cupcake with a tiered cream cap and strawberry, and a Love Mushroom with chocolate drips and heart decorations.
Each character is designed to finish approximately 12 cm / 4.7 inches tall, including the feet and attached decorations. The set uses sport-weight yarn, single crochet shaping, small decorative stitches, and sewn assembly.
Below you’ll find the materials, abbreviations, complete instructions, assembly directions, and practical tips for making all three mushrooms.
Jump to a Section
- Why This Crochet Mushroom Sweethearts Pattern Stands Out
- What You Need Before You Start
- Abbreviations and Working Notes
- How to Make the Arms and Legs
- How to Make the Mini Flat Hearts
- How to Crochet the Mushroom Potion
- How to Crochet the Mushroom Cupcake
- How to Crochet the Love Mushroom
- Putting Your Crochet Mushroom Sweethearts Together
- Tips for a Neater Crochet Mushroom Sweethearts Pattern
- FAQ About the Crochet Mushroom Sweethearts Pattern
- Your Next Stitch
Why This Crochet Mushroom Sweethearts Pattern Stands Out
The three mushrooms share small arms and feet, while their bodies, caps, and accessories give each one its own personality.
- Finished size: Approximately 12 cm / 4.7 inches tall, depending on tension, stuffing, and assembly.
- Skill level: Intermediate.
- Yarn: Sport-weight cotton or cotton-blend yarn.
- Hook: A 2 mm hook, adjusted if necessary to achieve the suggested gauge.
- Eyes: 8 mm safety eyes or embroidered eyes.
- Three characters: Mushroom Potion, Mushroom Cupcake, and Love Mushroom.
- Decorative details: Flat hearts, mushroom spots, a strawberry, leaves, chocolate drips, and small stuffed hearts.
- Construction: Separate crocheted components joined with sewing.
What You Need Before You Start
Yarn and Colors
Use sport-weight cotton or a cotton-blend yarn of similar thickness throughout the set.
You will need:
- Powder pink.
- Light cream.
- Beige.
- Red.
- Medium brown.
- Nude.
- Bright pink.
- Green.
- Fine black or dark brown embroidery thread.
The main color combinations are:
| Character | Body | Arms and feet | Cap and accessories |
|---|---|---|---|
| Mushroom Potion | Powder pink with a cream neck | Light cream | Red cap, beige stalk and underside, green leaves, brown cord |
| Mushroom Cupcake | Brown | Brown | Cream cap, red wrapper and strawberry, green strawberry crown |
| Love Mushroom | Nude | Powder pink | Bright pink cap, brown chocolate, cream, nude, and powder pink hearts |
Tools and Notions
- 2 mm crochet hook, or the size needed for firm fabric.
- Three pairs of 8 mm safety eyes, if using.
- Polyester stuffing.
- Tapestry needle.
- Stitch marker.
- Pins.
- Scissors.
- Fine embroidery needle if needed.
Use embroidered eyes for toys intended for babies or toddlers.
Gauge and Finished Size
Aim for approximately:
28 sc and 32 rounds per 10 cm, measured without stretching.
Over 5 cm, this is approximately 14 stitches and 16 rounds.
At this tension, a stuffed 48-stitch body should measure roughly 5–5.5 cm across.
Measure the finished character from the lowest part of its feet to its highest attached decoration. A tighter gauge produces a smaller character; a looser gauge produces a larger one.
Abbreviations and Working Notes
This pattern uses US crochet terminology.
- MR: Magic ring.
- ch: Chain.
- sc: Single crochet.
- hdc: Half double crochet.
- dc: Double crochet.
- sl st: Slip stitch.
- inc: Work 2 sc in the next stitch.
- dec: Invisible single crochet decrease over the next 2 stitches.
- BLO: Back loops only.
- FLO: Front loops only.
- FO: Fasten off.
- Rnd: Round.
- (…) × number: Repeat the instructions the stated number of times.
- [number]: Stitch count after completing the round.
Work in continuous rounds unless instructed otherwise. Mark the first stitch of each round and move the marker as you work.
Work through both loops unless a round specifies otherwise. Turning chains and joining slip stitches do not count as stitches.
For ordinary decreases, use an invisible decrease. When a round specifies BLO, work sc2tog through the back loops of the next two stitches.
When an edging is worked into the front loops of a round, the unused back loops belong to that same underlying round. For example, working cap Round 17 into the front loops of Round 16 leaves the back loops of Round 16 available for the underside.
If you choose embroidered eyes, place them at the same positions given for the safety eyes.
How to Make the Arms and Legs
Make two arms and two feet for each character.
Use:
- Light cream for the Mushroom Potion.
- Brown for the Mushroom Cupcake.
- Powder pink for the Love Mushroom.
Shared Arms
- Rnd 1: 5 sc in MR. [5]
- Rnd 2: 5 inc. [10]
- Rnd 3: 10 sc. [10]
- Rnd 4: (3 sc, dec) × 2. [8]
- Rnds 5–7: 8 sc in each round. [8]
Lightly stuff the rounded hand. Leave the upper arm unstuffed.
Flatten the opening and work 4 sc through both layers to close.
FO, leaving a sewing tail.
Shared Feet and Short Legs
Begin with ch 4. Work around both sides of the foundation chain.
- Rnd 1: Starting in the second chain from the hook, sc in the next 2 chains, 3 sc in the last chain. Continue along the opposite side: sc in the next chain, 2 sc in the final chain. [8]
- Rnd 2: Inc, sc, 3 inc, sc, 2 inc. [14]
- Rnd 3: BLO: 14 sc. [14]
- Rnd 4: 14 sc. [14]
- Rnd 5: 3 sc, 4 dec, 3 sc. [10]
- Rnd 6: 10 sc. [10]
- Rnd 7: (3 sc, dec) × 2. [8]
- Rnd 8: 8 sc. [8]
Stuff the toe lightly. Leave the ankle unstuffed.
Position the four decreases from Round 5 over the front of the foot. Flatten the ankle from side to side. If necessary, work one or two additional sc to reach a side edge.
Work 4 sc through both layers to close.
FO, leaving a sewing tail.
How to Make the Mini Flat Hearts
Use this small heart for the Potion cord and the Cupcake and Love Mushroom caps.
Make:
- One red heart for the Mushroom Potion.
- Six red hearts for the Mushroom Cupcake.
- Two cream, two nude, and two powder pink hearts for the Love Mushroom.
For each heart, make an MR and work everything below into the ring:
- Ch 2.
- 2 hdc.
- Sc.
- Ch 1, dc, ch 1.
- Sc.
- 2 hdc.
- Ch 2, sl st into the ring.
There are 7 worked stitches, excluding the chains and final slip stitch.
Tighten the ring. Shape the two upper lobes with your fingers, with the central dc forming the lower point.
FO, leaving a sewing tail.
Sew each heart flat, catching the lobes and point so the edges do not curl.
How to Crochet the Mushroom Potion
The Mushroom Potion has a pink bottle body, cream neck and limbs, a red mushroom stopper, and a leafy heart cord.
Bottle Body
Begin with light cream.
Ch 18 and join with a sl st to form a ring. Check that the chain is not twisted.
For Round 1, work into the back bumps of the foundation chain. This leaves the two loops of each chain available for the collar.
- Rnd 1: 18 sc around the foundation chain. [18]
- Rnd 2: 18 sc. [18]
- Rnd 3: 18 sc. [18]
- Rnd 4: 18 sc. [18]
Change to powder pink.
- Rnd 5: (2 sc, inc) × 6. [24]
- Rnd 6: (3 sc, inc) × 6. [30]
- Rnd 7: (4 sc, inc) × 6. [36]
- Rnd 8: (5 sc, inc) × 6. [42]
- Rnd 9: (6 sc, inc) × 6. [48]
- Rnds 10–15: 48 sc in each round. [48]
Choose the front, preferably opposite the beginning of the rounds.
Insert the eyes between Rounds 12 and 13, leaving 7 complete stitches between the posts. Secure the washers while the body is open.
- Rnd 16: 48 sc. [48]
- Rnd 17: 48 sc. [48]
- Rnd 18: (6 sc, dec) × 6. [42]
- Rnd 19: (5 sc, dec) × 6. [36]
- Rnd 20: (4 sc, dec) × 6. [30]
- Rnd 21: (3 sc, dec) × 6. [24]
Stuff the rounded bottle evenly.
Keep approximately the uppermost 1 cm of the neck free of stuffing so the mushroom stalk can fit inside.
- Rnd 22: (2 sc, dec) × 6. [18]
- Rnd 23: (sc, dec) × 6. [12]
- Rnd 24: 6 dec. [6]
FO.
Pass the tail through the front loops of the remaining 6 stitches, pull closed, and hide the end.
Rolled Bottle Collar
Hold the bottle with its neck opening upward.
Attach light cream to the unused loops of the foundation chain.
- Collar Rnd 1: (2 sc, inc) × 6. [24]
- Collar Rnd 2: 24 sc. [24]
- Collar Rnd 3: 24 sc. [24]
Sl st in the next stitch and FO.
Fold the collar outward and downward over the cream neck. Secure its lower edge with a few small stitches, leaving the neck opening accessible.
Mushroom Stalk and Underside
Use beige. Begin at the closed lower end of the stalk.
- Rnd 1: 6 sc in MR. [6]
- Rnd 2: 6 inc. [12]
- Rnd 3: 12 sc. [12]
- Rnd 4: 12 sc. [12]
- Rnd 5: 12 sc. [12]
- Rnd 6: FLO: 12 inc. [24]
- Rnd 7: (3 sc, inc) × 6. [30]
- Rnd 8: (4 sc, inc) × 6. [36]
- Rnd 9: (5 sc, inc) × 6. [42]
- Rnd 10: (6 sc, inc) × 6. [48]
- Rnd 11: (7 sc, inc) × 6. [54]
Sl st in the next stitch and FO.
The narrow stalk projects downward from the center of the wider mushroom underside.
Red Mushroom Cap
Use red.
- Rnd 1: 5 sc in MR. [5]
- Rnd 2: 5 inc. [10]
- Rnd 3: (sc, inc) × 5. [15]
- Rnd 4: 15 sc. [15]
- Rnd 5: (2 sc, inc) × 5. [20]
- Rnd 6: 20 sc. [20]
- Rnd 7: (3 sc, inc) × 5. [25]
- Rnd 8: (4 sc, inc) × 5. [30]
- Rnd 9: (4 sc, inc) × 6. [36]
- Rnd 10: (5 sc, inc) × 6. [42]
- Rnd 11: (6 sc, inc) × 6. [48]
- Rnd 12: (7 sc, inc) × 6. [54]
- Rnd 13: 54 sc. [54]
- Rnd 14: 54 sc. [54]
Do not cut the yarn.
Cream Cap Spots
Make five spots in light cream.
For each spot:
- Work 5 sc in MR. [5]
- Sl st in the first sc and FO, leaving a sewing tail.
Sew the spots around the red cap, keeping the lowest two rounds clear.
Join the Cap and Underside
Place the red cap and beige underside with their wrong sides facing each other.
The stalk should point away from the inside of the cap.
Match the two 54-stitch edges.
- Rnd 15: Using the red working yarn, work 54 sc through the corresponding stitches of both pieces. [54]
Before completing the final 10 stitches, add a thin layer of stuffing between the pieces.
Keep the underside fairly flat and preserve the gently pointed crown.
Complete the round, sl st in the next stitch, and FO.
Potion Leaves
Make two in green.
Ch 5.
Starting in the second chain from the hook:
- Sl st.
- Sc.
- Hdc.
- 3 hdc in the last chain.
Continue along the opposite side:
- Hdc.
- Sc.
- Sl st.
FO, leaving a sewing tail.
Decorative Cord and Heart
With brown, ch 42 and FO.
Make one red mini flat heart using the shared heart instructions.
Wrap the cord once around the bottle neck. Adjust its length if needed so it sits comfortably without tightening the neck.
Sew one leaf near each end of the cord. Sew the heart beside one leaf.
During assembly, tack the cord to the neck in three places and secure its short ends against the bottle.
How to Crochet the Mushroom Cupcake
The Mushroom Cupcake has a brown body and limbs, a red ribbed wrapper, a tiered cream mushroom cap, red hearts, and a strawberry.
Closed Body
Make this body in brown for the Mushroom Cupcake.
The Love Mushroom uses the same body instructions in nude.
Begin at the crown.
- Rnd 1: 8 sc in MR. [8]
- Rnd 2: 8 inc. [16]
- Rnd 3: (sc, inc) × 8. [24]
- Rnd 4: (2 sc, inc) × 8. [32]
- Rnd 5: (3 sc, inc) × 8. [40]
- Rnd 6: (4 sc, inc) × 8. [48]
- Rnds 7–12: 48 sc in each round. [48]
- Rnd 13: (10 sc, dec) × 4. [44]
- Rnds 14–17: 44 sc in each round. [44]
Insert the eyes between Rounds 11 and 12, leaving 7 complete stitches between the posts. Center them on the chosen front.
- Rnds 18–21: 44 sc in each round. [44]
- Rnd 22: (9 sc, dec) × 4. [40]
- Rnd 23: BLO: (3 sc, dec) × 8. [32]
The unused front loops of Round 22 form an attachment line for the cupcake wrapper.
- Rnd 24: (2 sc, dec) × 8. [24]
Stuff the body evenly, keeping the base slightly flattened.
- Rnd 25: (sc, dec) × 8. [16]
- Rnd 26: 8 dec. [8]
- Rnd 27: 4 dec. [4]
FO.
Gather the remaining front loops closed and hide the tail.
Tiered Cream Mushroom Cap
Use light cream.
- Rnd 1: 4 sc in MR. [4]
- Rnd 2: 4 inc. [8]
- Rnd 3: (sc, inc) × 4. [12]
- Rnd 4: BLO: 12 sc. [12]
- Rnd 5: (2 sc, inc) × 4. [16]
- Rnd 6: 16 sc. [16]
- Rnd 7: FLO: 16 inc. [32]
- Rnd 8: 32 sc. [32]
- Rnd 9: (7 sc, inc) × 4. [36]
- Rnd 10: (8 sc, inc) × 4. [40]
- Rnd 11: BLO: 40 sc. [40]
- Rnd 12: (4 sc, inc) × 8. [48]
- Rnd 13: (5 sc, inc) × 8. [56]
- Rnd 14: 56 sc. [56]
- Rnd 15: 56 sc. [56]
- Rnd 16: 56 sc. [56]
For the scalloped edge, work only into the front loops of Round 16.
- Rnd 17: Repeat the following 8 times: sl st in the next stitch, sc in the next stitch, hdc in the next stitch, 3 dc in the next stitch, hdc in the next stitch, sc in the next stitch, sl st in the next stitch. [8 scallops]
Each repeat uses 7 stitches of Round 16.
Join to the first edging stitch and FO.
Cream Cap Underside
Turn the cap so the inside faces you.
Attach cream to an unused back loop of Round 16, directly behind the scalloped edge.
- Underside Rnd 1: 56 sc in the unused back loops around. [56]
- Underside Rnd 2: (5 sc, dec) × 8. [48]
- Underside Rnd 3: (4 sc, dec) × 8. [40]
FO, leaving a long sewing tail.
Lightly stuff the pointed upper section. Leave the broad lower section mostly unstuffed so the body crown can sit inside it.
Red Ribbed Wrapper
Use red. Work in turning rows.
Ch 8.
- Row 1: Starting in the second chain from the hook, 7 sc. [7]
- Row 2: Ch 1, turn, BLO: 7 sc. [7]
- Rows 3–48: Repeat Row 2. [7 per row]
Before fastening off, wrap the strip around the body near Round 15.
It should fit with only gentle stretching. Add or remove rows in pairs if needed.
FO, leaving a sewing tail.
Join the final row to the foundation edge with a neat seam, creating a short tube. Position the seam at the back.
For the upper rim, attach red to one long edge:
- Work 1 sc into each row end around.
- With 48 rows, this gives 48 sc.
- Join with a sl st and FO.
If you adjusted the number of rows, work the same number of stitches around the rim as the number of rows in your strip.
Embroider a few tiny cream sprinkle stitches across the wrapper.
Strawberry
Use red. Begin at the pointed end.
- Rnd 1: 4 sc in MR. [4]
- Rnd 2: (sc, inc) × 2. [6]
- Rnd 3: (sc, inc) × 3. [9]
- Rnd 4: (2 sc, inc) × 3. [12]
- Rnd 5: 12 sc. [12]
- Rnd 6: 12 sc. [12]
- Rnd 7: 6 dec. [6]
Add a small amount of stuffing.
- Rnd 8: 3 dec. [3]
FO and gather the opening closed.
Embroider small cream seed stitches over the strawberry.
Strawberry Leaf Crown
Use green.
- Rnd 1: 5 sc in MR. [5]
- Rnd 2: Repeat the following 5 times: sl st in the next base stitch, ch 3, sl st in the second chain from the hook, sc in the next chain.
After the fifth point, sl st to the first edging slip stitch.
FO, leaving a sewing tail.
Sew the crown over the strawberry’s closed, wider end.
Cupcake Hearts
Make six red mini flat hearts using the shared heart instructions.
Set them aside for assembly.
How to Crochet the Love Mushroom
The Love Mushroom has a nude body, powder pink limbs, a bright pink mushroom cap, chocolate drips, flat hearts, and two small stuffed hearts on top.
Body and Limbs
Make:
- One nude body, following all 27 rounds of the closed body in the Mushroom Cupcake section.
- Two powder pink arms, following the shared arm instructions.
- Two powder pink feet, following the shared foot instructions.
Place the eyes between body Rounds 11 and 12, leaving 7 complete stitches between the posts.
Pink Mushroom Cap
Use bright pink.
- Rnd 1: 8 sc in MR. [8]
- Rnd 2: 8 inc. [16]
- Rnd 3: (sc, inc) × 8. [24]
- Rnd 4: 24 sc. [24]
- Rnd 5: (2 sc, inc) × 8. [32]
- Rnd 6: 32 sc. [32]
- Rnd 7: (3 sc, inc) × 8. [40]
- Rnd 8: 40 sc. [40]
- Rnd 9: (4 sc, inc) × 8. [48]
- Rnd 10: 48 sc. [48]
- Rnd 11: (5 sc, inc) × 8. [56]
- Rnd 12: 56 sc. [56]
- Rnd 13: (6 sc, inc) × 8. [64]
- Rnd 14: 64 sc. [64]
- Rnd 15: 64 sc. [64]
- Rnd 16: 64 sc. [64]
- Rnd 17: FLO: 64 sc. [64]
Sl st in the next stitch and FO.
Pink Cap Underside
Hold the cap with the inside facing you.
Attach nude yarn to an unused back loop of Round 16, behind the final pink edge.
- Underside Rnd 1: 64 sc in the unused back loops around. [64]
- Underside Rnd 2: (6 sc, dec) × 8. [56]
- Underside Rnd 3: (5 sc, dec) × 8. [48]
- Underside Rnd 4: (4 sc, dec) × 8. [40]
FO, leaving a long sewing tail.
Use only a thin layer of stuffing beneath the upper dome. Keep the lower brim flexible.
Chocolate Topping
Use brown.
- Rnd 1: 8 sc in MR. [8]
- Rnd 2: 8 inc. [16]
- Rnd 3: (sc, inc) × 8. [24]
- Rnd 4: 24 sc. [24]
- Rnd 5: (2 sc, inc) × 8. [32]
- Rnd 6: 32 sc. [32]
Do not cut the yarn.
The dripping edge uses all 32 base stitches, divided into eight groups of four.
For each group:
- Sc in the next 2 base stitches.
- Make the stated chain.
- Starting in the second chain from the hook, sc back along the chain.
- Sl st in the next base stitch.
- Sc in the next base stitch.
Work the eight groups with these chain lengths, in order:
- Group 1: Ch 4; work 3 sc back along the chain.
- Group 2: Ch 7; work 6 sc back along the chain.
- Group 3: Ch 5; work 4 sc back along the chain.
- Group 4: Ch 8; work 7 sc back along the chain.
- Group 5: Ch 4; work 3 sc back along the chain.
- Group 6: Ch 6; work 5 sc back along the chain.
- Group 7: Ch 5; work 4 sc back along the chain.
- Group 8: Ch 7; work 6 sc back along the chain.
The chain extensions do not consume additional base stitches.
After completing Group 8, join to the first edging sc.
FO, leaving a long sewing tail.
Flat Cap Hearts
Make six mini flat hearts:
- Two light cream.
- Two nude.
- Two powder pink.
Use the shared mini flat heart instructions.
Stuffed Top Hearts
Make two: one powder pink and one light cream.
Each heart begins with two small lobes.
First lobe
- Rnd 1: 6 sc in MR. [6]
- Rnd 2: 6 sc. [6]
FO, leaving a short tail for closing the gap between the lobes.
Second lobe
- Rnd 1: 6 sc in MR. [6]
- Rnd 2: 6 sc. [6]
Do not cut the yarn.
Join the lobes
- Rnd 3: Work 6 sc around the first lobe, then 6 sc around the second lobe. [12]
The first sc worked into the first lobe is the joining stitch and is included in its 6 sc. Do not add a separate joining chain or extra stitch.
- Rnd 4: (2 sc, dec) × 3. [9]
Lightly stuff both lobes.
Use the first lobe’s tail to close the small gap between them.
- Rnd 5: (sc, dec) × 3. [6]
- Rnd 6: 3 dec. [3]
FO, leaving a sewing tail.
Gather the remaining stitches closed.
Shape the upper indentation with your fingers. Avoid overstuffing, which can make the heart look round.
Putting Your Crochet Mushroom Sweethearts Together
Pin the main pieces in place before sewing. Check the face, balance, and overall height from the front and sides.
Assemble the Mushroom Potion
- Embroider the face. Make a small smile centered below the eyes, around body Rounds 14–15. Add short eyebrows if desired.
- Attach the feet. Sew their closed upper edges to the front of the bottle around Round 20. Point the toes forward and position them slightly below the bottle base.
- Anchor the feet. Add a small stitch behind each foot to keep the character seated.
- Attach the arms. Sew them to the sides around Rounds 15–16, angling the hands toward the front.
- Fit the mushroom stopper. Insert the beige stalk into the bottle neck. Its flared underside should rest above the collar.
- Secure the stopper. Sew the stalk to the inside edge of the neck with beige or cream yarn.
- Add the cord. Position the leaves and heart at the side. Tack the cord securely to the neck and hide the ends.
Assemble the Mushroom Cupcake
- Embroider the smile. Place it between body Rounds 13 and 14, centered below the eyes.
- Attach the feet. Sew the brown feet to the front around body Round 22, with the toes projecting forward and slightly below the base.
- Fit the wrapper. Slide it over the lower body and position its upper rim around Round 15.
- Secure the lower edge. Sew it to the unused front loops of body Round 22, easing the extra row ends evenly around.
- Secure the upper rim. Tack it to the body, keeping the smile visible.
- Attach the arms. Sew them at the sides around Rounds 15–16, stitching through the wrapper into the body where necessary.
- Position the cap. Place the cream cap over the crown. Its 40-stitch inner opening should sit around body Round 5.
- Sew the inner opening. Attach it evenly to the body. Leave the scalloped outer brim free.
- Add the hearts. Sew four around the lower cream tier and two around the upper tier.
- Attach the strawberry. Sew it at an angle on one side of the cap, securing it at several points.
Assemble the Love Mushroom
- Embroider the smile. Place it between body Rounds 13 and 14.
- Attach the feet. Sew the powder pink feet to the front around body Round 22, with the toes pointing forward.
- Anchor the feet. Secure their backs against the lower body so the character sits evenly.
- Attach the arms. Sew them around Rounds 15–16, angling the hands inward.
- Position the chocolate topping. Center it over the pink cap. Place a short drip toward the front and arrange longer drips around the sides and back.
- Sew the chocolate. Stitch around the circular portion and along the drip edges, keeping every drip flat against the cap.
- Add the flat hearts. Sew the six hearts into the exposed pink spaces.
- Add sprinkles if desired. Make a few short cream embroidery stitches between the hearts.
- Attach the stuffed hearts. Sew them beside each other on the crown. Secure each across its lower portion so it stays upright.
- Fit the cap. Position its 40-stitch inner opening around body Round 5.
- Finish the cap seam. Pin the brim above the eyes, then sew the inner opening to the body. Leave the outer brim free.
Check the Finished Height
Aim for approximately 12 cm / 4.7 inches, measured in the finished seated position.
If a size adjustment is needed, change the number of plain rounds while the body is still being worked:
- Mushroom Potion: Adjust within Rounds 10–17, preferably below the eyes.
- Mushroom Cupcake and Love Mushroom: Adjust within Rounds 14–21.
At the suggested gauge, adding or removing two plain rounds changes the height by approximately 6 mm.
Keep the same stitch count in added rounds. Shift later round numbers and assembly positions by the same amount. Fit the cupcake wrapper to the adjusted body.
Tips for a Neater Crochet Mushroom Sweethearts Pattern
Keep Your Tension Consistent
Use the same stitch method throughout each piece. Consistent tension makes the cap edges, body shaping, and decorative details easier to match.
Count at Every Shaping Round
Check the total after each increase or decrease round. A missed stitch can affect the size of an opening or prevent two edges from matching during assembly.
Stuff in Small Amounts
Add small tufts of filling rather than pushing in one large piece. Shape the body as you go and avoid stretching the stitches.
Keep the Brims Soft
The broad lower sections of the cream and pink caps should remain flexible. Too much stuffing can lift the brims, cover the face, or make the character top-heavy.
Mark the Reserved Loops
Place a spare marker in the unused back loops of cap Round 16. This makes them easier to locate when adding the underside.
Fit the Wrapper Before Sewing
The wrapper’s fit depends on your row gauge and how firmly the body is stuffed. Adjust the strip length before joining its short ends.
Sew Decorations Around Their Edges
Secure the flat hearts, chocolate drips, and mushroom spots at several points. Catching their edges helps them sit neatly against the curved caps.
Check the Seated Position
Set the character on a flat surface before finishing the foot seams. Adjust both feet until the body sits evenly.
FAQ About the Crochet Mushroom Sweethearts Pattern
What skill level is this crochet mushroom sweethearts pattern?
This is an intermediate pattern. You should be comfortable with magic rings, single crochet, increases, decreases, working around a foundation chain, front and back loops, and sewing small components.
How big are the finished mushrooms?
Each character is designed to finish approximately 12 cm / 4.7 inches tall, including its feet and attached decorations.
The exact size depends on yarn, tension, stuffing, and assembly.
What yarn should I use?
Use sport-weight cotton or a cotton-blend yarn. Keep the yarn thickness consistent across the body, cap, limbs, and accessories.
What hook size should I use?
Start with a 2 mm hook. Adjust the hook if necessary to approach the suggested gauge while maintaining firm fabric.
What size safety eyes do these mushrooms need?
This version uses 8 mm safety eyes, with one pair per character.
You can also embroider the eyes. Use embroidered eyes for toys intended for babies or toddlers.
Where should I place the eyes?
For the Mushroom Potion, place them between body Rounds 12 and 13.
For the Mushroom Cupcake and Love Mushroom, place them between body Rounds 11 and 12.
Leave 7 complete stitches between the posts.
Do all three mushrooms use the same body?
The Mushroom Cupcake and Love Mushroom share the same 27-round closed body.
The Mushroom has a separate bottle-shaped body, beginning at its open neck.
How much stuffing should I put inside the caps?
Use enough to support the upper shape without making the cap hard.
The Potion cap needs a thin layer between its red upper section and beige underside. The Cupcake cap needs light stuffing in the upper section. The Love Mushroom cap needs only a thin layer beneath its dome.
Keep the outer brims soft.
Why does my cupcake wrapper not fit?
The wrapper is worked sideways, so its circumference depends on your row gauge.
Wrap the strip around the stuffed body before joining it. Add or remove rows in pairs until the ends meet comfortably with gentle stretching.
Can I make the mushrooms slightly taller or shorter?
Yes. Adjust the plain body rounds before completing the body.
Use the straight pink section of the Potion or the 44-stitch straight section of the Cupcake and Love Mushroom. Shift subsequent round references and accessory placements to match.
How many mushrooms are included?
There are three:
- Mushroom Potion with a mushroom stopper, leaves, and heart cord.
- Mushroom Cupcake with a red wrapper, cream cap, strawberry, and hearts.
- Love Mushroom with chocolate drips, flat hearts, and two stuffed top hearts.
Your Next Stitch
This crochet mushroom sweethearts pattern brings together three small characters with plenty of personality. The Potion has its leafy bottle neck, the Cupcake wears a strawberry-topped cream cap, and the Love Mushroom carries chocolate drips and tiny hearts.
Gather your sport-weight yarn, prepare your hook, and make the shared arms and feet first if you enjoy working in batches. Then choose a character and follow its body, cap, and accessory instructions.
Take your time with the final placement. A slight tilt of the cap, evenly positioned feet, and a small embroidered smile will help each mushroom feel complete.
Happy crocheting!