Crochet Kittens Pattern Mini Cats That Pop Out of Eggshells
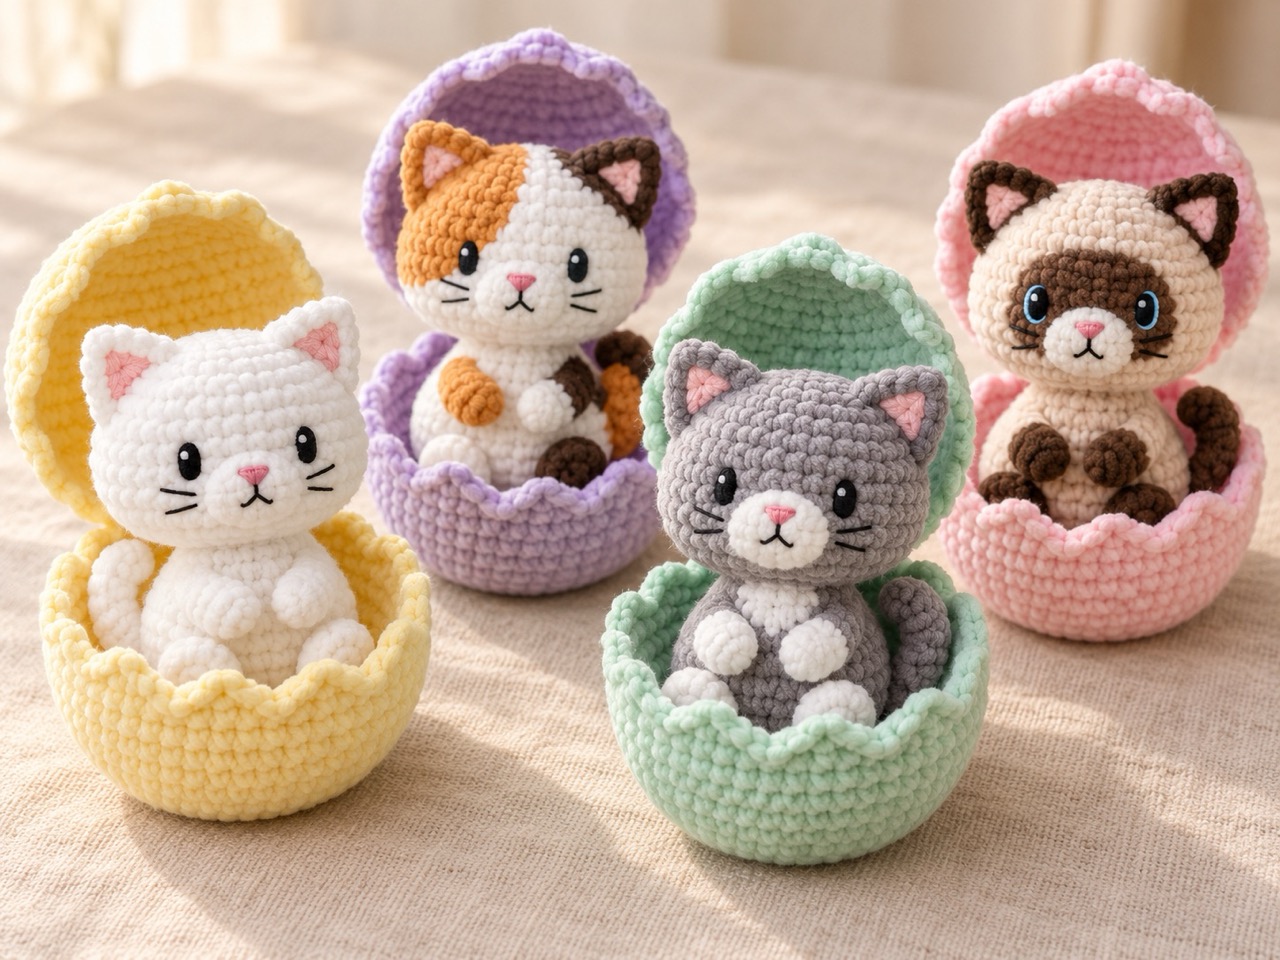
There’s something magical about a tiny kitten tucked inside an eggshell. Lift the lid, and a little face appears: pointed ears, a pink nose, and paws resting against a rounded belly. This crochet hatching kittens pattern lets you make four versions—a white kitten, a calico, a gray-and-white kitten, and a Siamese—each with its own colorful crocheted egg.
The kittens have a body and head worked together from the bottom upward, separate ears and paws, embroidered faces, and softly curled tails. Sewn patches create their different markings. Each eggshell has a waved rim and a flexible hinge so its lid can fold backward for the hatching pose.
Below you’ll find the complete materials list, color plans, step-by-step instructions, assembly guidance, tips, and answers to common questions.
Jump to a Section
- Why This Crochet Hatching Kittens Pattern Stands Out
- What You Need Before You Start
- Abbreviations and Pattern Notes
- Choose Your Kitten’s Colors
- How to Crochet the Muzzle and Markings
- How to Crochet the Kitten Body and Head
- How to Crochet the Ears
- How to Crochet the Forepaws
- How to Crochet the Hind Feet
- How to Crochet the Curled Tail
- How to Add the Body Markings
- How to Crochet the Lower Eggshell
- How to Crochet the Upper Eggshell
- How to Join the Eggshell
- Putting Your Crochet Hatching Kittens Together
- Tips for a Neater Crochet Hatching Kittens Pattern
- FAQ About the Crochet Hatching Kittens Pattern
- Your Next Stitch
Why This Crochet Hatching Kittens Pattern Stands Out
The four kittens share one main pattern, making it easy to build a coordinated little collection.
- Four color variations: White, calico, gray-and-white, and Siamese.
- small plush size: Approximately 10–12 cm tall, including the ears.
- Skill level: Confident beginner to intermediate, mainly because of the small pieces and sewn assembly.
- Seamless main piece: The body continues directly into the head.
- Embroidered features: Small stitched eyes, a pink nose, a tiny mouth, and whiskers.
- Separate details: Pointed ears, rounded paws, and a tubular tail.
- Removable kitten: The kitten lifts out of its eggshell.
- Flexible lid: A sewn hinge lets the lid fold backward.
- Adjustable shell depth: Extra plain rounds can accommodate differences in yarn, tension, and stuffing.
What You Need Before You Start
Yarn and Tools
For one small plush kitten and its eggshell, allow approximately:
- 30–40 g of kitten-colored chenille yarn
- 40–55 g of eggshell-colored chenille yarn
- Small amounts of contrasting yarn for the markings, ears, paws, and muzzle
- Fine pink yarn for the nose and inner-ear embroidery
- Fine black or dark brown yarn for the eyes, mouth, and whiskers
- Optional white or pale blue yarn for eye details
- 4–4.5 mm crochet hook, adjusted to produce firm fabric
- Polyester fiberfill
- Stitch marker
- Tapestry needle
- Pins
- Scissors
These yarn amounts are vary between chenille brands. Allow additional yarn when making several colors of markings.
Begin the eggshell with yarn of the same thickness and the same hook size used for the kitten. Check its fit before completing the decorative rim.
Finished Size Options
The same stitch counts can be used with different yarn weights.
| Version | Suggested yarn | Starting hook size | kitten height |
|---|---|---|---|
| Mini | Sport or DK cotton | 2.5–3 mm | 7–8 cm |
| Small plush | Standard plush chenille | 4–4.5 mm | 10–12 cm |
| Large plush | Thick blanket chenille | 6–7 mm | 15–17 cm |
Measurements include the ears and refer to the kitten alone.
Tension and Fit
Choose a hook that creates compact stitches without visible stuffing.
Yarn weight, stitch height, stuffing, and assembly all affect the result, so use the size table as a starting guide.
Complete the kitten before finishing its shell.
Abbreviations and Pattern Notes
This pattern uses US crochet terminology.
- ch: chain
- sc: single crochet
- hdc: half double crochet
- dc: double crochet
- sl st: slip stitch
- inc: work 2 sc into the same stitch
- dec: decrease the next 2 stitches into 1 sc
- BLO: back loops only
- Rnd: round
- FO: fasten off
- […] × N: repeat the bracketed instructions N times
- (N): stitch count after completing the round
Working Method
- Work in continuous spirals unless instructed otherwise.
- Mark the first stitch of each round.
- Use invisible decreases on the stuffed pieces.
- The instructions use a chain-2 start. You may substitute a securely closed magic ring.
- Beginning chains and joining slip stitches do not count as stitches.
- Slip stitches inside the eggshell edging repeat do count, because each is worked into one stitch.
- Stuff gradually with small pieces of fiberfill.
- Leave approximately 20–25 cm tails on small pieces that will be sewn on.
- Secure chenille ends by weaving them through several stitches. Do not heat or burn the yarn.
Color Changes
To change colors, begin the final single crochet in the old color. Complete its final pull-through with the new color.
Leave enough yarn at each change to secure the ends inside the piece.
Choose Your Kitten’s Colors
White Kitten
Use white for:
- Body and head
- Both ears
- Both forepaws
- Both hind feet
- Tail
- Muzzle
Add pink inner-ear embroidery and a pink nose.
Calico Kitten
Use:
- White: body, head, muzzle, one forepaw, and one hind foot
- Ginger: one ear and the other forepaw
- Dark brown: the other ear and the other hind foot
- Tail: dark brown for rounds 1–3, then ginger for rounds 4–10
Also make:
- One ginger 12-stitch face patch
- One dark brown 12-stitch body patch
- One ginger 6-stitch back patch
Gray-and-White Kitten
Use:
- Gray: body, head, ears, and tail
- White: both forepaws, both hind feet, muzzle, and chest patch
Siamese Kitten
Use:
- Cream or beige: body and head
- Dark brown: ears, forepaws, hind feet, tail, and face mask
- Cream: muzzle
A thin pale blue or cream outline can help the dark embroidered eyes stand out against the face mask.
How to Crochet the Muzzle and Markings
Prepare the required face pieces first. You will attach them while the kitten’s head is still open.
Small Oval Muzzle — Make 1
Use white for the white, calico, and gray-and-white kittens. Use cream for the Siamese.
Ch 4.
- Rnd 1: Starting in the second chain from the hook, sc in the next 2 chains, 3 sc in the last chain. Continue along the opposite side of the foundation: sc in the next chain, inc in the final chain. (8)
- Rnd 2: Inc, sc, 3 inc, sc, 2 inc. (14)
FO with a sewing tail.
Keep the muzzle flat and unstuffed.
Round Marking Patch
Use this piece for the calico’s larger markings and the gray-and-white kitten’s chest.
- Rnd 1: Ch 2, work 6 sc into the second chain from the hook. (6)
- Rnd 2: Inc × 6. (12)
FO with a sewing tail.
For the calico’s smaller ginger back patch, work round 1 only, then FO.
Siamese Face Mask — Make 1
Use dark brown. Ch 5.
- Rnd 1: Starting in the second chain from the hook, sc in the next 3 chains, 3 sc in the last chain. Continue along the opposite side: sc in the next 2 chains, inc in the final chain. (10)
- Rnd 2: Inc, 2 sc, 3 inc, 2 sc, 2 inc. (16)
- Rnd 3: Sc, inc, 2 sc, [sc, inc] × 3, 2 sc, [sc, inc] × 2. (22)
FO with a sewing tail.
Keep the mask flat. Position its longer axis horizontally across the face.
How to Crochet the Kitten Body and Head
Make one in your chosen main color.
Begin at the bottom and continue directly into the head.
Lower Body
- Rnd 1: Ch 2, work 6 sc into the second chain from the hook. (6)
- Rnd 2: Inc × 6. (12)
- Rnd 3: [Sc, inc] × 6. (18)
- Rnd 4: [2 sc, inc] × 6. (24)
- Rnd 5: BLO: 24 sc. (24)
- Rnds 6–8: 24 sc in each round. 3 rounds. (24)
- Rnd 9: [2 sc, dec] × 6. (18)
Begin stuffing. Keep the underside slightly flat so the kitten can sit.
- Rnd 10: [Sc, dec] × 6. (12)
- Rnd 11: 12 sc. (12)
Round 11 forms the narrow neck. Add enough filling to support it without stretching the stitches.
Head
- Rnd 12: [Sc, inc] × 6. (18)
- Rnd 13: [2 sc, inc] × 6. (24)
- Rnd 14: [3 sc, inc] × 6. (30)
- Rnds 15–18: 30 sc in each round. 4 rounds. (30)
Pause here to attach and embroider the face.
Position the Face Pieces
Partially stuff the head so it holds its shape. Choose the center front and mark it with a short piece of contrasting yarn.
For all kittens, pin the muzzle horizontally across approximately rounds 14–16.
For the calico, place the ginger face patch over one upper cheek, approximately across rounds 16–19. Sew it down before embroidering the eye on that side.
For the Siamese, center the dark brown mask across approximately rounds 14–19. Sew it flat, then attach the cream muzzle over its lower center.
Use small stitches around the appliqué edges. Keep the sewing tension gentle so the face remains smooth.
Embroider the Eyes
Place the eye centers between rounds 17 and 18, approximately 6 stitch columns apart.
For each eye:
- Outline a small vertical oval approximately one stitch wide and one to two rounds high.
- Fill the oval with several short black or dark brown stitches.
- Add one tiny white highlight if desired.
For the Siamese, add a thin pale blue or cream outline around the outer edge of each dark eye.
Embroider the Nose, Mouth, and Whiskers
Using pink yarn, make a small triangular nose near the upper center of the muzzle.
Using fine dark yarn:
- Make a short vertical stitch below the nose.
- Add two short diagonal stitches to form a tiny Y-shaped mouth.
- Add two short whisker stitches on each side.
Keep the whiskers flat against the fabric.
Secure the embroidery ends inside the open head.
Close the Crown
- Rnd 19: [3 sc, dec] × 6. (24)
- Rnd 20: [2 sc, dec] × 6. (18)
- Rnd 21: [Sc, dec] × 6. (12)
Finish stuffing the head. Keep the cheeks rounded and the neck supported.
- Rnd 22: Dec × 6. (6)
FO. Thread the tail through the front loops of the remaining 6 stitches and pull closed.
Secure and hide the tail.
How to Crochet the Ears
Make two in the colors selected for your kitten.
Begin at the pointed tip.
- Rnd 1: Ch 2, work 4 sc into the second chain from the hook. (4)
- Rnd 2: [Sc, inc] × 2. (6)
- Rnd 3: [2 sc, inc] × 2. (8)
- Rnd 4: [3 sc, inc] × 2. (10)
- Rnd 5: 10 sc. (10)
Do not stuff.
Flatten the opening so there are 5 stitches on each side. Work 5 sc through both layers to close the base.
FO with a sewing tail.
Embroider a small pink triangle inside each ear, leaving a visible border of the ear color.
Pin the bases to the upper sides of the head across approximately rounds 19–21. Angle the tips slightly outward.
Sew through the full width of each flattened base.
How to Crochet the Forepaws
Make two in your chosen paw colors.
- Rnd 1: Ch 2, work 6 sc into the second chain from the hook. (6)
- Rnds 2–3: 6 sc in each round. 2 rounds. (6)
Leave unstuffed, or add only a tiny wisp of filling at the rounded end.
Flatten the opening and work 3 sc through both layers.
FO with a sewing tail.
Attach the flattened ends to the upper front sides of the body around rounds 8–9. Angle the rounded paws inward so they rest against the belly.
Add one small anchoring stitch behind each paw if needed.
How to Crochet the Hind Feet
Make two in your chosen foot colors.
- Rnd 1: Ch 2, work 6 sc into the second chain from the hook. (6)
- Rnd 2: [Sc, inc] × 3. (9)
- Rnd 3: 9 sc. (9)
- Rnd 4: [Sc, dec] × 3. (6)
Add a small amount of filling to the rounded foot.
Flatten the opening and work 3 sc through both layers.
FO with a sewing tail.
Attach the feet to the lower front of the body around rounds 5–6, leaving approximately 2 body stitches between their inner edges.
Point the rounded ends forward. Add a small tack between each foot and the body to help the kitten sit evenly.
How to Crochet the Curled Tail
Use the chosen tail color.
For the calico, work rounds 1–3 in dark brown, then change to ginger for rounds 4–10.
- Rnd 1: Ch 2, work 4 sc into the second chain from the hook. (4)
- Rnd 2: [Sc, inc] × 2. (6)
- Rnds 3–10: 6 sc in each round. 8 rounds. (6)
Do not stuff.
Flatten the opening and work 3 sc through both layers.
FO with a long sewing tail.
Sew the flattened base to the center back of the body around rounds 5–7.
Curve the tail around one side of the kitten. Anchor it against the lower body in two places so it forms a soft curl and fits comfortably inside the shell.
How to Add the Body Markings
Calico Kitten
Sew the dark brown 12-stitch patch to one side of the body around rounds 6–8.
Place the smaller ginger 6-stitch patch toward the opposite side of the back around rounds 7–9.
Keep the patch edges clear of the limb attachment seams.
Gray-and-White Kitten
Sew the white 12-stitch chest patch to the center front of the body around rounds 5–9.
Let the forepaws overlap its upper corners slightly.
Keep all body patches flat and unstuffed.
How to Crochet the Lower Eggshell
Use your chosen shell color and begin with the same hook size used for the kitten.
The shell remains unstuffed.
- Rnd 1: Ch 2, work 6 sc into the second chain from the hook. (6)
- Rnd 2: Inc × 6. (12)
- Rnd 3: [Sc, inc] × 6. (18)
- Rnd 4: [2 sc, inc] × 6. (24)
- Rnd 5: [3 sc, inc] × 6. (30)
- Rnd 6: [4 sc, inc] × 6. (36)
- Rnd 7: [5 sc, inc] × 6. (42)
- Rnd 8: BLO: 42 sc. (42)
- Rnds 9–13: 42 sc in each round. 5 rounds. (42)
Check the Cup Fit
Place the completed kitten inside.
The lower body and curled tail should fit comfortably, with the head visible above the opening.
If the cup needs more depth, add one or two plain rounds of 42 sc before making the rim.
If the opening is too tight, remake the shell using a hook approximately 0.5 mm larger. Keep the kitten’s fabric firm.
Cracked-Shell Rim
- Rnd 14: [Sc, hdc, dc, hdc, sc, sl st] × 7, working each stitch into the next stitch around. (42)
This creates seven shallow waves.
Sl st into the first sc to join. This additional joining slip stitch does not count.
FO and weave in the ends.
How to Crochet the Upper Eggshell
Use the same shell color or choose a contrasting pastel.
Begin at the pointed top.
- Rnd 1: Ch 2, work 6 sc into the second chain from the hook. (6)
- Rnd 2: 6 sc. (6)
- Rnd 3: [Sc, inc] × 3. (9)
- Rnd 4: [2 sc, inc] × 3. (12)
- Rnd 5: [3 sc, inc] × 3. (15)
- Rnd 6: [4 sc, inc] × 3. (18)
- Rnd 7: [5 sc, inc] × 3. (21)
- Rnd 8: [6 sc, inc] × 3. (24)
- Rnd 9: [7 sc, inc] × 3. (27)
- Rnd 10: [8 sc, inc] × 3. (30)
- Rnd 11: [9 sc, inc] × 3. (33)
- Rnd 12: [10 sc, inc] × 3. (36)
- Rnd 13: [11 sc, inc] × 3. (39)
- Rnd 14: [12 sc, inc] × 3. (42)
- Rnd 15: 42 sc. (42)
Check the Lid Depth
Place the kitten in the lower cup and fit the lid over its head.
The ears may fold gently, but the lid should not flatten the head.
If more depth is needed, add one to three plain rounds of 42 sc before making the rim.
Upper Cracked-Shell Rim
- Rnd 16: [Sc, hdc, dc, hdc, sc, sl st] × 7, working each stitch into the next stitch. (42)
Sl st into the first sc to join.
FO with a long tail for the hinge.
How to Join the Eggshell
Remove the kitten while attaching the two shell sections.
- Hold the cup and lid with their openings facing each other, forming a closed egg.
- Choose the center back.
- Mark 6 corresponding stitches on each piece, directly below the decorative rims.
- Sew those six pairs together with small, flexible stitches.
- Leave enough flexibility for the lid to fold backward.
- Secure the sewing yarn and weave in the ends.
For the unadjusted shell, sew through lower cup round 13 and upper lid round 15.
If you added depth rounds, use the final plain round before each decorative rim.
Place the kitten inside with its back toward the hinge and its face toward the front. The lid rests over the kitten when closed and folds backward to reveal it.
Putting Your Crochet Hatching Kittens Together
Use this checklist to finish each kitten and shell.
- Complete the face. Attach the muzzle and any face patch while the head is open, then embroider the eyes, nose, mouth, and whiskers.
- Finish stuffing and close the head. Support the neck and keep the cheeks evenly rounded.
- Attach the ears. Pin both before sewing so their heights and angles match.
- Sew on the feet. Check that the kitten sits evenly.
- Attach the forepaws. Angle them toward the belly.
- Add the body patches. Keep their edges flat.
- Attach and curl the tail. Anchor it close to the lower body.
- Fit the lower shell. Check the opening and depth before making its rim.
- Fit the lid. Add plain rounds if needed before finishing its rim.
- Sew the hinge. Keep the join flexible.
- Finish all ends. Remove every pin and temporary marker.
The kitten remains removable from its eggshell.
Tips for a Neater Crochet Hatching Kittens Pattern
- Choose the yarn first. Different chenille thicknesses can change both size and proportions.
- Mark every round. Plush yarn can make the first stitch difficult to recognize.
- Count before continuing. Correct a missed increase or decrease before the next round.
- Use fine yarn for the face. Smooth embroidery yarn creates clearer eyes and whiskers.
- Attach the face while the head is open. It is easier to secure the ends inside.
- Stuff in small amounts. This helps avoid lumps in the head and belly.
- Support the neck. A little filling at the narrow section helps the head stay upright.
- Keep the paws soft. Light stuffing lets them rest against the body.
- Pin the ears together. Check their position from the front and both sides.
- Keep the tail close. A compact curl makes fitting the kitten inside the shell easier.
- Work the rim slip stitches loosely. Tight stitches can pull the waved edge inward.
- Test the shell on its kitten. Extra plain rounds add depth; a larger hook changes the overall shell size.
- Weave ends securely. Use several stitches while keeping the hinge flexible.
FAQ About the Crochet Hatching Kittens Pattern
What skill level is this crochet hatching kittens pattern?
It suits a confident beginner to intermediate crocheter.
You should be comfortable with single crochet, increases, decreases, crocheting around a foundation chain, half double crochet, double crochet, slip stitches, embroidery, and sewn assembly.
How big are the finished kittens?
The small plush version is to measure 10–12 cm tall, including the ears, using standard plush chenille and a 4–4.5 mm hook.
Finer cotton may produce a kitten around 7–8 cm tall, while thicker blanket chenille may produce one around 15–17 cm.
What yarn does this crochet hatching kittens pattern use?
The main version uses plush chenille yarn.
Use matching yarn thicknesses for the kitten’s main pieces, markings, and eggshell. Use finer, smoother yarn for the embroidered face.
Are the body and head made separately?
They are worked together in one continuous piece.
Begin at the bottom of the body, narrow for the neck, increase into the head, and finish at the crown.
Does this pattern use bobble stitches?
The kitten details are made with separate ears, forepaws, hind feet, and a tubular tail.
How are the different kitten markings made?
The calico uses sewn ginger and brown patches. The gray-and-white kitten has a white chest patch and white paws. The Siamese has a dark brown face mask, ears, paws, and tail.
How do I make the kitten’s eyes?
Embroider small dark ovals between rounds 17 and 18, approximately 6 stitch columns apart.
Add a tiny white highlight if desired. A pale outline helps define the Siamese kitten’s eyes against its dark mask.
Can I remove the kitten from the egg?
Yes. The kitten sits inside the lower cup and can be lifted out.
The upper shell is attached to the lower shell at the back with a flexible sewn hinge.
How does the eggshell close?
The lid rests over the kitten. It folds backward at the hinge for the open hatching pose.
What if the eggshell is too small?
If it needs more depth, add plain rounds before the decorative rim.
If the opening is too tight, remake the shell with a slightly larger hook. Check the completed kitten’s paws and curled tail as well as its head.
Should I stuff the eggshell?
Leave both shell pieces unstuffed. Their crocheted fabric forms the cup and lid.
Your Next Stitch
This crochet hatching kittens pattern gives you four ways to make a small companion with plenty of personality. Choose a snowy white kitten, a patchy calico, a gray-and-white cat, or a cream Siamese with dark points.
Start with the muzzle and any face markings, then work the body and head in one piece. Take your time with the embroidery and ear placement—those small details shape the kitten’s expression.
Once the kitten is finished, crochet its eggshell and check the fit before adding the waved rims. Fold the lid backward, tuck the curled tail beside the body, and let the little face peek out.
Happy crocheting!