Crochet Dachshund Pattern Plush Wiener Dog
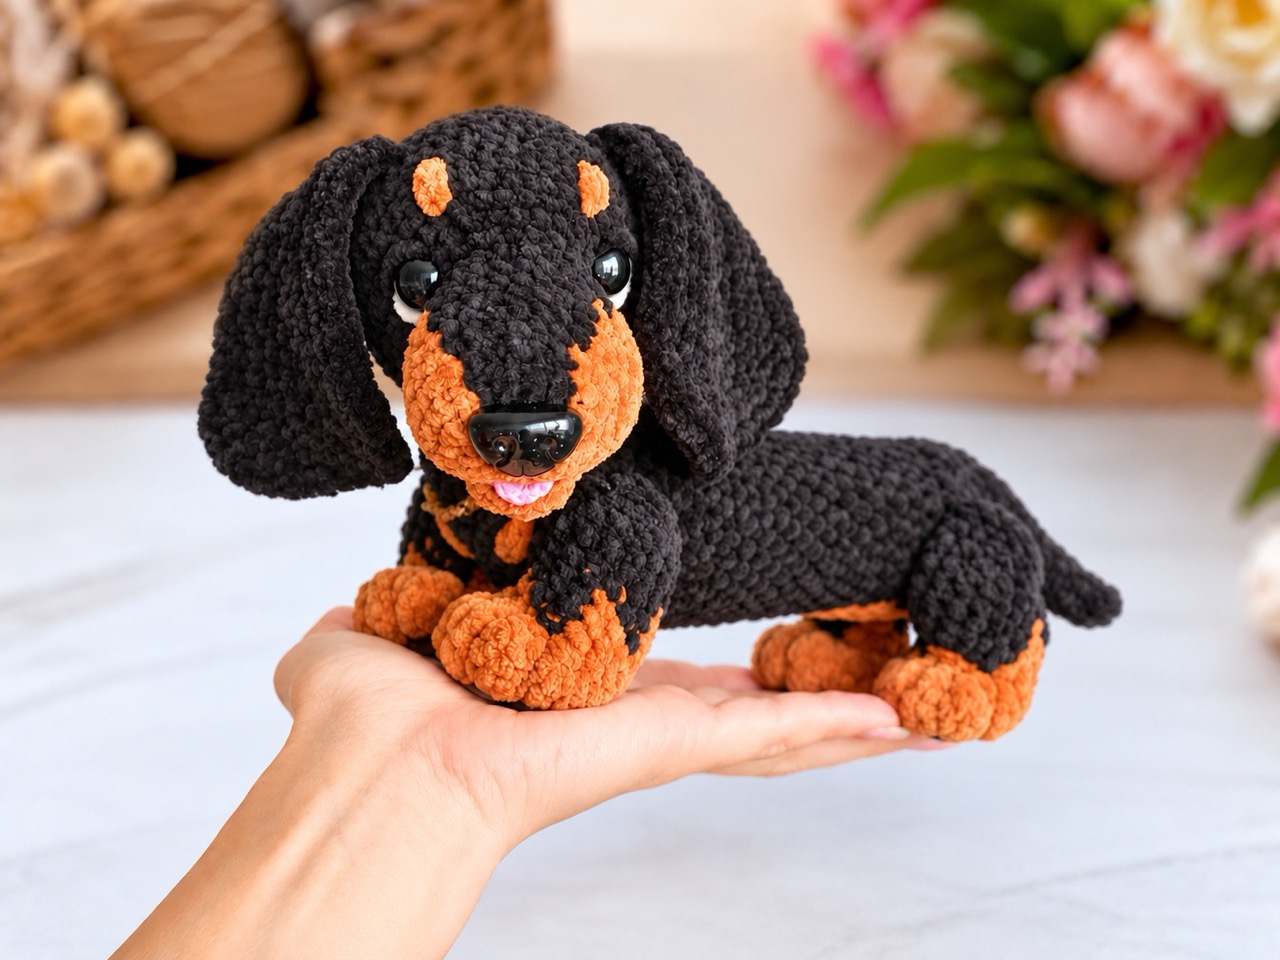
The long body and floppy ears make a dachshund recognizable even at a small size. This crochet dachshund pattern by Crochhet uses black plush yarn for the body, brown for the muzzle and paws, and a little pink cotton for the tongue. The four legs are sewn on, giving it a professional, almost lifelike look. Whether you’re making it for a child, a fellow dog lover, or yourself, this handmade dachshund is the kind of friend that becomes part of the family.
Below is a complete guide to the Crochet Dachshund pattern. You’ll find the materials, abbreviations, step-by-step instructions for the head, neck, ears, legs, body, tail, and mouth, plus assembly notes, tips, and answers to common questions.
Jump to a Section
- What You Need Before You Start
- Abbreviations and Pattern Notes
- How to Crochet the Long Body
- How to Crochet the Head and Muzzle
- How to Crochet the Floppy Ears
- How to Crochet the Four Legs
- How to Crochet the Side Patch and Tail
- How to Crochet the Mouth and Tongue
- Putting Your Crochet Dachshund Together
- Tips for a Neater Crochet Dachshund
- FAQ About the Crochet Dachshund Pattern
What You Need Before You Start
Yarn and Tools
- Black plush or chenille yarn for the body, head, ears, and tail
- Brown plush or chenille yarn for the muzzle, paws, mouth piece, and side patch
- A small amount of pink cotton yarn for the tongue
- 3.5 mm hook for the plush pieces
- 2.0 mm hook for the tongue
- Fiberfill stuffing
- Stitch marker, tapestry needle, pins, and scissors
- Black embroidery yarn for the mouth and optional nose details
- Optional 12–14 mm safety eyes and a toy nose that fits the crocheted muzzle
The hardware size in this smaller design differs from the larger inspiration pattern. Check the eyes and nose against your finished head before attaching them. For a dachshund intended for a young child, embroider the eyes and nose and secure all sewn pieces carefully.
Construction Notes
The body is a long tube worked from rump to chest. The muzzle begins in brown and grows into a black head. Four matching legs, two ears, a side patch, a tail, and the mouth details are made separately.
Work in continuous spiral rounds unless stated otherwise. Use a stitch marker for the beginning of each round.
Abbreviations and Pattern Notes
This pattern uses US crochet terminology.
- MR — magic ring
- ch — chain
- sc — single crochet
- inc — 2 sc in one stitch
- dec — single crochet 2 stitches together
- sl st — slip stitch
- (…) × N — repeat the instructions N times
The number at the end of each round is its stitch count. Change yarn color while completing the final stitch before the new color begins.
How to Crochet the Long Body
Work in black, starting at the rump. The final rounds shape the front of the chest.
- Rnd 1: 6 sc in MR (6).
- Rnd 2: 6 inc (12).
- Rnd 3: (Sc, inc) × 6 (18).
- Rnd 4: (2 sc, inc) × 6 (24).
- Rnd 5: (3 sc, inc) × 6 (30).
- Rnd 6: (4 sc, inc) × 6 (36).
- Rnds 7–18: 36 sc (36).
- Rnd 19: (4 sc, dec) × 6 (30).
- Rnd 20: 30 sc (30).
- Rnd 21: (3 sc, dec) × 6 (24).
- Rnd 22: 24 sc (24).
Stuff the body so it holds its long shape. Continue adding filling as the chest closes.
- Rnd 23: (2 sc, dec) × 6 (18).
- Rnd 24: (Sc, dec) × 6 (12).
- Rnd 25: 6 dec (6).
Fasten off. Thread the yarn tail through the front loops of the remaining six stitches and pull the opening closed.
How to Crochet the Head and Muzzle
Begin at the brown tip of the muzzle. Round 1 is worked around both sides of a foundation chain.
- Rnd 1: Ch 5. Starting in the second ch from the hook, 3 sc, then 3 sc in the last ch. Work along the other side of the chain: 2 sc, then inc in the first ch (10).
- Rnd 2: Inc, 2 sc, 3 inc, 2 sc, 2 inc (16).
- Rnds 3–4: 16 sc (16).
- Rnd 5: Change to black; (3 sc, inc) × 4 (20).
- Rnd 6: (4 sc, inc) × 4 (24).
- Rnd 7: (3 sc, inc) × 6 (30).
- Rnd 8: (4 sc, inc) × 6 (36).
- Rnds 9–12: 36 sc (36).
Position the eyes between rounds 9 and 10, one on either side above the muzzle. Secure optional safety eyes and a toy nose now, while you can reach inside the head. Place the nose at the brown tip.
- Rnd 13: (4 sc, dec) × 6 (30).
- Rnd 14: (3 sc, dec) × 6 (24).
Stuff the muzzle first, then shape the wider back of the head.
- Rnd 15: (2 sc, dec) × 6 (18).
- Rnd 16: (Sc, dec) × 6 (12).
- Rnd 17: 6 dec (6).
Fasten off and close the opening with a needle. If you are embroidering the nose, add it now.
How to Crochet the Floppy Ears
Make two in black.
- Rnd 1: 6 sc in MR (6).
- Rnd 2: (Sc, inc) × 3 (9).
- Rnd 3: (2 sc, inc) × 3 (12).
- Rnd 4: (3 sc, inc) × 3 (15).
- Rnd 5: (4 sc, inc) × 3 (18).
- Rnds 6–8: 18 sc (18).
- Rnd 9: (4 sc, dec) × 3 (15).
- Rnds 10–11: 15 sc (15).
- Rnd 12: (3 sc, dec) × 3 (12).
- Rnds 13–14: 12 sc (12).
Do not stuff. Flatten each opening and crochet 6 sc through both layers. Fasten off with a long sewing tail.
Pin the ears to the sides of the black part of the head, around head rounds 9–12. Check that they hang beside the cheeks, then sew their bases in place.
How to Crochet the Four Legs
Make four alike. Each leg begins with a brown paw and changes to black.
- Rnd 1: With brown, 6 sc in MR (6).
- Rnd 2: 6 inc (12).
- Rnd 3: (Sc, inc) × 6 (18).
- Rnd 4: 18 sc (18).
- Rnd 5: Change to black; (Sc, dec) × 6 (12).
- Rnds 6–8: 12 sc (12).
- Rnd 9: (4 sc, dec) × 2 (10).
- Rnd 10: 10 sc (10).
Stuff the paw and lower leg. Leave the top soft enough to flatten against the body. Flatten the opening and crochet 5 sc through both layers. Fasten off with a long tail.
Pin two legs beneath the front of the body around body rounds 17–21, and two beneath the rump around rounds 5–9. Stand the pinned dog on a flat surface to check that all four paws touch before sewing.
How to Crochet the Side Patch and Tail
Brown Side Patch
Work around both sides of a foundation chain.
- Rnd 1: Ch 7. Starting in the second ch from the hook, 5 sc, then 3 sc in the last ch. Work along the other side: 4 sc, then inc in the first ch (14).
- Rnd 2: Inc, 4 sc, 3 inc, 4 sc, 2 inc (20).
- Rnd 3: (4 sc, inc) × 4 (24).
Fasten off with a sewing tail. Pin the patch to one side of the body across approximately rounds 10–15 and sew around its edge.
Curved Tail
Work in black. Stuff only the wider base.
- Rnd 1: 4 sc in MR (4).
- Rnd 2: 4 sc (4).
- Rnd 3: (Sc, inc) × 2 (6).
- Rnds 4–5: 6 sc (6).
- Rnd 6: (2 sc, inc) × 2 (8).
- Rnds 7–8: 8 sc (8).
Fasten off with a long tail. Pin the wide end to the upper rump around body rounds 3–5, with the narrow end pointing upward. Sew the base securely. To hold a stronger curve, tack the middle of the tail to the body with one or two hidden stitches.
How to Crochet the Mouth and Tongue
Brown Mouth Piece
Use brown plush yarn and the 3.5 mm hook.
- Rnd 1: Ch 5. Starting in the second ch from the hook, 3 sc, then 3 sc in the last ch. Work along the other side: 2 sc, then inc in the first ch (10).
- Rnd 2: Inc, 2 sc, 3 inc, 2 sc, 2 inc (16).
Fasten off with a long tail. Sew its upper edge beneath the muzzle around head rounds 3–6. Leave the lower edge slightly free to suggest an open mouth. Outline that lower edge with black embroidery yarn.
Pink Tongue
Use pink cotton yarn and the 2.0 mm hook. Work in turning rows. The turning chain does not count as a stitch.
- Row 1: Ch 4. Starting in the second ch from the hook, 3 sc (3). Ch 1, turn.
- Row 2: Inc, sc, inc (5). Ch 1, turn.
- Row 3: 5 sc (5).
Fasten off with a sewing tail. Sew the narrow end inside the mouth so the wider pink end peeks out.
Putting Your Crochet Dachshund Together
- Finish the eyes and nose, then sew the mouth and tongue beneath the muzzle.
- Pin and sew the floppy ears to the head.
- Lay the stuffed body horizontally, with its closed front end facing forward. Pin the head over that end so the muzzle projects outward. Sew the back and underside of the head to the upper front of the body, adding supporting stitches across the chest.
- Pin the four legs in place. Set the dachshund on a flat surface, adjust its stance, and sew each leg firmly to the body.
- Sew the brown patch to the side and the tail to the upper rump.
- Embroider optional eyebrows or short toe lines. Weave in and hide all ends.
Tips for a Neater Crochet Dachshund
- Count every shaping round. The body and head depend on their stated stitch counts.
- Stuff the body evenly. Distribute filling along its length so it stays straight.
- Pin the legs before sewing. Their position determines whether the dog can stand.
- Leave the ear fabric unstuffed. It lets the ears hang naturally.
- Check the face hardware against the muzzle. Plush yarn thickness can change the apparent size of eyes and noses.
- Sew the head across a broad area. Several supporting stitches beneath the chest help keep it from tipping forward.
- Use matching yarn for seams. It blends into the plush surface.
FAQ About the Crochet Dachshund Pattern
How big is the finished crochet dachshund?
The target size is about 16 cm long from nose to rump and 12 cm tall from paws to head. The raised tail is excluded from the length. Your yarn and tension may change the result.
What skill level is this pattern?
It is suitable for a confident beginner or intermediate crocheter comfortable with magic rings, increases, decreases, crocheting around a chain, and sewing pieces together.
What yarn and hooks do I need?
Use black and brown plush or chenille yarn with a 3.5 mm hook. The small cotton-yarn tongue uses a 2.0 mm hook.
Are the legs or head jointed?
No. In this version, all four legs and the head are sewn to the body. Pinning the legs first lets you adjust the dog’s stance.
Does the pattern use Jacquard colorwork?
No. The brown muzzle begins with a yarn change, while the separate brown patch is sewn to the black body.
Are safety eyes required?
No. You can embroider the eyes and nose. If using hardware, choose pieces that fit the finished head and install them before closing it.
How do I attach the tongue?
Sew its narrow end inside the brown mouth piece, leaving the wider end visible below the muzzle.
Your Next Stitch
This crochet dachshund pattern is one of those projects that brings a little joy to every stitch. It’s soft, it’s detailed, and it’s made to be loved. Whether you make it for a child, a fellow dog lover, or yourself, you’ll end up with an 18 cm friend who looks like it just trotted in from a sunny afternoon.
So gather your plush yarn, pick up your 3.5 mm hook, and start with that first magic ring. If you get stuck on the Jacquard technique or the head sculpting, come back to this guide and work through it step by step. And when your dachshund is finished, share it post a photo, and show off your work. Your next project might be exactly what someone else needs to see.
Happy crocheting!