Crochet Pattern Kiwi Bird Amigurumi With a Kiwi Slice Hat
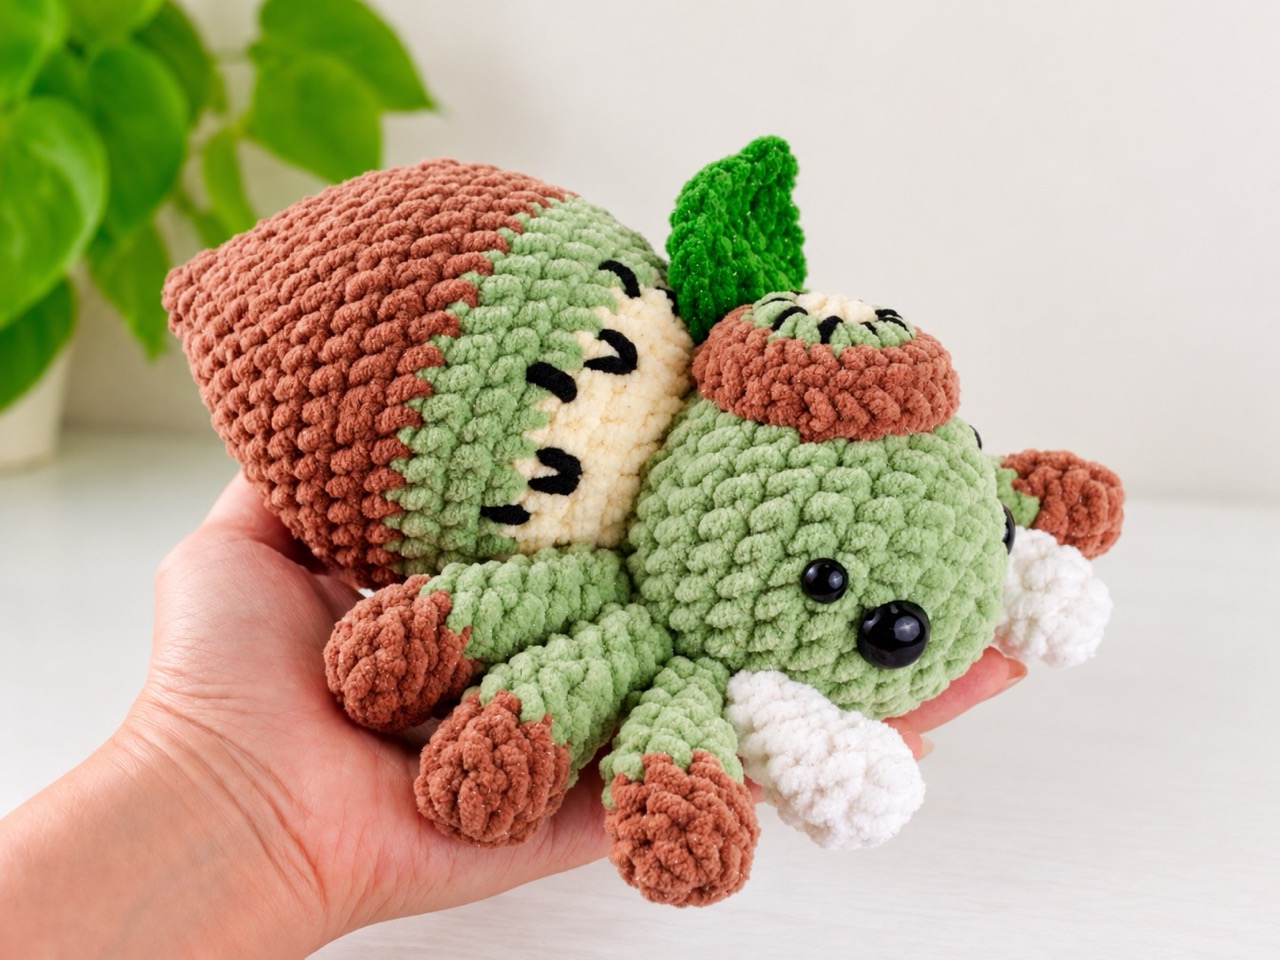
There’s something irresistibly whimsical about a tiny bird wearing a slice of fruit on its head. This crochet kiwi bird pattern brings that playful idea to life. The finished amigurumi is about 20 cm long and 18 cm wide — a huggable size that’s big enough to display but small enough to sit in your palm. With its green-and-brown body, long pink legs, and a little kiwi slice hat complete with a leaf, it’s the kind of project that makes you smile every time you look at it. Whether you’re a fan of kiwi birds, love fruit-themed amigurumi, or just want a unique handmade friend, this pattern delivers.
Below is a complete guide to the Kiwi Bird pattern. You’ll find the materials, abbreviations, step-by-step instructions for the body, legs, kiwi slice, and leaf, plus assembly notes, tips, and answers to common questions.
Jump to a Section
- Why This Crochet Pattern Kiwi Bird Stands Out
- What You Need Before You Start
- Abbreviations and Special Stitches
- How to Crochet the Kiwi Bird Body
- Make the body from the bottom upward.
- Make the head from the crown downward.
- Make six long pink legs.
- Make two short white front appendages.
- Make the front of the kiwi slice.
- Make the back of the kiwi slice.
- Make one leaf in dark green.
- Add the body embroidery.
- Assemble the character in this order:
- Tips for a Neater Crochet Pattern Kiwi Bird
- FAQ About the Crochet Pattern Kiwi Bird
- Your Next Stitch
Why This Crochet Pattern Kiwi Bird Stands Out
Plenty of amigurumi bird patterns exist, but this kiwi bird has a few qualities that make it especially charming.
- Finished size: Approximately 20 x 18 cm (7.8 x 7.02 inches).
- Skill level: ★ ★ ★ ★ ★ (Intermediate — requires color changes, embroidery, and assembly).
- Yarn: Worsted-weight yarn in green, brown, pink, dark pink, light yellow, white, and dark green, plus embroidery thread. See the materials list .
- Eyes: 14 mm safety eyes (and optional 8 mm eyes for extra detail).
- Construction: The head, body, legs, and white front appendages are made separately and sewn together. The kiwi slice and leaf are attached to the head.
- Details: Embroidered back patterns, a kiwi slice hat, and a leaf.
If you’ve been searching for a crochet pattern kiwi bird that feels approachable and looks adorable, this one is a wonderful choice.
What You Need Before You Start
Gather your supplies first. The pattern uses several colors and requires basic amigurumi skills.
Materials
Use smooth worsted-weight yarn, approximately 90–110 m per 50 g. Allow approximately:
- Green: 45 g.
- Brown: 35 g.
- Pink: 20 g.
- Dark pink: 10 g.
- Light yellow: 10 g.
- White: 10 g.
- Dark green: 5 g.
- Black embroidery thread for the kiwi seeds and body details.
- A small amount of brown embroidery thread for the mouth.
- A 3.25–3.5 mm crochet hook.
- Two 14 mm safety eyes.
- Optional: two 8 mm safety eyes for the smaller upper pair.
- Alternatively, embroider all the eyes.
- Fiberfill, stitch marker, tapestry needle, pins, and scissors.
Gauge guide: approximately 20 sc and 24 rounds per 10 cm, measured over single crochet worked in the round. Use a hook that produces firm fabric without visible stuffing gaps.
Abbreviations and Special Stitches
- MR — Magic Ring
- st(s) — Stitch(es)
- sl st — Slip stitch
- ch — Chain
- SC — Single crochet
- INC — Increase
- DEC — Decrease
- tch — Chain and turn
- HDC — Half double crochet
- HDC INC — 2 HDC in one stitch
Work in continuous spirals, moving a marker to the first stitch of each round. Do not join rounds unless instructed. Bracketed instructions repeat the stated number of times. Numbers in parentheses show the completed stitch count.
When changing colors, complete the final stitch of the previous color by pulling the new yarn through its last two loops.
How to Crochet the Kiwi Bird Body
Make the body from the bottom upward.
Begin with brown.
- R1: 6 sc in MR. (6)
- R2: Inc in every stitch. (12)
- R3: [1 sc, inc] × 6. (18)
- R4: [2 sc, inc] × 6. (24)
- R5: [3 sc, inc] × 6. (30)
- R6: [4 sc, inc] × 6. (36)
- R7: [5 sc, inc] × 6. (42)
- R8: [6 sc, inc] × 6. (48)
- R9: [7 sc, inc] × 6. (54)
- R10: [8 sc, inc] × 6. (60)
- R11: 60 sc. (60)
- R12: 60 sc. (60)
- R13: 60 sc. (60)
- R14: 60 sc. (60)
- R15: 60 sc. (60)
Change to green.
- R16: 60 sc. (60)
- R17: 60 sc. (60)
- R18: 60 sc. (60)
- R19: 60 sc. (60)
- R20: 60 sc. (60)
- R21: 60 sc. (60)
- R22: 60 sc. (60)
- R23: 60 sc. (60)
- R24: 60 sc. (60)
- R25: 60 sc. (60)
- R26: [8 sc, dec] × 6. (54)
- R27: [7 sc, dec] × 6. (48)
- R28: [6 sc, dec] × 6. (42)
Begin stuffing. Shape the brown section into a rounded base and distribute the filling evenly around the green section.
Change to light yellow.
- R29: [5 sc, dec] × 6. (36)
- R30: [4 sc, dec] × 6. (30)
- R31: [3 sc, dec] × 6. (24)
- R32: [2 sc, dec] × 6. (18)
- R33: 18 sc. (18)
Fasten off, leaving approximately 40 cm for attaching the head. Keep the neck opening unclosed.
Finish stuffing the body. Press the bottom gently against a flat surface to shape a stable sitting base.
Make the head from the crown downward.
Use green.
- R1: 6 sc in MR. (6)
- R2: Inc in every stitch. (12)
- R3: [1 sc, inc] × 6. (18)
- R4: [2 sc, inc] × 6. (24)
- R5: [3 sc, inc] × 6. (30)
- R6: [4 sc, inc] × 6. (36)
- R7: [5 sc, inc] × 6. (42)
- R8: [6 sc, inc] × 6. (48)
- R9: [7 sc, inc] × 6. (54)
- R10: 54 sc. (54)
- R11: 54 sc. (54)
- R12: 54 sc. (54)
- R13: 54 sc. (54)
- R14: 54 sc. (54)
- R15: 54 sc. (54)
- R16: 54 sc. (54)
- R17: 54 sc. (54)
- R18: 54 sc. (54)
- R19: 54 sc. (54)
- R20: 54 sc. (54)
Pause to position the face while the inside remains accessible.
Place the two large eyes between R14 and R15, with their centers approximately ten stitch spaces apart. Choose a front area away from the beginning-of-round marker.
For the optional upper pair, place the smaller eyes between R11 and R12, with their centers approximately six stitch spaces apart. Center this pair above the larger eyes.
Check all placements before securing the washers.
With brown embroidery thread, make a small curved smile centered below the large eyes, around R18. Use two or three short stitches rather than one long loose strand.
Continue shaping:
- R21: [7 sc, dec] × 6. (48)
- R22: [6 sc, dec] × 6. (42)
- R23: [5 sc, dec] × 6. (36)
- R24: [4 sc, dec] × 6. (30)
- R25: [3 sc, dec] × 6. (24)
- R26: [2 sc, dec] × 6. (18)
- R27: 18 sc. (18)
Fasten off and leave the opening unclosed.
Stuff the head evenly. Keep the face smooth, filling around the eye backs without pushing the eyes outward.
Make six long pink legs.
Begin each leg with dark pink.
- R1: 6 sc in MR. (6)
- R2: Inc in every stitch. (12)
- R3: Working in BLO, 12 sc. (12)
- R4: 12 sc. (12)
- R5: [2 sc, dec] × 3. (9)
Change to pink.
- R6: 9 sc. (9)
- R7: 9 sc. (9)
- R8: 9 sc. (9)
- R9: 9 sc. (9)
- R10: 9 sc. (9)
- R11: 9 sc. (9)
- R12: 9 sc. (9)
- R13: 9 sc. (9)
- R14: [1 sc, dec] × 3. (6)
- R15: 6 sc. (6)
- R16: 6 sc. (6)
- R17: 6 sc. (6)
- R18: 6 sc. (6)
Stuff the dark-pink foot firmly enough to hold its shape. Add a little filling through approximately R12, keeping the upper portion soft.
Flatten the opening and work 3 sc through both layers. Fasten off with a long sewing tail.
To give each leg a gentle bend, fold it around R9–R10. Using matching pink yarn, make two small stitches connecting R8 to R11 on the inside of the bend. Tighten gradually until the leg curves, then secure the yarn.
Shape three legs to curve toward the left and three toward the right by placing these shaping stitches on opposite sides.
Make two short white front appendages.
Use white.
- R1: 6 sc in MR. (6)
- R2: Inc in every stitch. (12)
- R3: [3 sc, inc] × 3. (15)
- R4: 15 sc. (15)
- R5: 15 sc. (15)
- R6: [3 sc, dec] × 3. (12)
- R7: 12 sc. (12)
- R8: [1 sc, dec] × 4. (8)
- R9: 8 sc. (8)
- R10: 8 sc. (8)
Lightly stuff the rounded end, leaving the last two rounds soft.
Flatten the opening and work 4 sc through both layers. Fasten off with a sewing tail.
Make the front of the kiwi slice.
Begin with light yellow.
- R1: 6 sc in MR. (6)
- R2: Inc in every stitch. (12)
Change to green.
- R3: [1 sc, inc] × 6. (18)
- R4: [2 sc, inc] × 6. (24)
- R5: [3 sc, inc] × 6. (30)
Change to brown.
- R6: [4 sc, inc] × 6. (36)
Fasten off and weave the ends onto the wrong side.
Using black embroidery thread, add twelve small seed stitches around R4, approximately one seed every two stitches. Angle each seed toward the yellow center.
For extra detail, use light-yellow yarn to make six short rays extending from the center into the green area. Keep the stitches loose enough that the disc remains flat.
Make the back of the kiwi slice.
Use brown.
- R1: 6 sc in MR. (6)
- R2: Inc in every stitch. (12)
- R3: [1 sc, inc] × 6. (18)
- R4: [2 sc, inc] × 6. (24)
- R5: [3 sc, inc] × 6. (30)
- R6: [4 sc, inc] × 6. (36)
Do not fasten off.
Place the two discs together with their wrong sides facing inward. Align their stitches.
Work 1 sc through each matching pair of edge stitches, joining the two layers. There will be 36 joining stitches.
Before completing the last six stitches, insert a thin layer of stuffing. Keep the slice relatively flat rather than ball-shaped.
Complete the joining round, sl st into its first stitch, and fasten off with a long tail for attachment.
Make one leaf in dark green.
This piece is worked in rows. Leave a 15 cm starting tail for sewing the base.
Ch 2.
- Row 1: Sc in the second chain from the hook. (1)
- Row 2: Ch 1, turn, inc. (2)
- Row 3: Ch 1, turn, inc in both stitches. (4)
- Row 4: Ch 1, turn, inc, 2 sc, inc. (6)
- Row 5: Ch 1, turn, 6 sc. (6)
- Row 6: Ch 1, turn, 6 sc. (6)
- Row 7: Ch 1, turn, dec, 2 sc, dec. (4)
- Row 8: Ch 1, turn, dec twice. (2)
- Row 9: Ch 1, turn, dec. (1)
Fasten off and weave in the finishing tail.
Using the main green yarn, embroider a central vein from the narrow base toward the tip with several short stitches. Add two small diagonal veins on each side if desired.
Gently fold the leaf lengthwise and place one securing stitch near its base to give it a slight cup.
Add the body embroidery.
Choose the side opposite the face as the back.
Across the green area, approximately R18–R24, embroider eight to ten short black seed-like marks. Let each mark span about one round, leaving three or four stitches between neighboring marks.
Across the yellow shoulder area around R29–R30, add four small V-shaped marks. Make each V with two short stitches meeting at their lower ends.
Keep the embroidery relaxed so it does not pull dents into the stuffing.
Assemble the character in this order:
- Attach the head. Align the head’s 18-stitch opening with the body’s 18-stitch neck opening. Keep the face centered over the chosen front. Sew corresponding stitches together around the neck, adding a little stuffing before closing the final section. Make a second pass through the seam if needed to support the head.
- Pin the six pink legs. Position three on each side of the body. Place their flattened upper ends approximately at R24, R19, and R14. Mirror these positions on the opposite side.
- Arrange the feet. Angle the upper pair slightly forward, the middle pair outward, and the lower pair slightly backward. Let the body rest on its base while you position the feet around it.
- Sew the legs securely. Sew across each flattened opening, then add a few supporting stitches through the upper side of the leg and the body. Preserve the soft bend rather than pulling the legs tight against the body.
- Attach the white appendages. Sew their flattened ends to the front of the yellow shoulder area around R29–R31, directly beneath the head. Leave a small gap between them and let their rounded ends hang forward.
- Position the kiwi slice. Pin it slightly off-center on the crown, with its decorated face pointing forward. Tilt it so it rises approximately 3 cm above the head.
- Secure the slice. Sew the lower quarter of its rim to the crown around head R2–R5. Add several supporting stitches through the lower back of the slice into the head so it holds its angle.
- Attach the leaf. Place it behind the slice, with the tip extending approximately 1 cm above the upper rim. Sew its base and lower section firmly to the head, leaving the upper part free.
- Finish shaping. Check the seated height, adjust the decoration angle, and arrange the legs symmetrically. Secure and bury all remaining yarn ends.
Tips for a Neater Crochet Pattern Kiwi Bird
- Use a stitch marker. Joined rounds can be tricky to track without one.
- Count your stitches. The pattern changes counts frequently.
- Stuff as you go. It’s easier to shape the head and body before closing.
- Embroider the back patterns before stuffing. It’s easier to reach the back when the piece is flat.
- Sew the legs securely. They’re a focal point, so use a few extra stitches.
- Position the kiwi slice carefully. It should sit on top of the head like a little hat.
- Use matching yarn for sewing. It hides the seams better.
- Take your time with the leaf. The shaping is simple but needs careful counting.
FAQ About the Crochet Pattern Kiwi Bird
What skill level is this crochet pattern kiwi bird?
It’s rated ★ ★ ★ ★ ★ (intermediate). You need to know magic ring, single crochet, increase, decrease, color changes, and basic embroidery.
How big is the finished crochet pattern kiwi bird?
It’s approximately 20 x 18 cm (7.8 x 7.02 inches).
What yarn is used for this crochet pattern kiwi bird?
Use smooth worsted-weight yarn, approximately 90–110 m per 50 g. The materials list gives amounts for each color, along with the hook and embroidery thread.
What size safety eyes do I need?
The pattern uses 14 mm safety eyes, with optional 8 mm eyes for extra detail.
How do I make the kiwi slice?
Make the front and back of the slice separately with light yellow, green, and brown yarn, then join their rims. Add black embroidery for the seeds. Full instructions are in the slice sections.
Your Next Stitch
This crochet pattern kiwi bird is one of those projects that brings a little joy to every stitch. It’s soft, it’s whimsical, and it has a tiny kiwi slice hat that makes it instantly lovable. Whether you make it for yourself, a friend, or a fellow fruit lover, you’ll end up with a 20 cm friend who looks like it just waddled out of a storybook.
So gather your yarn, pick your hook, and start with that first magic ring. If you get stuck on the legs or the kiwi slice, come back to this guide and work through it step by step. And when your kiwi bird is finished, share it, post a photo, and show off your work. Your next project might be exactly what someone else needs to see.
Happy crocheting!