Crochet Baby Rabbit Pattern Plush Bunny
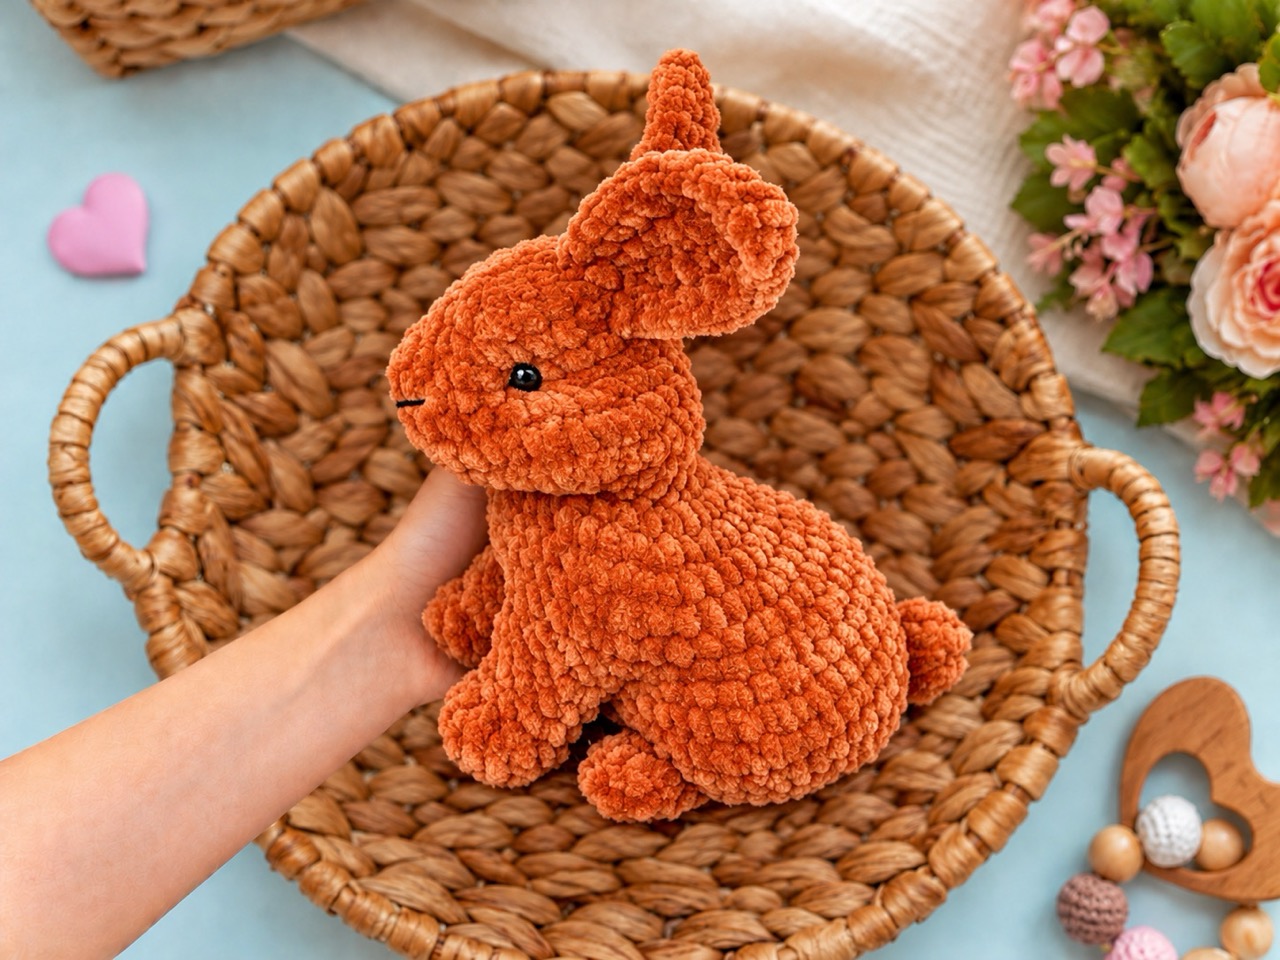
There’s something incredibly sweet about a tiny handmade rabbit. It fits perfectly in the palm of your hand, has soft floppy ears, and looks like it’s always ready for a gentle cuddle. This crochet baby rabbit pattern by Crochhet captures that exact charm. At just 12 cm tall (16 cm with the ears), this little bunny is quick to work up and absolutely precious. The pattern gives you two options: a smooth, velvety rabbit made with plush chenille yarn, or a fluffy, realistic rabbit made with faux fur yarn. Whether you’re a beginner looking for a confidence-boosting project or an experienced maker wanting a quick, satisfying make, this pattern delivers a huggable friend that’s sure to bring a smile.
Below is a complete guide to the Baby Rabbit pattern. You’ll find the materials, abbreviations, step-by-step instructions for the body, forelegs, ears, hind legs, and tail, plus assembly notes, tips for working with faux fur, and answers to common questions.
Jump to a Section
- Why Make This Crochet Baby Rabbit?
- What You Need Before You Start
- Abbreviations and Pattern Notes
- How to Crochet the Body and Head
- How to Crochet the Ears
- How to Crochet the Front Paws
- How to Crochet the Hind Feet and Tail
- Face and Assembly
- Tips for Velvet and Faux Fur Yarn
- FAQ About the Crochet Baby Rabbit Pattern
Why Make This Crochet Baby Rabbit?
- Approximate size: 12 cm tall without ears; 16 cm with ears.
- Construction: The body and head are one piece, so there is no head seam.
- Yarn options: Velvet makes the stitches easier to see; faux fur gives the rabbit a fluffy appearance.
- Skill level: Suitable for someone comfortable with a magic ring, single crochet, increases, decreases, and sewing pieces together.
- Expression: Eye placement and a small embroidered nose create the face without complicated sculpting.
What You Need Before You Start
- Approximately 50–70 g of plush or velvet yarn, such as Wolans Bunny Baby, Himalaya Dolphin Baby, or YarnArt Dolce; or a suitable faux fur yarn such as Himalaya Koala
- A small amount of pink yarn for the nose and optional ear details
- 3.5 mm crochet hook, or the size needed to make a firm fabric
- Approximately 10 g of fiberfill
- Two 6 mm safety eyes for a smooth velvet version, or eyes around 10 mm if smaller ones disappear into the faux fur
- Stitch marker, tapestry needle, scissors, and pins
You may embroider the eyes instead. Use embroidered features for a toy that may be mouthed, since attached eyes can come loose.
Notes on size
The stated measurements are for plush yarn. Faux fur, thinner cotton yarn, a different hook, or looser stitches will change the size. Keep your stitches close enough that the stuffing does not show through.
Abbreviations and Pattern Notes
This pattern uses US crochet terms. Work in continuous spirals and mark the first stitch of each round.
- MR — magic ring
- sc — single crochet
- inc — 2 sc in one stitch
- dec — single crochet 2 stitches together
- sl st — slip stitch
- (…) × 6 — repeat the instructions six times
- [12] — total stitches at the end of the round
Start the body at its base and continue upward into the head. Keep your round marker toward the center back so you can place the facial features evenly on the front.
How to Crochet the Body and Head
Use your main yarn color. Add stuffing as the opening narrows, keeping the base broad and the neck supported.
Body
- Rnd 1: 6 sc in MR [6]
- Rnd 2: 6 inc [12]
- Rnd 3: (sc, inc) × 6 [18]
- Rnd 4: (2 sc, inc) × 6 [24]
- Rnd 5: (3 sc, inc) × 6 [30]
- Rnd 6: (4 sc, inc) × 6 [36]
- Rnds 7–9: 36 sc [36 per round]
- Rnd 10: (4 sc, dec) × 6 [30]
- Rnd 11: 30 sc [30]
- Rnd 12: (3 sc, dec) × 6 [24]
- Rnd 13: 24 sc [24]
- Rnd 14: (2 sc, dec) × 6 [18]
- Rnd 15: 18 sc [18]
Stuff the lower body firmly. Add enough filling at the neck to support the head, then continue with the same yarn.
Head
- Rnd 16: (2 sc, inc) × 6 [24]
- Rnd 17: (3 sc, inc) × 6 [30]
- Rnd 18: (4 sc, inc) × 6 [36]
- Rnd 19: (5 sc, inc) × 6 [42]
- Rnds 20–25: 42 sc [42 per round]
If using safety eyes, place them between rounds 22 and 23 on the front of the head, with approximately 7–8 stitches between them. Check their position before attaching the backs.
- Rnd 26: (5 sc, dec) × 6 [36]
- Rnd 27: (4 sc, dec) × 6 [30]
- Rnd 28: (3 sc, dec) × 6 [24]
- Rnd 29: (2 sc, dec) × 6 [18]
Stuff the head evenly, pushing filling toward its sides to keep it round.
- Rnd 30: (sc, dec) × 6 [12]
- Rnd 31: 6 dec [6]
Fasten off. Thread the yarn tail through the front loops of the remaining six stitches, pull the opening closed, and hide the tail inside.
How to Crochet the Ears
Make 2 with the main yarn. These ears begin at the tip and widen toward the base. Do not stuff them.
- Rnd 1: 4 sc in MR [4]
- Rnd 2: (sc, inc) × 2 [6]
- Rnd 3: (2 sc, inc) × 2 [8]
- Rnd 4: (3 sc, inc) × 2 [10]
- Rnd 5: (4 sc, inc) × 2 [12]
- Rnds 6–8: 12 sc [12 per round]
- Rnd 9: (5 sc, inc) × 2 [14]
- Rnd 10: 14 sc [14]
Flatten each opening and crochet 7 sc through both layers. Fasten off with a long sewing tail. If you want a little color, embroider a narrow pink line down the front of each ear.
How to Crochet the Front Paws
Make 2. Stuff only the rounded paw tips lightly; leave the upper sections soft.
- Rnd 1: 6 sc in MR [6]
- Rnd 2: 6 inc [12]
- Rnds 3–4: 12 sc [12 per round]
- Rnd 5: (2 sc, dec) × 3 [9]
- Rnds 6–7: 9 sc [9 per round]
- Rnd 8: 7 sc, dec [8]
Flatten each opening and work 4 sc through both layers. Fasten off with a long tail for sewing.
How to Crochet the Hind Feet and Tail
Hind feet — make 2
These wider feet sit at the lower front of the rabbit.
- Rnd 1: 6 sc in MR [6]
- Rnd 2: 6 inc [12]
- Rnd 3: (sc, inc) × 6 [18]
- Rnd 4: 18 sc [18]
- Rnd 5: (sc, dec) × 6 [12]
- Rnd 6: 12 sc [12]
Stuff lightly. Flatten the opening and crochet 6 sc through both layers. Fasten off with a sewing tail.
Tail
- Rnd 1: 6 sc in MR [6]
- Rnd 2: 6 inc [12]
- Rnd 3: 12 sc [12]
- Rnd 4: 6 dec [6]
Add a small pinch of stuffing. Fasten off, leaving the six-stitch opening and a long tail for sewing.
Face and Assembly
- Embroider the nose. Make a small pink triangle at the center of the face around rounds 20–21, below the eyes. Add a short vertical stitch and two tiny mouth stitches if you like.
- Pin on the ears. Place their flattened bases across approximately head rounds 28–30, leaving about five stitches between them. Check the front view, then sew along each base.
- Sew on the front paws at opposite sides of the upper body, around body rounds 11–13. Angle the paw tips slightly forward.
- Pin the hind feet to the lower front, around body rounds 4–6. Set the rabbit on a flat surface and adjust the feet until it sits as you want; then sew them firmly.
- Sew the tail to the lower center back, around body rounds 4–6. It can add a little support when the rabbit sits.
- Weave in all loose ends and gently shape the head, body, and ears with your hands.
Tips for Velvet and Faux Fur Yarn
- Use a stitch marker every round. Plush fibers can make the start of a round difficult to find.
- Feel for the stitches. With faux fur, separating the fibers with your fingers is often easier than trying to see every loop.
- Check the visible side of a faux fur swatch. Some yarns look fluffier when turned inside out. Choose the side you prefer before making the whole rabbit.
- Pin the eyes temporarily. Fur can hide small eyes, so check their size and spacing on the actual head before securing them.
- Stuff in small amounts. This helps the neck stay firm without distorting the head.
- Make paired pieces together. Working both ears, then both paws, helps you keep their tension similar.
FAQ About the Crochet Baby Rabbit Pattern
How big is this crochet baby rabbit?
Aim for approximately 12 cm tall without the ears and 16 cm with them. The size may change with your yarn, hook, and tension.
Can I make the pattern with faux fur yarn?
Yes. The round counts are the same, though the finished toy may be larger or fluffier. Part the fibers as you work and check which side of the fabric you want facing outward.
Are the front paws crocheted into the body?
No. In this new design, the body and head are continuous, while both front paws are made separately and sewn to the upper body.
Do I need to tighten or sculpt the eyes?
No eye tightening is required. Place the eyes evenly and use the embroidered nose to complete the expression.
Can I use cotton yarn?
Yes, but thinner cotton yarn will usually produce a smaller rabbit. Choose a hook that makes a firm fabric and adjust the eye size to suit the new head.
Your Next Stitch
This crochet baby rabbit pattern is one of those projects that brings a little joy to every stitch. It’s small, it’s soft, and it’s made to be loved. Whether you make the smooth velvet version or the fluffy faux fur version, you’ll end up with a 13 cm friend who looks like it just hopped out of a storybook.
So gather your plush yarn, pick up your 3.5 mm hook, and start with that first chain. If you get stuck on the forelegs or the eye tightening, come back to this guide and work through it step by step. And when your baby rabbit is finished, share it in post a photo, and show off your work. Your next project might be exactly what someone else needs to see.
Happy crocheting!