Free Crochet Mini Cats Pattern 6 Adorable Amigurumi Kittens
Crochet Mini Cats Pattern: Make Six Tiny 8–9 cm Kittens
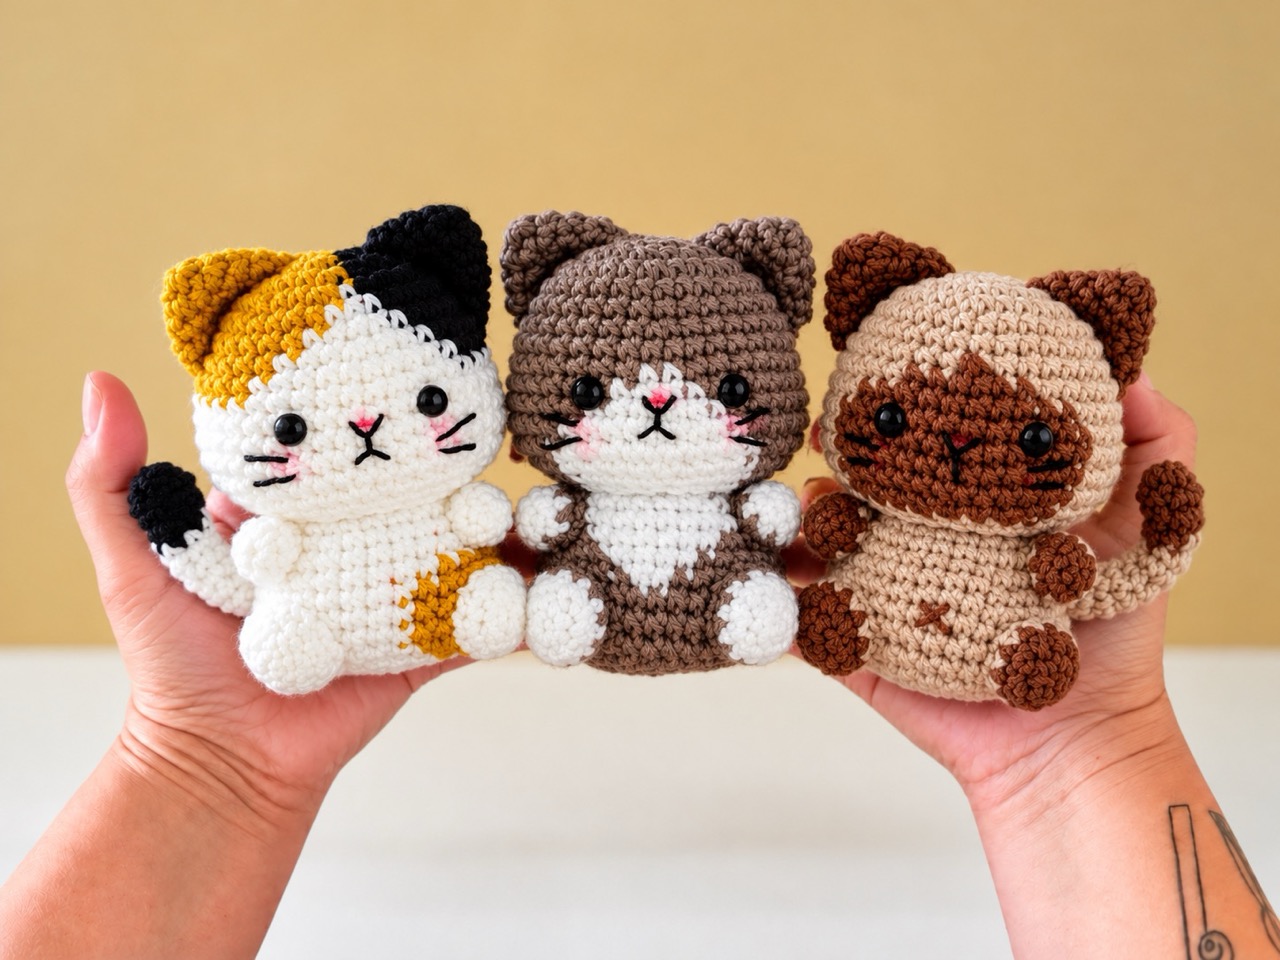
A tiny handmade cat can hold plenty of personality. A dark face mask gives one kitten its Siamese look, a white chest creates a little tuxedo, and uneven patches turn another into a cheerful calico. This crochet mini cats pattern brings those details together in six small kittens with rounded heads, pointed ears, little paws, and curved tails.
Each kitten is designed to measure approximately 8–9 cm tall, including the ears, using fine cotton yarn and a 2.0 mm hook. The head and body are crocheted separately, while sewn-on markings create the different coats.
Below you’ll find the complete base pattern, instructions for all six color variations, shared pieces, assembly directions, tips, and answers to common questions.
Jump to a Section
- Why This Crochet Mini Cats Pattern Stands Out
- What You Need Before You Start
- Abbreviations and Special Techniques
- How to Crochet Cat 1: The Siamese Kitten
- How to Crochet Cat 2: The White and Camel Kitten
- How to Crochet Cat 3: The Black and White Tuxedo
- How to Crochet Cat 4: The Gray and White Kitten
- How to Crochet Cat 5: The Black and White Patched Kitten
- How to Crochet Cat 6: The Calico Kitten
- How to Make the Arms, Legs, Ears, and Tail
- How to Make the Muzzle and Coat Markings
- Putting Your Crochet Mini Cats Together
- Tips for a Neater Crochet Mini Cats Pattern
- FAQ About the Crochet Mini Cats Pattern
- Your Next Stitch
Why This Crochet Mini Cats Pattern Stands Out
The collection uses one set of shapes, with different colors and markings for each kitten.
- Target size: Approximately 8–9 cm tall, including the ears.
- Skill level: Confident beginner, comfortable working small rounds and sewing pieces together.
- Yarn: Fine sport or fingering-weight cotton.
- Suggested hook: 2.0 mm, adjusted to achieve firm fabric.
- Eyes: Embroidered with black thread.
- Six variations: Siamese, white and camel, tuxedo, gray and white, black and white patched, and calico.
- Construction: Separate head and body with matching neck openings.
- Details: Small muzzle cheeks, shaped paws, pointed ears, and a flexible tail.
- Coat markings: Flat crochet patches sewn onto the finished shapes.
Most pieces are worked in continuous rounds. The forehead blaze is worked in rows.
What You Need Before You Start
Yarn and Hook
Choose smooth cotton yarn approximately 160–180 m per 50 g. Smooth yarn helps you see the small stitches and embroider the face.
For one kitten, allow approximately:
- Main color: 20 g.
- Each contrasting color: 5 g.
- Small amounts of black, pink, and white embroidery thread.
Use a 2.0 mm hook, or the size needed to create firm fabric without visible stuffing.
Color Guide
Throughout the pattern:
- A means the main head and body color.
- P means the paw color.
| Kitten | Main color A | Paw color P | Ears | Tail |
|---|---|---|---|---|
| Siamese | Light beige | Dark brown | Dark brown | Dark brown |
| White and camel | White | White* | Camel | Camel |
| Tuxedo | Black | White | Black | Black |
| Gray and white | Gray | White | Gray | Gray |
| Black and white patched | White | White | One black, one white | Black tip, white base |
| Calico | White | White | One orange, one black | Black tip, white base |
For the white and camel kitten, make the paw section of one back foot in camel.
The individual kitten sections list the additional patches to make.
Notions and Tools
- Polyester stuffing.
- Yarn needle.
- Fine embroidery needle suitable for your thread.
- Stitch marker.
- Scissors.
- Pins for positioning pieces.
Gauge and Finished Size
Aim for approximately 28 sc and 32 rounds per 10 cm, measured on firm fabric worked in the round.
The assembled head and body should measure approximately 7–8 cm before adding the ears. Ear placement brings the intended total height to approximately 8–9 cm.
Check your fabric as you work. If the kitten is becoming too large, use finer yarn or a smaller hook that still allows you to crochet comfortably. Bulky chenille will produce a substantially larger kitten with these stitch counts.
Abbreviations and Special Techniques
This pattern uses US crochet terminology.
- MR: Magic ring.
- ch: Chain.
- sc: Single crochet.
- sl st: Slip stitch.
- inc: Work 2 sc into the same stitch.
- dec: Invisible single crochet decrease over the next 2 stitches.
- BLO: Back loop only.
- R: Round.
- st/sts: Stitch/stitches.
- […] × number: Repeat the enclosed instructions.
- (number): Stitch count at the end of the round or row.
Changing Colors
Work the last stitch of the current color until two loops remain on the hook. Yarn over with the new color and pull through both loops.
Continue with the new color. Secure the ends inside the piece, keeping dark ends behind dark fabric where possible.
Invisible Decrease
- Insert the hook through the front loop of the next stitch.
- Insert it through the front loop of the following stitch.
- Yarn over and pull through both front loops.
- Yarn over and pull through the remaining two loops.
Closing a Flattened Piece
For ears and limbs, flatten the opening so the front and back stitches line up.
Insert the hook through one stitch from each layer and make a single crochet. Each closing stitch joins two stitches from the opening.
For example, a six-stitch opening becomes three stitches across the flattened edge.
General Notes
- Work in continuous rounds unless instructed otherwise.
- Mark the first stitch of every round.
- Work through both loops unless BLO is specified.
- Turning chains do not count as stitches.
- Round numbers restart for each separate piece.
- Do not stuff the ears, tail, muzzle cheeks, or coat patches.
- Leave a sewing tail on pieces that will be attached later.
How to Crochet Cat 1: The Siamese Kitten
For the Siamese kitten, use light beige as A and dark brown as P.
Make the body and head below. These are also the base instructions for the other five kittens.
Body — Make One
Begin with light beige at the bottom of the body.
- R1: 6 sc in MR. (6)
- R2: Inc in every stitch. (12)
- R3: [Sc, inc] × 6. (18)
- R4: [2 sc, inc] × 6. (24)
- R5: [3 sc, inc] × 6. (30)
- R6–R8: Sc around. (30 each round)
- R9: [8 sc, dec] × 3. (27)
- R10: Sc around. (27)
- R11: [7 sc, dec] × 3. (24)
- R12: Sc around. (24)
- R13: [2 sc, dec] × 6. (18)
Begin stuffing. Keep the lower body broad and gently flatten the bottom against your palm.
- R14: [Sc, dec] × 6. (12)
- R15: Sc around. (12)
Fasten off, leaving approximately 30 cm for attaching the head.
Leave the neck opening unclosed. Finish stuffing, keeping the neck slightly softer than the lower body.
Head — Make One
Begin with light beige at the crown.
- R1: 6 sc in MR. (6)
- R2: Inc in every stitch. (12)
- R3: [Sc, inc] × 6. (18)
- R4: [2 sc, inc] × 6. (24)
- R5: [3 sc, inc] × 6. (30)
- R6: [4 sc, inc] × 6. (36)
- R7–R11: Sc around. (36 each round)
- R12: [4 sc, dec] × 6. (30)
- R13: [3 sc, dec] × 6. (24)
Begin stuffing with small pieces, spreading them evenly around the sides.
- R14: [2 sc, dec] × 6. (18)
- R15: [Sc, dec] × 6. (12)
Fasten off and secure the end. Leave the opening unclosed.
Finish stuffing until the head is rounded without stretching the stitches. The 12-stitch head opening will be sewn to the 12-stitch body opening.
Siamese Colors and Markings
Using the shared instructions below, make:
- Two dark brown ears.
- Two front legs with dark brown paws and beige upper sections.
- Two back feet with dark brown paws and beige upper sections.
- One solid dark brown tail.
- Two beige muzzle cheeks.
- One dark brown large oval for the face mask.
Center the mask horizontally on the front of the head, approximately across head R6–R11. Sew it flat before adding the eyes and muzzle cheeks.
The eyes sit on the mask, and the beige cheeks cover its lower central area. Use a black or dark brown nose and pale beige whiskers.
How to Crochet Cat 2: The White and Camel Kitten
Use white as A and white as P, with camel for the markings.
Head and Body
Work every round of the Cat 1 body and head in white.
Other Pieces
Make:
- Two camel ears.
- Two entirely white front legs.
- One entirely white back foot.
- One back foot with camel R1–R4 and white R5–R6.
- One solid camel tail.
- Two white muzzle cheeks.
- Two camel small oval patches.
Marking Placement
Place one camel oval on each upper side of the forehead, approximately across head R3–R8.
Angle the patches slightly outward and keep a white strip between them. Pin both patches before sewing to check their balance.
Finish with a pink nose and dark whiskers.
How to Crochet Cat 3: The Black and White Tuxedo
Use black as A and white as P.
Head and Body
Work every round of the Cat 1 body and head in black.
Other Pieces
Make:
- Two black ears.
- Two front legs with white paws and black upper sections.
- Two back feet with white paws and black upper sections.
- One solid black tail.
- Two white muzzle cheeks.
- One white forehead blaze.
- One white large oval for the chest bib.
Marking Placement
Position the forehead blaze with its narrow point around head R6 and its wider edge just above the muzzle cheeks.
Place the eyes just outside the white blaze. Add a tiny white or pale gray stitch along the outer edge of each black eye to help it stand out against the black head.
Center the chest bib vertically on the front of the body, approximately across body R6–R12.
Use a pink nose and pale gray or white whiskers where they cross black fabric.
How to Crochet Cat 4: The Gray and White Kitten
Use gray as A and white as P.
Head and Body
Work every round of the Cat 1 body and head in gray.
Other Pieces
Make:
- Two gray ears.
- Two front legs with white paws and gray upper sections.
- Two back feet with white paws and gray upper sections.
- One solid gray tail.
- Two white muzzle cheeks.
- One white forehead blaze.
- One white large oval for the chest bib.
Marking Placement
Attach the blaze and chest bib in the same positions described for the tuxedo kitten.
Use black embroidered eyes, a pink nose, and dark whiskers. Optional short pink stitches beneath the eyes add cheek details.
How to Crochet Cat 5: The Black and White Patched Kitten
Use white as A and white as P, with black markings.
Head and Body
Work every round of the Cat 1 body and head in white.
Other Pieces
Make:
- One black ear and one white ear.
- Two entirely white front legs.
- Two entirely white back feet.
- One tail with black R1–R3 and white R4–R12.
- Two white muzzle cheeks.
- One black small oval patch.
- One black round patch.
Marking Placement
Sew the small oval onto the upper side of the head beneath the black ear, approximately across head R3–R8. Keep the center of the face white.
Sew the round patch onto one side of the body, approximately across body R6–R9.
Finish with a pink nose and black whiskers.
How to Crochet Cat 6: The Calico Kitten
Use white as A and white as P, with orange and black markings.
Head and Body
Work every round of the Cat 1 body and head in white.
Other Pieces
Make:
- One orange ear and one black ear.
- Two entirely white front legs.
- Two entirely white back feet.
- One tail with black R1–R3 and white R4–R12.
- Two white muzzle cheeks.
- One orange small oval patch for the head.
- One black round patch for the head.
- One orange round patch for a hip.
- One black round patch for the back.
Marking Placement
Place each head patch beneath its matching ear, leaving the center of the forehead white.
Sew the orange body patch onto one hip and the black body patch onto the opposite side of the back. Keep the markings slightly uneven for an individual calico coat.
Use a pink nose and black whiskers.
How to Make the Arms, Legs, Ears, and Tail
Use the colors listed for your chosen kitten.
Arms / Front Legs — Make Two
Begin with paw color P.
- R1: 6 sc in MR. (6)
- R2: [Sc, inc] × 3. (9)
- R3: Sc around. (9)
Change to main color A.
- R4: [Sc, dec] × 3. (6)
- R5–R7: Sc around. (6 each round)
Place a tiny amount of stuffing in the paw only. Leave the upper section unstuffed.
Flatten the opening and work 3 sc through both layers.
Fasten off with a sewing tail.
If A and P are the same color, continue without changing yarn.
Legs / Back Feet — Make Two
Begin with paw color P.
- R1: 6 sc in MR. (6)
- R2: Inc in every stitch. (12)
- R3: Working BLO, sc around. (12)
- R4: Working through both loops, sc around. (12)
Change to main color A.
- R5: [Sc, dec] × 4. (8)
- R6: Sc around. (8)
Lightly stuff the rounded toe section, keeping the opening soft.
Flatten and work 4 sc through both layers.
Fasten off with a sewing tail.
For the white and camel kitten, use camel for R1–R4 of one foot.
Optional: embroider two short vertical lines over the front of each foot to suggest toes.
Ears — Make Two
Begin at the tip, using the ear color specified for your kitten.
- R1: 4 sc in MR. (4)
- R2: [Sc, inc] × 2. (6)
- R3: [2 sc, inc] × 2. (8)
- R4: [3 sc, inc] × 2. (10)
Do not stuff.
Flatten the opening and work 5 sc through both layers.
Fasten off with a sewing tail.
Optional: embroider two short pink stitches inside each ear, keeping them away from the outer edges.
Tail — Make One
Begin at the tip.
- R1: 4 sc in MR. (4)
- R2: [Sc, inc] × 2. (6)
- R3–R12: Sc around. (6 each round)
For the black and white patched and calico kittens, work R1–R3 in black and change to white before beginning R4.
For the other kittens, use the designated tail color throughout.
Do not stuff. Fasten off with a sewing tail, leaving the six-stitch opening unclosed.
How to Make the Muzzle and Coat Markings
All pieces in this section remain flat and unstuffed.
Muzzle Cheeks — Make Two per Kitten
Use beige for the Siamese kitten and white for all other kittens.
- R1: 6 sc in MR. (6)
Sl st to the first sc and fasten off with a sewing tail.
These circles sit side by side beneath the nose.
Large Oval — Face Mask or Chest Bib
Use dark brown for the Siamese mask or white for a tuxedo or gray-and-white chest bib.
Ch 6. Work around both sides of the foundation chain.
- R1: Beginning in the second chain from the hook, sc in the next 4 chains, 3 sc in the last chain. Continue along the unused side of the foundation chain: sc in the next 3 chains, inc in the final chain. (12)
- R2: Inc, 3 sc, inc in each of the next 3 stitches, 3 sc, inc in each of the final 2 stitches. (18)
- R3: Sc, inc, 3 sc, [sc, inc] × 3, 3 sc, [sc, inc] × 2. (24)
Sl st to the next stitch and fasten off with a sewing tail.
Use the long axis horizontally for a face mask and vertically for a chest bib.
Small Oval Patch
Use the color specified for your kitten.
Ch 4.
- R1: Beginning in the second chain from the hook, sc in the next 2 chains, 3 sc in the last chain. Continue along the unused side of the foundation chain: sc in the next chain, inc in the final chain. (8)
- R2: Inc, sc, inc in each of the next 3 stitches, sc, inc in each of the final 2 stitches. (14)
Sl st to the next stitch and fasten off with a sewing tail.
Round Patch
Use the color specified for your kitten.
- R1: 6 sc in MR. (6)
- R2: Inc in every stitch. (12)
Sl st to the next stitch and fasten off with a sewing tail.
White Forehead Blaze
Use white and work in rows.
Ch 2.
- Row 1: Sc in the second chain from the hook. (1)
- Row 2: Ch 1, turn, inc. (2)
- Row 3: Ch 1, turn, inc in both stitches. (4)
- Row 4: Ch 1, turn, 4 sc. (4)
Fasten off with a sewing tail.
The narrow starting end points toward the crown. The wider end sits above the muzzle cheeks.
Putting Your Crochet Mini Cats Together
Pin the pieces before sewing. Check the kitten from the front and both sides as you work.
1. Join the Head and Body
Match the 12 stitches of the head opening to the 12 stitches of the body opening.
Use the body’s long yarn tail to sew around the entire neck. Before closing the final gap, add a little stuffing if the neck feels hollow.
Secure the seam without pulling so tightly that it creates a deep groove.
2. Attach the Coat Markings
Follow the placement guide for your chosen kitten.
Sew around each patch with small stitches, keeping its edges flat. Attach face patches before embroidering the eyes.
3. Sew on the Ears
Attach the flattened ear bases to the upper sides of the head, spanning approximately head R3–R6.
Angle the tips upward and slightly outward. Check that the ears sit at matching heights before securing them.
4. Embroider the Eyes
Mark the eye centers between head R8 and R9, approximately five stitch spaces apart.
Measure the spacing on the head itself, even when a patch covers the fabric.
For each eye:
- Make three or four short vertical stitches in black thread.
- Build a small oval approximately 3–4 mm tall.
- Add one tiny white highlight if desired.
On very dark faces, add a short pale gray or white stitch along each eye’s outer edge for definition.
5. Attach the Muzzle Cheeks
Sew the two small circles side by side beneath the eyes, approximately across head R9–R11.
Their inner edges should meet at the center of the face.
6. Embroider the Nose and Mouth
Embroider a small triangular nose over the meeting point of the cheeks, approximately one stitch wide.
Add a short vertical stitch beneath the nose, followed by two tiny diagonal stitches for the mouth.
Use pink for most kittens and black or dark brown for the Siamese.
7. Add Whiskers and Optional Cheeks
Embroider two whiskers on each side of the muzzle, each approximately one or two stitches long.
Keep the thread tension gentle so the face does not pucker.
For optional cheeks, add a short pink stitch beneath each eye.
8. Attach the Front Legs
Sew the flattened upper edges onto the sides of the body around body R12–R13.
Let the paws hang slightly toward the front. Check that both paws finish at a similar height.
9. Attach the Back Feet
Sew the flattened upper edges onto the lower front of the body around body R3–R5.
Let the rounded toes project forward. Adjust both feet so the kitten sits evenly.
10. Attach the Tail
Sew the open end to the center back around body R5–R6.
Curve the tail around one side and secure it with one or two small stitches so it rests beside the feet.
11. Add an Optional Belly Detail
For a tiny belly button, embroider one short vertical stitch at the center front of body R8.
This detail can be omitted on kittens with chest bibs.
12. Finish and Shape
Secure and hide all yarn ends. Remove every positioning pin.
Gently shape the head, flatten the bottom, and adjust the ears and paws.
Tips for a Neater Crochet Mini Cats Pattern
- Check size early. Yarn thickness can change the finished height even when you use the suggested hook.
- Count after shaping rounds. Catching a missed increase or decrease immediately makes correction easier.
- Use a stitch marker. Small spiral rounds are easy to lose track of.
- Add stuffing gradually. Small pieces create a smoother surface than one large clump.
- Keep limb tops soft. Unstuffed upper sections are easier to flatten and sew.
- Pin both ears together. Compare their height and angle before attaching either permanently.
- Sew patches with gentle tension. Tight stitches can distort the head or body.
- Check eye spacing before embroidering. Temporary thread markers help you compare placement.
- Keep dark yarn ends behind dark fabric. This reduces shadows through white stitches.
- Use fine thread for facial details. Thick yarn can overwhelm a face this small.
- Measure one finished sample. Confirm the size and appearance before making a full set.
FAQ About the Crochet Mini Cats Pattern
What skill level is this crochet mini cats pattern?
It is suitable for confident beginners who can work magic rings, single crochet, increases, decreases, and simple color changes. You will also need to sew small pieces and embroider facial details.
How big are the finished mini cats?
The intended height is approximately 8–9 cm, including the ears.
What yarn should I use for this crochet mini cats pattern?
Use fine sport or fingering-weight cotton, approximately 160–180 m per 50 g. Choose similar yarn thicknesses for the main color and contrasting pieces.
What hook size should I use?
Start with a 2.0 mm hook. Adjust if needed to create firm fabric without visible stuffing.
Does this pattern use safety eyes?
The written instructions use embroidered eyes. Make small black ovals and add tiny white highlights if desired.
Where do I place the eyes?
Place the eye centers between head R8 and R9, approximately five stitch spaces apart. Count this spacing on the head fabric rather than on any face patch.
Are the head and body crocheted in one piece?
They are made separately. Each finishes with a 12-stitch opening, allowing the head and body to be sewn together stitch for stitch.
How are the coat markings made?
The markings are separate flat crochet pieces: small ovals, circles, a larger oval, and a narrow forehead blaze. Sew them onto the head and body in the positions described for each kitten.
How many variations are included?
There are six: Siamese, white and camel, tuxedo, gray and white, black and white patched, and calico.
Which parts should I stuff?
Stuff the head and body. Add a small amount to the front paws and back feet. Leave the upper front legs, ears, tail, muzzle cheeks, and coat patches unstuffed.
Can I use chenille yarn?
You can experiment with it, but thicker chenille will make a larger kitten. Fine cotton is the intended choice for the 8–9 cm size and small embroidered details.
Your Next Stitch
Choose the kitten whose markings you like best, gather your colors, and begin with the body. Once the head and paws are assembled, the ears, patches, and embroidered expression will give your little cat its character.
Make one kitten first to check the height and placement with your own tension. Then use the same crochet mini cats pattern to build a matching collection, changing the coat colors and patch positions for each new addition.
Happy crocheting!