Flower Dragon Free Crochet Pattern
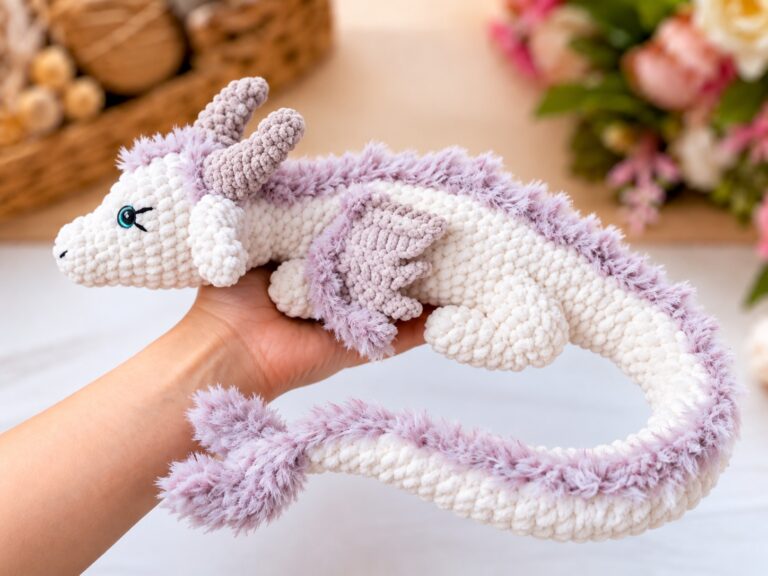
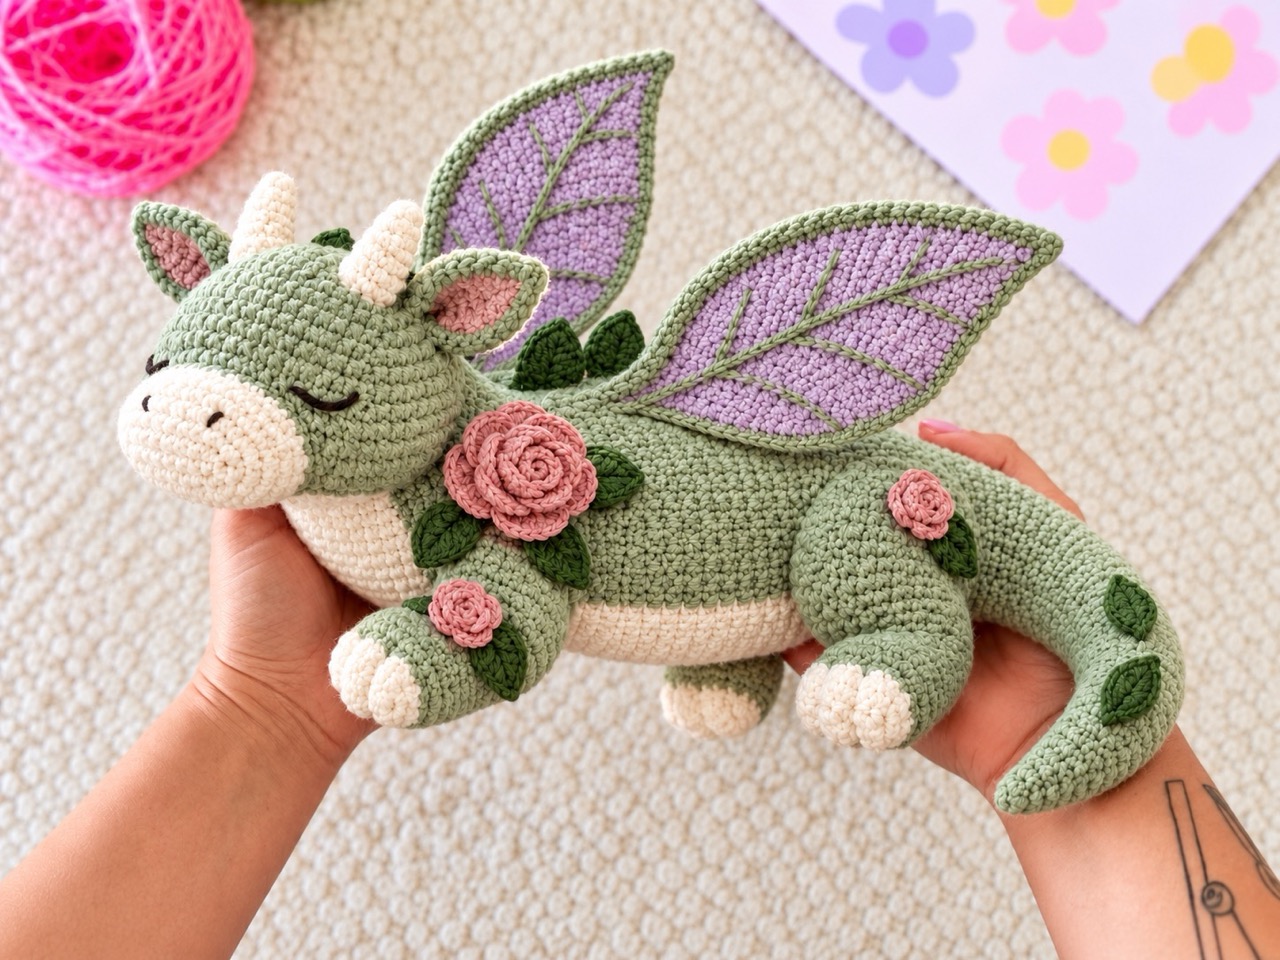
A handmade dragon can bring a little garden color into your home. This flower dragon crochet pattern combines a long sage-green body, a cream muzzle, lavender leaf wings, and dusty-rose flowers. Its embroidered sleeping eyes give it a quiet expression, while four little paws support its reclining pose.
The Meadow Bloom Dragon is designed to measure approximately 55–60 cm from nose to tail tip. Its tail and body are crocheted together, with a separate head and sewn-on details.
Below are the complete instructions for the body, head, paws, horns, ears, belly panel, wings, fins, roses, and leaves.
Jump to a Section
- Before You Begin
- Materials and Tools for Your Flower Dragon
- Crochet Abbreviations and Working Notes
- Complete Flower Dragon Crochet Pattern
- Assembling Your Flower Dragon
- Tips for a Neater Flower Dragon
- Frequently Asked Questions About the Flower Dragon Crochet Pattern
- Your Next Stitch
Before You Begin
The project suits an intermediate crocheter comfortable with shaping, working around a foundation chain, crocheting in rows, and sewing pieces together.
Materials and Tools for Your Flower Dragon
Use bulky yarn of similar thickness throughout the project.
Yarn Requirements
| Color | Suggested Shade | Used For | Amount |
|---|---|---|---|
| A | Sage green | Body, head, ears, upper legs, wing undersides | 300–400 m |
| B | Pale cream | Muzzle, paws, belly, horns | 75–100 m |
| C | Lavender | Wing fronts | 75–100 m |
| D | Dusty rose | Flowers and ear embroidery | 50–75 m |
| E | Forest green | Leaves and back fins | 25–50 m |
Check the length on your yarn labels rather than assuming that every skein contains the same amount.
Tools and Notions
- 4.5 mm crochet hook, or a hook that produces firm fabric with your chosen yarn.
- Fine dark embroidery yarn for the eyes and nostrils.
- Fiberfill stuffing.
- Stitch markers.
- Tapestry needle.
- Straight pins.
- Scissors.
Gauge and Finished Size
A working gauge near 14 sc and 16 rounds per 10 cm is a starting point for the intended scale. This is a planning gauge rather than a measured sample result.
The target length is 55–60 cm, measured from the nose to the tail tip with the dragon resting naturally. Different yarn, tension, and head placement will change that measurement.
Crochet Abbreviations and Working Notes
This pattern uses US crochet terminology.
- MR — magic ring.
- ch — chain.
- sc — single crochet.
- hdc — half double crochet.
- dc — double crochet.
- inc — work 2 sc in one stitch.
- dec — single crochet 2 stitches together.
- sl st — slip stitch.
- BLO — back loop only.
- (…) × N — repeat the instructions N times.
- [N] — stitch count at the end of the round or row.
Work in continuous spiral rounds unless a piece is described in rows. Move the stitch marker after each round.
For turning rows, the turning chain does not count as a stitch. Change colors during the final pull-through of the preceding stitch.
Leave long yarn tails on pieces that will be sewn on.
Complete Flower Dragon Crochet Pattern
1. Tail and Body
Use Color A. Begin at the tail tip and work toward the chest.
Stuff the narrow tail lightly. Add more filling as the piece widens.
- Rnd 1: 6 sc in MR [6].
- Rnd 2: 6 sc [6].
- Rnd 3: (2 sc, inc) × 2 [8].
- Rnds 4–7: 8 sc [8 per round].
- Rnd 8: (3 sc, inc) × 2 [10].
- Rnds 9–12: 10 sc [10 per round].
- Rnd 13: (4 sc, inc) × 2 [12].
- Rnds 14–17: 12 sc [12 per round].
- Rnd 18: (3 sc, inc) × 3 [15].
- Rnds 19–22: 15 sc [15 per round].
- Rnd 23: (4 sc, inc) × 3 [18].
- Rnds 24–27: 18 sc [18 per round].
- Rnd 28: (5 sc, inc) × 3 [21].
- Rnds 29–32: 21 sc [21 per round].
- Rnd 33: (6 sc, inc) × 3 [24].
- Rnds 34–37: 24 sc [24 per round].
The tapered tail is complete. Continue directly into the body.
- Rnd 38: (3 sc, inc) × 6 [30].
- Rnd 39: 30 sc [30].
- Rnd 40: (4 sc, inc) × 6 [36].
- Rnd 41: 36 sc [36].
- Rnd 42: (5 sc, inc) × 6 [42].
- Rnd 43: 42 sc [42].
- Rnd 44: (6 sc, inc) × 6 [48].
- Rnd 45: (7 sc, inc) × 6 [54].
- Rnds 46–57: 54 sc [54 per round].
- Rnd 58: (7 sc, dec) × 6 [48].
- Rnds 59–62: 48 sc [48 per round].
- Rnd 63: (6 sc, dec) × 6 [42].
- Rnds 64–66: 42 sc [42 per round].
- Rnd 67: (5 sc, dec) × 6 [36].
- Rnds 68–70: 36 sc [36 per round].
- Rnd 71: (4 sc, dec) × 6 [30].
- Rnds 72–73: 30 sc [30 per round].
Finish stuffing the body. Shape the underside into a slightly flattened resting surface.
- Rnd 74: (3 sc, dec) × 6 [24].
- Rnd 75: (2 sc, dec) × 6 [18].
- Rnd 76: (Sc, dec) × 6 [12].
- Rnd 77: 6 dec [6].
Fasten off. Thread the yarn through the front loops of the remaining stitches and pull closed.
Lay the piece horizontally. Round 1 is the tail tip; round 77 is the front of the chest. Mark the upper centerline with pins.
2. Head With Integrated Cream Muzzle
Begin with Color B at the nose end. Work around both sides of the foundation chain.
- Rnd 1: Ch 7. Starting in the second ch from the hook, 5 sc, then 3 sc in the last ch. Continue along the other side: 4 sc, then inc in the first ch [14].
- Rnd 2: Inc, 4 sc, 3 inc, 4 sc, 2 inc [20].
- Rnd 3: (4 sc, inc) × 4 [24].
- Rnds 4–6: 24 sc [24 per round].
- Rnd 7: Change to Color A; (3 sc, inc) × 6 [30].
- Rnd 8: (4 sc, inc) × 6 [36].
- Rnd 9: 36 sc [36].
- Rnd 10: (5 sc, inc) × 6 [42].
- Rnd 11: (6 sc, inc) × 6 [48].
- Rnds 12–17: 48 sc [48 per round].
- Rnd 18: (6 sc, dec) × 6 [42].
- Rnd 19: (5 sc, dec) × 6 [36].
Stuff the muzzle first, then the wider back of the head.
- Rnd 20: (4 sc, dec) × 6 [30].
- Rnd 21: (3 sc, dec) × 6 [24].
- Rnd 22: (2 sc, dec) × 6 [18].
- Rnd 23: (Sc, dec) × 6 [12].
- Rnd 24: 6 dec [6].
Fasten off and close the opening.
Embroider two small nostrils on the upper surface of the cream muzzle around rounds 3–4. Add a sleeping-eye curve on each side of the head around rounds 12–13. Check that the curves sit level when viewed from the front.
3. Paws and Legs — Make Four
Begin each paw with Color B.
- Rnd 1: Ch 5. Starting in the second ch from the hook, 3 sc, then 3 sc in the last ch. Continue along the other side: 2 sc, then inc in the first ch [10].
- Rnd 2: Inc, 2 sc, 3 inc, 2 sc, 2 inc [16].
- Rnd 3: (3 sc, inc) × 4 [20].
- Rnd 4: BLO 20 sc [20].
- Rnds 5–6: 20 sc [20 per round].
- Rnd 7: Change to Color A; 4 sc, 6 dec, 4 sc [14].
- Rnd 8: 4 sc, 3 dec, 4 sc [11].
- Rnd 9: Dec, 9 sc [10].
- Rnds 10–13: 10 sc [10 per round].
- Rnd 14: (3 sc, dec) × 2 [8].
Stuff the paw and lower leg. Leave the upper end soft enough to bend against the body.
Flatten the opening and crochet 4 sc through both layers. Fasten off with a long sewing tail.
The grouped decreases shape the front of each paw. During assembly, point the toes outward and slightly forward.
4. Cream Horns — Make Two
Use Color B, starting at the tip.
- Rnd 1: 4 sc in MR [4].
- Rnd 2: 4 sc [4].
- Rnd 3: (Sc, inc) × 2 [6].
- Rnd 4: 6 sc [6].
- Rnd 5: (2 sc, inc) × 2 [8].
- Rnds 6–8: 8 sc [8 per round].
- Rnd 9: (3 sc, inc) × 2 [10].
- Rnd 10: 10 sc [10].
Stuff lightly. Fasten off with the base open and a long sewing tail.
Pin the horns to the upper sides of the head around rounds 14–17, behind the embroidered eyes. Angle the tips slightly backward and sew around the bases.
5. Ears — Make Two
Use Color A.
- Rnd 1: 4 sc in MR [4].
- Rnd 2: (Sc, inc) × 2 [6].
- Rnd 3: (2 sc, inc) × 2 [8].
- Rnd 4: (3 sc, inc) × 2 [10].
- Rnd 5: (4 sc, inc) × 2 [12].
- Rnd 6: 12 sc [12].
Do not stuff. Flatten and close with 6 sc through both layers. Leave long sewing tails.
Add a few dusty-rose embroidery stitches inside each ear. Sew the ears outside and slightly behind the horns, around head rounds 15–18.
6. Cream Belly Panel
Use Color B. Work in turning rows. Ch 1 and turn after each row except the final row.
- Row 1: Ch 9. Starting in the second ch from the hook, 8 sc [8].
- Row 2: Inc, 6 sc, inc [10].
- Row 3: Inc, 8 sc, inc [12].
- Row 4: Inc, 10 sc, inc [14].
- Row 5: Inc, 12 sc, inc [16].
- Rows 6–16: 16 sc [16 per row].
- Row 17: Dec, 12 sc, dec [14].
- Row 18: Dec, 10 sc, dec [12].
- Row 19: Dec, 8 sc, dec [10].
- Row 20: Dec, 6 sc, dec [8].
Fasten off with a long tail.
Pin the panel lengthwise beneath the body, spanning approximately body rounds 47–68. Sew around the perimeter without stretching its edges.
7. Leaf Wings — Make Four Panels
Make two panels in Color C for the upper surfaces and two in Color A for the undersides.
Each finished wing uses one panel of each color. Work in turning rows. Ch 1 and turn after every row except the final row.
- Row 1: Ch 3. Starting in the second ch from the hook, 2 sc [2].
- Row 2: 2 inc [4].
- Row 3: Inc, 2 sc, inc [6].
- Row 4: Inc, 4 sc, inc [8].
- Row 5: Inc, 6 sc, inc [10].
- Row 6: Inc, 8 sc, inc [12].
- Row 7: Inc, 10 sc, inc [14].
- Row 8: Inc, 12 sc, inc [16].
- Row 9: Inc, 14 sc, inc [18].
- Row 10: 18 sc [18].
- Row 11: Dec, 14 sc, dec [16].
- Row 12: 16 sc [16].
- Row 13: Dec, 12 sc, dec [14].
- Row 14: 14 sc [14].
- Row 15: Dec, 10 sc, dec [12].
- Row 16: 12 sc [12].
- Row 17: Dec, 8 sc, dec [10].
- Row 18: Dec, 6 sc, dec [8].
- Row 19: Dec, 4 sc, dec [6].
- Row 20: Dec, 2 sc, dec [4].
- Row 21: 2 dec [2].
- Row 22: Dec [1].
Fasten off.
Join the Wing Panels
Place one lavender panel against one sage panel with the edges aligned. Keep the lavender side facing upward.
Join Color A at a lower corner and crochet through both layers:
- Work 1 sc into each row-end along the first side, from rows 1–21.
- Work 3 sc into the single tip stitch of row 22.
- Work 1 sc into each row-end down the other side, from rows 21–1.
- Work 1 sc into each of the two foundation stitches.
- Sl st into the first edging stitch.
The edging contains 47 sc.
Do not stuff the wing. Leave a long sewing tail. Repeat with the remaining two panels.
If desired, embroider a central vein and short diagonal veins on each lavender surface.
Sew the lower portions of the wings—approximately wing rows 1–5—to opposite sides of the upper back around body rounds 60–66. Angle the tips outward and toward the tail.
8. Soft Back Fins — Make Three
Use Color E.
- Rnd 1: 4 sc in MR [4].
- Rnd 2: (Sc, inc) × 2 [6].
- Rnd 3: (Sc, inc) × 3 [9].
- Rnd 4: (2 sc, inc) × 3 [12].
- Rnd 5: 12 sc [12].
- Rnd 6: (2 sc, dec) × 3 [9].
- Rnd 7: (Sc, dec) × 3 [6].
Do not stuff. Flatten and close with 3 sc through both layers.
Sew the fins along the upper centerline, approximately at body rounds 41, 48, and 55.
9. Rolled Roses
Use Color D. Make one large rose and two small roses.
Each scallop uses four stitches of the preceding row: a slip stitch, a skipped stitch, a stitch holding five dc, and another skipped stitch.
Large Rose
- Row 1: Ch 25. Starting in the second ch from the hook, 24 sc [24]. Ch 1, turn.
- Row 2: (Sl st in the next stitch, skip the next stitch, 5 dc in the next stitch, skip the next stitch) × 6.
Fasten off with a long tail.
Roll the strip from one short end, keeping the foundation edge at the bottom and the scallops facing outward. Sew repeatedly through the base to secure all layers.
Small Roses — Make Two
- Row 1: Ch 17. Starting in the second ch from the hook, 16 sc [16]. Ch 1, turn.
- Row 2: (Sl st in the next stitch, skip the next stitch, 5 dc in the next stitch, skip the next stitch) × 4.
Fasten off with long tails. Roll and secure each rose as described above.
Flower Placement
- Large rose: Left shoulder, near body rounds 62–66, just below the wing attachment.
- First small rose: Beside the right front-leg attachment, near rounds 67–70.
- Second small rose: Left hip, near rounds 49–53.
Sew through each rose’s secured base and several body stitches.
10. Decorative Leaves — Make Six
Use Color E. Work each leaf around a foundation chain.
Ch 8.
Starting in the second ch from the hook, work:
- Sl st, sc, hdc, dc, hdc, sc.
- Work 3 sc in the final chain.
- Continue along the opposite side: sc, hdc, dc, hdc, sc, sl st.
Fasten off with a sewing tail.
Sew four leaves beneath the roses, allowing their tips to remain visible. Attach the remaining two leaves along one side of the tail around body rounds 20 and 30.
Assembling Your Flower Dragon
Pin the pieces before sewing and check the pose from the front, sides, and above.
- Position the body. Lay it horizontally with the broad belly underneath and the tail extending behind.
- Attach the belly panel. Sew it beneath the body, keeping its surface smooth.
- Attach the rear legs to the lower sides around body rounds 48–54.
- Attach the front legs around body rounds 67–72. Adjust all four paws until the dragon rests evenly.
- Attach the head. Pin the underside of head rounds 14–20 against the upper chest around body rounds 68–75, with the muzzle pointing forward. Sew an oval seam through a broad area of both pieces.
- Add the horns and ears. Check their spacing before securing the final stitches.
- Attach both wings to the upper back.
- Sew on the back fins, followed by the roses and leaves.
- Shape the tail gently. Distribute its filling with your hands so it curves naturally.
- Secure the yarn ends. Hide them inside the pieces and check the seams.
Tips for a Neater Flower Dragon
- Mark important rounds. A small marker at body rounds 38, 45, 58, and 67 makes assembly placement easier.
- Keep the tail tip soft. Too much stuffing makes the narrow section stiff and difficult to curve.
- Fill the body evenly. Small amounts of filling are easier to distribute than one large handful.
- Keep paired pieces consistent. Make all four legs and all four wing panels with similar tension.
- Support the head with a broad seam. Several rows of contact help distribute its weight.
- Secure every rose layer. Stitch through the rolled base several times before attaching the flower.
- Check wing edges before joining. Match the row ends so the two layers lie together smoothly.
- Sew flat panels without stretching. Pulling tightly around the belly panel can pucker the body.
Frequently Asked Questions About the Flower Dragon Crochet Pattern
How long is the finished flower dragon?
The target length is 55–60 cm from nose to tail tip. The exact result depends on yarn thickness, tension, stuffing, and how far the head projects from the chest.
What skill level does this flower dragon crochet pattern require?
It is an intermediate project. You should be comfortable with increases, decreases, oval foundations, turning rows, and sewing shaped pieces together.
Are the head, body, and tail one piece?
The tail and body are one continuous piece. The head is made separately and sewn to the upper front of the chest.
How many wings do I make?
Make four panels: two lavender fronts and two sage undersides. Join them in pairs to create two finished leaf wings.
Does the pattern need safety eyes?
The face uses embroidered sleeping eyes and nostrils. Plastic eyes are unnecessary for this version.
How are the roses made?
Each rose begins as a short strip of single crochet with a scalloped double-crochet edge. Roll the strip, sew through its base to secure the layers, then attach it to the dragon.
Can I change the colors?
Yes. Keep the yarns similar in thickness so the paws, wings, belly panel, and decorations remain in proportion.
How much yarn should I buy?
Use the meterage in the materials table. Check your chosen yarn’s label to calculate the number of skeins, allowing extra for your gauge and any changes.
Your Next Stitch
Begin with the long tapered tail and build toward the body, adding stuffing as the shape grows. Once the head and paws are pinned in place, check the dragon’s resting pose before sewing. The leaf wings, embroidered face, and rolled roses give the finished Meadow Bloom Dragon its garden character.
Choose your colors, gather your hook and markers, and start with the first six stitches.