Free Crochet Mini Penguin Pattern 3 Adorable Amigurumi for Winter
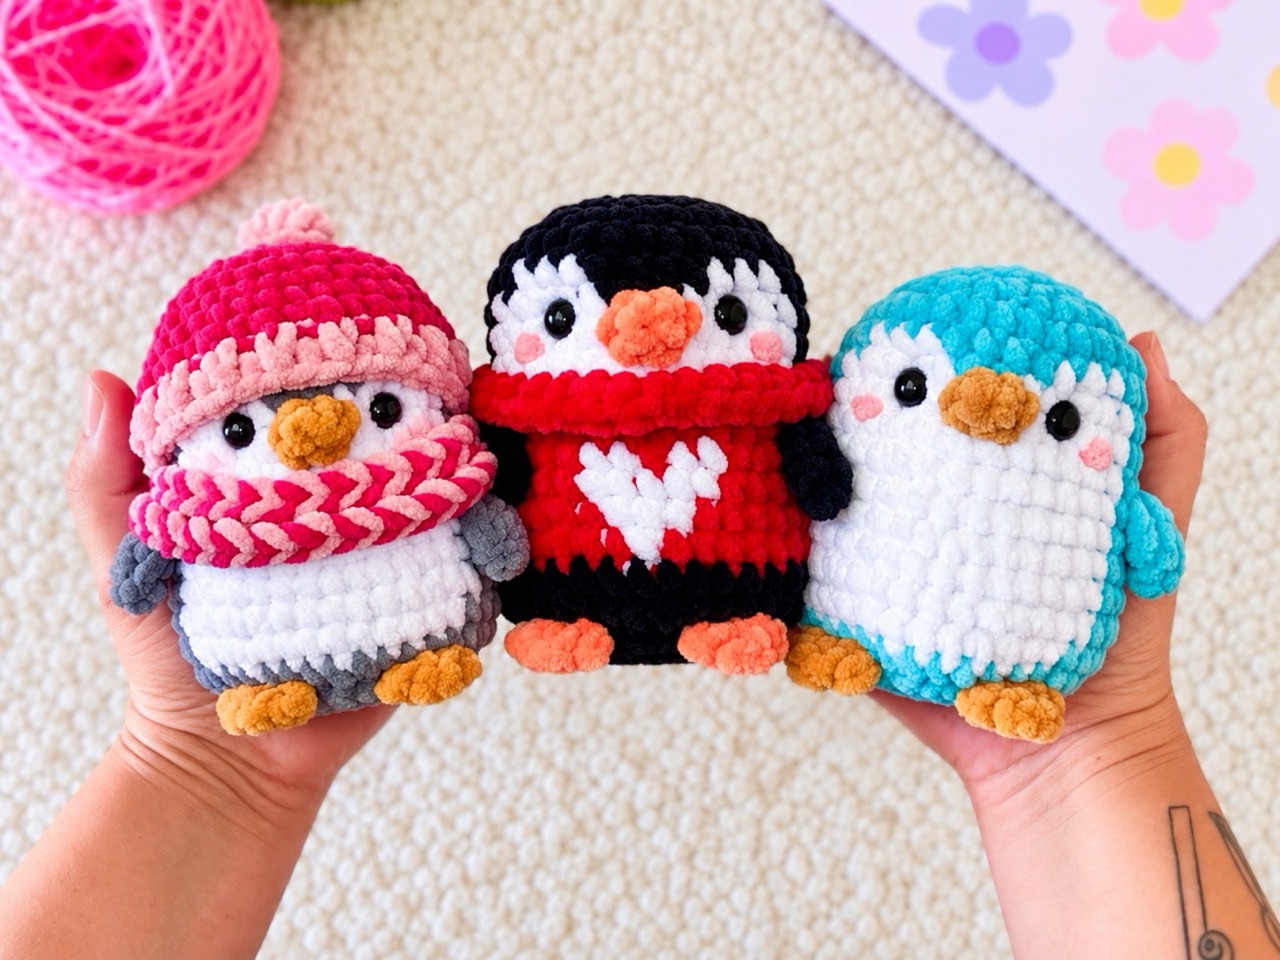
There’s something about a tiny handmade penguin that makes winter feel warmer. A rounded body, little flippers, and a bright pointed beak give this soft character plenty of personality. This crochet mini penguin pattern includes three variations: a gray penguin wearing a beanie and scarf, a black penguin with a red heart pullover, and a simple light turquoise penguin.
Each version uses the same basic body, with separate white eye patches and small pieces sewn into place. Choose your favorite colors and follow the instructions for the outfit you want.
Finished-size note: The penguin itself is intended to measure approximately 5 inches / 12.7 cm, from its feet to its bare crown. The beanie and pompom add approximately 2 cm.
Jump to a Section
- Why This Crochet Mini Penguin Pattern Stands Out
- What You Need Before You Start
- Abbreviations and Special Stitches
- How to Crochet the Mini Penguin Beanie Version
- How to Crochet the Mini Penguin Pullover Version
- How to Crochet the Light Turquoise Penguin
- How to Make the Beak, Wings, and Claws
- How to Make the Beanie, Scarf, and Pompom
- Putting Your Crochet Mini Penguin Together
- Tips for a Neater Crochet Mini Penguin Pattern
- FAQ About the Crochet Mini Penguin Pattern
- Your Next Stitch
Why This Crochet Mini Penguin Pattern Stands Out
This little penguin combines a simple rounded body with details you can position individually during assembly.
- Target size: Approximately 5 inches tall, excluding the hat and pompom.
- Skill level: Confident beginner, with some experience sewing amigurumi pieces together.
- Yarn: Super bulky chenille, approximately 120 m per 100 g.
- Main hook: 4 mm.
- Beanie hook: 4.5 mm.
- Eyes: Two 10–12 mm safety eyes, or embroidered eyes.
- Construction: One continuous body and head, worked upward from the bottom.
- Details: White eye patches, a pointed beak, flat flippers, and three-toed feet.
- Three variations: Beanie and scarf, red pullover, or plain turquoise.
Most pieces use continuous rounds. The feet and scarf are worked in rows, while the pullover collar uses one joined round.
What You Need Before You Start
The following quantities are approximate yarn allowances, not measured sample usage. Keep a little extra yarn available while checking the size and fit.
Yarn for the Beanie Version
- Gray: approximately 35–45 g.
- White: approximately 10–15 g.
- Gold: approximately 5–8 g.
- Fuchsia: approximately 15 g.
- Coral: approximately 10 g.
- Pink: a small amount for the cheeks.
Yarn for the Pullover Version
- Black: approximately 20–25 g.
- Red: approximately 20–25 g.
- White: approximately 5–10 g.
- Orange: approximately 5–8 g.
- Pink: a small amount for the cheeks.
Yarn for the Light Turquoise Version
- Light turquoise: approximately 35–45 g.
- White: approximately 10–15 g.
- Gold: approximately 5–8 g.
- Pink: a small amount for the cheeks.
Other Materials
- 4 mm crochet hook for the penguin, scarf, and pompom.
- 4.5 mm crochet hook for the beanie.
- Fiberfill.
- Two 10–12 mm safety eyes, or black yarn for embroidery.
- Matching smooth cotton yarn for sewing.
- Tapestry needle, stitch marker, pins, and scissors.
Gauge and Finished Size
Aim for approximately 14 sc and 16 rounds per 10 cm in firm single crochet.
Gauge affects both the penguin’s size and the fit of its clothing. Use the suggested hook sizes as starting points, keeping the fabric dense enough to hide the stuffing.
Notes on Chenille Yarn
Work slowly when undoing stitches because chenille can shed or lose its pile. Use matching smooth cotton yarn for seams if the chenille is difficult to pull through the fabric.
If tightening a magic ring damages your yarn, use the chain-ring alternative explained below. Secure and weave in all ends carefully.
Abbreviations and Special Stitches
This pattern uses US crochet terminology.
- MR: Magic ring.
- ch: Chain.
- sc: Single crochet.
- hdc: Half double crochet.
- dc: Double crochet.
- sl st: Slip stitch.
- inc: Work 2 sc in the same stitch.
- dec: Invisible decrease over the next 2 stitches.
- BLO: Back loop only.
- R: Round.
- st/sts: Stitch/stitches.
- [instructions] × number: Repeat the bracketed instructions.
- (number): Completed stitch count.
Turning chains do not count as stitches unless specifically stated.
Starting Ring
Work the number of stitches stated for R1 into a magic ring.
Alternatively, ch 2 and work those stitches into the second chain from the hook. Some pieces start with six stitches and others with four, so follow the count given for each piece.
Invisible Single Crochet Decrease
Insert the hook under the front loop of the next stitch, then under the front loop of the following stitch. Yarn over and pull through both front loops. Yarn over again and pull through the two remaining loops on the hook.
Color Change
Work the final stitch of the old color until two loops remain on the hook. Draw the new color through those loops to complete the stitch.
Closing a Flat Opening
Flatten the piece so the stitches form two matching layers. Insert the hook through one stitch from each layer and work a single crochet through both.
For example, a six-stitch opening closes with three single crochets through both layers.
How to Crochet the Mini Penguin Beanie Version
Use gray for the body and flippers, white for the eye patches and belly, and gold for the beak and feet.
Make the eye patches first so they are ready to attach before closing the body.
White Eye Patches — Make Two
Use white yarn.
- R1: 6 sc in MR. (6)
- R2: Inc in every stitch. (12)
Fasten off with a sewing tail. Keep the patches flat and unstuffed.
These same patches are used for all three penguin versions.
Body and Head
Use gray yarn. Begin at the bottom and work upward in continuous rounds.
- R1: 6 sc in MR. (6)
- R2: Inc in every stitch. (12)
- R3: [1 sc, inc] × 6. (18)
- R4: [2 sc, inc] × 6. (24)
- R5: [3 sc, inc] × 6. (30)
- R6: [4 sc, inc] × 6. (36)
- R7: 36 sc. (36)
- R8: 36 sc. (36)
- R9: 36 sc. (36)
- R10: 36 sc. (36)
- R11: 36 sc. (36)
- R12: 36 sc. (36)
- R13: [4 sc, dec] × 6. (30)
- R14: 30 sc. (30)
- R15: 30 sc. (30)
- R16: 30 sc. (30)
- R17: 30 sc. (30)
- R18: 30 sc. (30)
- R19: 30 sc. (30)
- R20: 30 sc. (30)
- R21: 30 sc. (30)
- R22: [3 sc, dec] × 6. (24)
- R23: 24 sc. (24)
Pause to attach the eye patches and eyes.
Lightly stuff the lower body so you can judge the shape. Choose the front and pin the white patches symmetrically onto the upper section.
Position their centers approximately between R19 and R20, about five stitch spaces apart. Sew around the patches without gathering their edges.
Place an eye near the center of each patch. For safety eyes, pass each post through both the white patch and the main fabric, securing the washer inside the body. If the posts cannot accommodate both layers securely, embroider the eyes instead.
Finish stuffing, keeping the bottom broad and the upper section rounded.
- R24: [2 sc, dec] × 6. (18)
- R25: [1 sc, dec] × 6. (12)
- R26: Dec × 6. (6)
Fasten off with a tail. Thread it through the front loops of the remaining six stitches, draw the opening closed, and bury the end.
White Belly
Use white yarn.
Ch 6.
- R1: Starting in the second chain from the hook, work 4 sc, then 3 sc in the last chain. Continue along the other side of the foundation: 3 sc, then 2 sc in the final chain. (12)
- R2: Inc, 3 sc, inc in each of the next 3 stitches, 3 sc, inc in each of the final 2 stitches. (18)
- R3: 1 sc, inc, 3 sc, [1 sc, inc] × 3, 3 sc, [1 sc, inc] × 2. (24)
Fasten off with a long sewing tail. Do not stuff.
Position the oval vertically on the front. Tuck its upper edge slightly beneath the lower edges of the eye patches. Its lower edge should finish approximately around body R5–R7.
Sew around the edge with small stitches, keeping the panel smooth.
Complete this version with the shared beak, flippers, and feet below, followed by the beanie and scarf.
How to Crochet the Mini Penguin Pullover Version
Use the same 26-round body instructions, changing colors as follows:
| Body rounds | Color and instructions |
|---|---|
| R1–R3 | Black; follow the standard stitch counts |
| R4–R13 | Red; follow the standard stitch counts |
| R14 | Change to black and work 30 sc in BLO |
| R15–R26 | Black; follow the standard stitch counts |
Working R14 in BLO leaves 30 unused front loops along the top of R13. These will hold the collar.
Make two white eye patches and attach the eyes at the same point as the gray version: after R23, before the final decreases.
Do not make the white belly. This version has a small white heart on the red body section.
Use orange for the beak and feet. For the flippers, work R1–R6 in black and R7–R8 in red.
Pullover Collar
Join red yarn to one of the unused front loops of body R13 at the back.
- Ch 1.
- Work 1 sc into each unused front loop around. (30)
- Sl st to the first sc.
Fasten off and secure the ends.
The starting chain and joining slip stitch do not count toward the 30 stitches.
White Heart
Into one loose MR, work:
Ch 2, 3 hdc, 1 dc, 3 hdc, ch 2, sl st into the ring.
Pull the ring closed and shape the center dc into the lower point. Fasten off with a sewing tail.
Sew the heart flat onto the front of the red body section, centered approximately across R7–R11.
How to Crochet the Light Turquoise Penguin
Follow the complete 26-round body instructions using light turquoise throughout. Work R14 through both loops, as in the gray version.
Complete the turquoise penguin with:
- Two white eye patches.
- Eyes positioned between R19 and R20.
- One white belly.
- One gold beak.
- Two turquoise flippers.
- Two gold feet.
- Optional pink cheeks.
This version does not require the beanie, scarf, collar, or heart.
How to Make the Beak, Wings, and Claws
Pointed Beak — Make One
Use gold for the gray and turquoise penguins, or orange for the pullover penguin.
- R1: 4 sc in MR. (4)
- R2: [1 sc, inc] × 2. (6)
- R3: 6 sc. (6)
- R4: [2 sc, inc] × 2. (8)
Fasten off with a sewing tail. Leave the base open.
Shape the tip using the blunt end of your needle. Add only a tiny pinch of stuffing if necessary.
Sew the open base between and slightly below the eyes, approximately across body R17–R18. Angle the point gently downward.
Flipper Wings — Make Two
Use the penguin’s main color.
For the pullover version, use black for R1–R6 and red for R7–R8.
- R1: 4 sc in MR. (4)
- R2: [1 sc, inc] × 2. (6)
- R3: [2 sc, inc] × 2. (8)
- R4: [3 sc, inc] × 2. (10)
- R5: 10 sc. (10)
- R6: [3 sc, dec] × 2. (8)
- R7: [2 sc, dec] × 2. (6)
- R8: 6 sc. (6)
Do not stuff.
Flatten the opening and work 3 sc through both layers. Fasten off with a sewing tail.
Sew the closed ends to opposite sides of the body around R13–R15. Angle the flippers slightly forward, leaving their pointed ends free.
Three-Toed Feet — Make Two
Use gold or orange. Work in rows.
Leave a starting tail approximately 15 cm long for attaching the heel.
Ch 4.
- Row 1: Starting in the second chain from the hook, 3 sc. (3)
- Row 2: Ch 1, turn, inc, 1 sc, inc. (5)
- Row 3: Ch 1, turn, 5 sc. (5)
- Row 4: Ch 1, turn. Work [(sc, hdc, sc) in the next stitch, sl st in the next stitch] twice. Work (sc, hdc, sc) in the final stitch. (11 worked stitches)
The three stitch groups form the toes.
Fasten off and weave in the finishing tail. Use the starting tail to sew the narrow heel edge underneath the body around R2–R4.
Position the feet side by side with the toes pointing forward and slightly outward. Leave the toe edges free.
Cheeks
Using pink yarn, embroider two small horizontal stitches below and slightly outside each eye.
Avoid pulling tightly, which can create dents in the face.
How to Make the Beanie, Scarf, and Pompom
Beanie
Use fuchsia yarn and the 4.5 mm hook.
- R1: 6 sc in MR. (6)
- R2: Inc in every stitch. (12)
- R3: [1 sc, inc] × 6. (18)
- R4: [2 sc, inc] × 6. (24)
- R5: [3 sc, inc] × 6. (30)
- R6: 30 sc. (30)
- R7: 30 sc. (30)
Try the hat on before making the brim. It should fit over the crown without compressing the head. Adjust the hat’s hook size and remake it if necessary.
Change to coral.
- R8: Working in BLO, 30 sc. (30)
- R9: 30 sc. (30)
Fasten off and weave in the ends.
Fold the two coral rounds outward over the lower fuchsia section. The back-loop round provides a fold line. Secure the folded brim with a few small stitches.
Soft Crochet Pompom
Use coral yarn and the 4 mm hook.
- R1: 6 sc in MR. (6)
- R2: [1 sc, inc] × 3. (9)
- R3: 9 sc. (9)
Add a small amount of stuffing.
- R4: [1 sc, dec] × 3. (6)
Fasten off with a long tail. Thread through the front loops of the remaining stitches and draw closed.
Sew the pompom securely to the center of the hat’s crown.
Place the hat above the eyes and tack it to the head at the back and both sides.
Two-Color Scarf
Use the 4 mm hook. Begin with fuchsia.
Ch 46 loosely.
- Row 1: Starting in the second chain from the hook, 45 sc. (45)
Change to coral.
- Row 2: Ch 1, turn, 45 sc. (45)
Fasten off and weave in the ends.
The scarf should measure approximately 32–35 cm long. If your tension produces a substantially different length, adjust the foundation chain. Each row will contain one fewer stitch than the number of starting chains.
Wrap the scarf once around the penguin below the face, crossing the ends at one side. Sew the crossing together and tack the scarf to the body at the back.
Putting Your Crochet Mini Penguin Together
- Prepare the eye patches. Make both white patches before beginning the body.
- Work the body through R23. Lightly stuff the lower section and position the face.
- Attach the patches and eyes. Secure safety-eye washers while the upper opening is accessible, or embroider the eyes.
- Finish stuffing and close the crown. Work R24–R26 and draw the final opening closed.
- Attach the belly where required. Add the white oval to the gray and turquoise versions.
- Sew on the beak. Center it below the eyes with its tip angled downward.
- Attach the flippers. Position them evenly on the sides around R13–R15.
- Attach the feet. Sew the heels underneath the body and check the sitting position.
- Embroider the cheeks. Add small pink stitches below the eyes.
- Finish the chosen outfit. Add the beanie and scarf, or the pullover collar and heart.
- Secure all ends. Check every seam and gently shape the penguin with your hands.
Tips for a Neater Crochet Mini Penguin Pattern
- Move your stitch marker every round. The body is worked in a spiral without joining.
- Count before continuing. Check increase and decrease rounds before adding more fabric.
- Keep the face patches flat. Small sewing stitches help prevent puckered edges.
- Install safety eyes before closing. This pattern pauses after R23 for that step.
- Add stuffing gradually. Small pieces of filling give you more control over the shape.
- Use smooth cotton yarn for seams. It can be easier to sew with than chenille.
- Pin the flippers and feet first. Check their positions from the front and sides.
- Keep the feet flat. Their free toe edges help create the penguin’s waddling appearance.
- Test the hat before finishing its brim. Fit depends on both hook size and tension.
- Measure the scarf. Its finished length matters more than matching a chain count with different yarn.
- Sew the accessories in place. Small attachment stitches keep the hat and scarf positioned neatly.
FAQ About the Crochet Mini Penguin Pattern
What skill level is this crochet mini penguin pattern?
It suits confident beginners who know single crochet, increases, decreases, and basic sewing. The feet, heart, and scarf also use half double crochet, double crochet, slip stitches, and turned rows.
How big is the finished mini penguin?
The target is approximately 5 inches / 12.7 cm from the feet to the bare crown. The beanie and pompom add approximately 2 cm. Actual measurements depend on gauge, stuffing, and assembly.
What yarn should I use?
The draft is written for super bulky chenille yarn with an approximate length of 120 m per 100 g.
Different chenille yarns can vary in thickness even when they share the same weight category, so check your gauge.
Which hooks does this version use?
Use a 4 mm hook for the penguin, scarf, and pompom, and a 4.5 mm hook for the beanie. Adjust as needed for firm fabric and a comfortable hat fit.
What size eyes should I use?
Use two 10–12 mm safety eyes, with posts that can accommodate both the white eye patch and the main fabric. Embroidered eyes are another option.
Can I make the penguin without safety eyes?
Yes. Embroider a small rounded black eye on each white patch, securing the yarn ends inside the work.
Where do I place the eyes?
Position their centers approximately between body R19 and R20, about five stitch spaces apart. Attach the white patches first, then install the eyes before working the final decreases.
Is the beak crocheted directly onto the body?
No. This version uses a separate four-round cone. Sew its open base between and below the eyes, approximately across R17–R18.
Are the wings and feet worked directly onto the penguin?
No. Both flippers and both feet are made separately and sewn on. This lets you pin and adjust their positions before securing them.
How is the pullover made?
The pullover is part of the body’s color pattern: black for R1–R3, red for R4–R13, then black from R14 onward.
R14 is worked in BLO, leaving front loops for the red collar. A separate white heart decorates the chest.
Can I replace the magic ring with a chain start?
Yes. Ch 2 and work the number of stitches stated for R1 into the second chain from the hook.
Can I use cotton or a thinner yarn?
Yes, but the finished penguin will change size. Use a suitable hook for dense fabric and check the hat and scarf against your completed penguin.
Your Next Stitch
Choose the gray penguin for a winter outfit, the red-pullover version for a bright heart detail, or the turquoise penguin for a simple finish.
Start with the white eye patches, then work the body one round at a time. Before making a whole colony, complete one sample to check its height, face placement, and accessory fit. Once those details are settled, you can enjoy experimenting with different hats, scarf stripes, and sweater colors.