Crochet Sunflower Bucket Hat Pattern
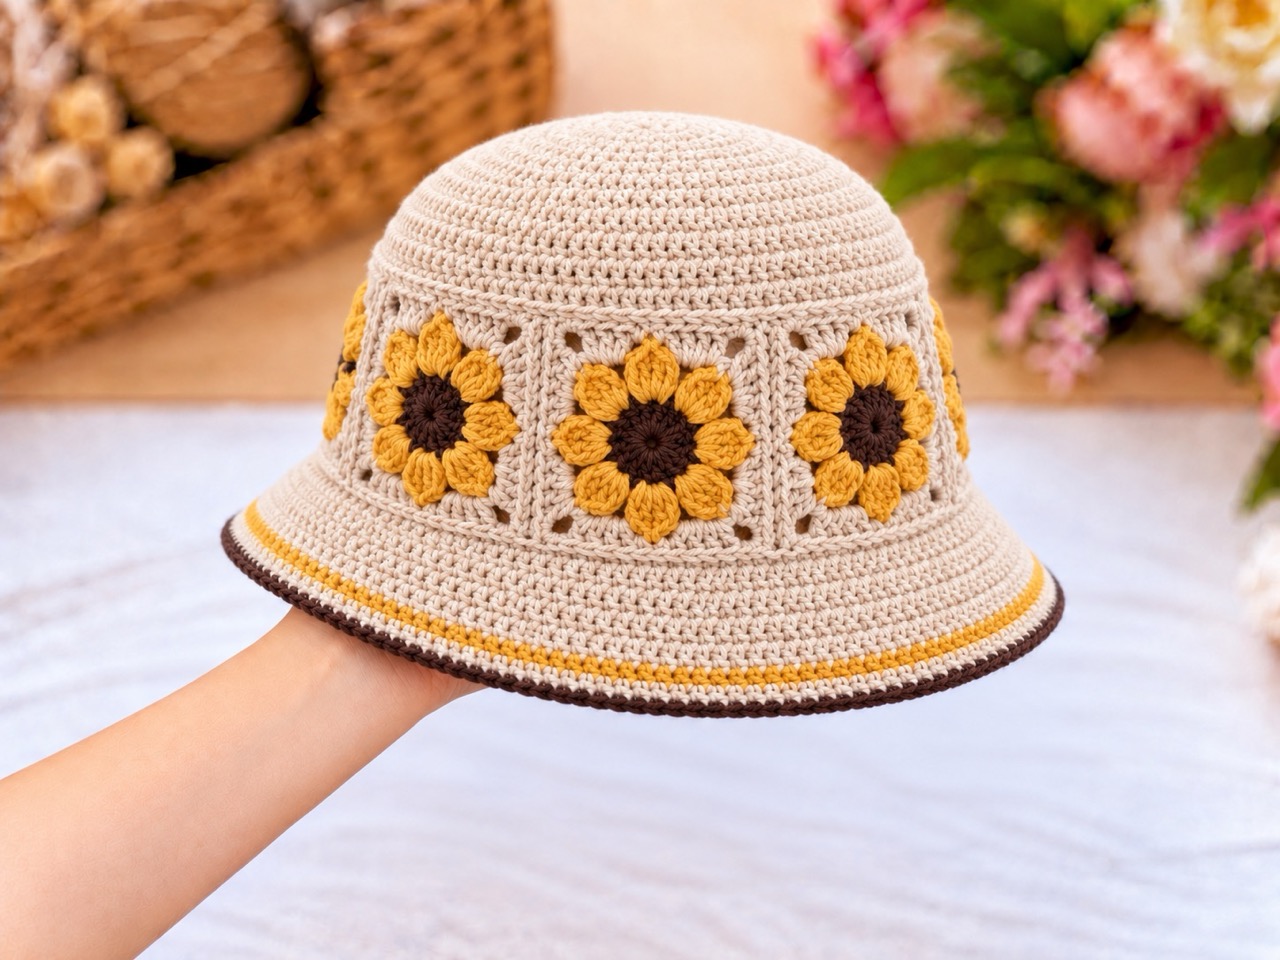
There’s something about sunflowers that makes a handmade project feel warmer. The golden petals, dark centers, and simple floral shapes bring a cheerful touch to everyday accessories. This crochet sunflower bucket hat pattern combines those details with a comfortable motif band, a fitted crown, and a gently flared brim.
The hat is made from six sunflower squares, each featuring eight golden cluster petals. Beige borders frame the flowers, while a narrow dark brown edging finishes the brim.
This pattern is designed for a head circumference of approximately 50–53 cm. You’ll choose the fit by checking the size of your first square before making the remaining motifs.
Below you’ll find the complete instructions, including materials, gauge, sunflower squares, crown, assembly, brim, fitting notes, and answers to common questions.
Jump to a Section
- Why This Crochet Sunflower Bucket Hat Pattern Stands Out
- What You Need Before You Start
- Size and Gauge
- Abbreviations and Special Stitches
- How to Crochet the Sunflower Squares
- How to Join the Sunflower Band
- How to Crochet the Upper Band Pickup Round
- How to Crochet the Crown
- How to Attach the Crown
- How to Crochet the Brim
- Putting Your Crochet Sunflower Bucket Hat Together
- Tips for a Neater Sunflower Bucket Hat
- FAQ About the Crochet Sunflower Bucket Hat Pattern
- Your Next Stitch
Why This Crochet Sunflower Bucket Hat Pattern Stands Out
This hat combines floral motifs with a clearly counted crown and brim.
- Skill level: Intermediate.
- Head size: Approximately 50–53 cm, depending on gauge.
- Yarn: DK-weight cotton or a cotton blend.
- Starting hook: 4 mm.
- Motifs: Six squares, each with an eight-petal sunflower.
- Crown: Joined half-double-crochet rounds ending with 96 stitches.
- Band attachment: Each square contributes 16 pickup stitches.
- Brim: Gradual increases create a gentle flare.
- Color options: Use classic sunflower colors or change the background and petals to suit your wardrobe.
What You Need Before You Start
Yarn
Use DK-weight cotton or a cotton blend measuring approximately 110–125 m per 50 g.
Allow approximately:
| Color | Quantity | Used for |
|---|---|---|
| Beige | 100 g | Square backgrounds, crown, band pickup rounds, and most of the brim |
| Golden yellow | 25 g | Sunflower petals and optional brim accent |
| Dark brown | 20–25 g | Flower centers and final brim edging |
These quantities include an allowance for swatches and sewing.
Tools
- 4 mm crochet hook as a starting point.
- A smaller or larger hook if needed to obtain the required measurements.
- Tapestry needle.
- Scissors.
- Stitch markers.
- Measuring tape.
- Optional blocking mat and pins.
Size and Gauge
The 50–53 cm measurement refers to the wearer’s head circumference, rather than the hat’s height.
The six squares determine the circumference of the motif band. Aim for a finished band approximately 0–0.5 cm smaller than the head, depending on the stretch of your fabric.
The following table allows approximately 0.5 cm of negative ease.
| Head circumference | Target band circumference | Finished square width | Crown diameter after Round 12 |
|---|---|---|---|
| 50 cm | 49.5 cm | 8.25 cm | 15.8 cm |
| 51 cm | 50.5 cm | 8.4 cm | 16.1 cm |
| 52 cm | 51.5 cm | 8.6 cm | 16.4 cm |
| 53 cm | 52.5 cm | 8.75 cm | 16.7 cm |
If your fabric has very little stretch, choose a band circumference closer to the actual head measurement.
Starting Gauge
Approximately 19 hdc and 15 rounds per 10 cm.
The finished square measurement is the main fitting check. Complete one square, let it relax, and measure it before making the remaining five.
Change your hook size if necessary. Avoid stretching an undersized square aggressively to obtain the measurement.
Brim Measurement
The standard brim measures approximately 3.5–4 cm along the fabric, depending on your row gauge.
Abbreviations and Special Stitches
This pattern uses US crochet terminology.
- MR — magic ring.
- ch — chain.
- sc — single crochet.
- hdc — half double crochet.
- dc — double crochet.
- sl st — slip stitch.
- hdc inc — work 2 hdc in the same stitch.
- 3-dc cl — three-double-crochet cluster.
- BLO — back loop only.
- FLO — front loop only.
- st/sts — stitch/stitches.
- sp — space.
- RS — right side.
- WS — wrong side.
- FO — fasten off.
- [N] — stitch count at the end of the round.
Three-Double-Crochet Cluster
Work three incomplete double crochets into the same stitch:
- Yarn over, insert the hook into the stitch, yarn over, and pull up a loop.
- Yarn over and pull through two loops.
- Repeat Steps 1–2 twice more into the same stitch.
- Four loops remain on the hook.
- Yarn over and pull through all four loops.
The completed cluster counts as one petal stitch.
Work any chains following the cluster separately.
General Pattern Notes
- All rounds are joined with a slip stitch.
- Do not turn between rounds.
- Beginning ch 1 and ch 2 do not count as stitches.
- The beginning ch 3 in Square Round 4 counts as one dc.
- Joining slip stitches do not count.
- Work through both loops unless instructed otherwise.
- Keep the corner chain spaces clearly visible.
- Use consistent tension across all six squares.
- Weave in the flower-center and petal tails before assembly.
How to Crochet the Sunflower Squares
Make six squares.
Each square begins with a brown center, followed by eight golden cluster petals and three beige shaping rounds.
Round 1 — Dark Brown Center
Make an MR.
Ch 1, work 8 sc into the ring.
Tighten the ring and sl st into the first sc. [8]
Round 2 — Dark Brown
Ch 1.
Work 2 sc in each stitch around.
Sl st into the first sc. [16]
FO.
Round 3 — Golden Yellow Petals
Join golden yellow in any stitch.
Ch 2; this does not count as a stitch.
Work a 3-dc cl in the same stitch, ch 3, and skip the next brown stitch.
Repeat the following seven times:
3-dc cl in the next stitch, ch 3, skip the next stitch.
Sl st into the top of the first cluster.
You should have:
- 8 cluster petals.
- 8 ch-3 spaces.
All 16 brown stitches have been used: eight hold clusters and eight are skipped.
FO.
Round 4 — Beige Square Foundation
Join beige in any ch-3 space.
In that first space, work:
Ch 3, 1 dc, ch 2, 2 dc.
The beginning ch 3 counts as a dc, completing the first corner.
Repeat the following three times:
- Work 4 hdc in the next ch-3 space.
- Work 2 dc, ch 2, 2 dc in the next ch-3 space.
Work 4 hdc in the final ch-3 space.
Sl st into the top of the beginning ch 3.
You should have:
- 32 stitches: 16 dc and 16 hdc.
- 4 corner ch-2 spaces.
- 8 stitches along each side between corner spaces.
Do not fasten off.
Round 5 — Beige Border
Sl st along to the nearest corner ch-2 space.
Ch 1.
Work 2 sc, ch 2, 2 sc in that corner.
Repeat the following three times:
- Sc in the next 8 stitches.
- Work 2 sc, ch 2, 2 sc in the next corner space.
Sc in the final 8 stitches.
Sl st into the first sc.
You should have:
- 48 sc.
- 4 corner ch-2 spaces.
- 12 sc along each side between corner spaces.
Round 6 — Beige Outer Edge
Sl st along to the nearest corner ch-2 space.
Ch 1.
Work hdc, ch 2, hdc in that corner.
Repeat the following three times:
- Hdc in the next 12 stitches.
- Work hdc, ch 2, hdc in the next corner space.
Hdc in the final 12 stitches.
Sl st into the first hdc.
You should have:
- 56 hdc.
- 4 corner ch-2 spaces.
- 14 hdc along each side between corner spaces.
FO, leaving approximately 30–40 cm for sewing.
Check the Square
Smooth the square gently without pulling on the petals.
If needed, damp-block it according to the yarn’s care instructions. Allow it to dry completely before measuring.
Compare its width with the sizing table. Once the measurement is suitable, make five more matching squares.
How to Join the Sunflower Band
Arrange all six squares in a straight line with their right sides facing upward.
Join neighboring vertical edges using a flat sewn seam.
For each seam:
- Match the lower corner spaces.
- Match the 14 hdc along the joining edges.
- Match the upper corner spaces.
- Sew with small mattress stitches.
- Draw the edges together without overlapping them.
Continue until the squares form a strip.
Join the first and last square in the same way to make a ring.
Keep the top and bottom corner openings accessible for the pickup rounds.
Measure the actual ring circumference after sewing. It should match your chosen target band measurement.
How to Crochet the Upper Band Pickup Round
This round creates the 96 stitches that will match the crown.
Keep the RS facing outward. Join beige at an upper corner beside a seam.
Ch 1.
Across the top of each square, work:
- 1 hdc in the first corner ch-2 space.
- 1 hdc in each of the 14 edge stitches.
- 1 hdc in the second corner ch-2 space.
Repeat across all six squares.
Sl st into the first hdc. [96]
Each square contributes 16 stitches:
1 corner stitch + 14 edge stitches + 1 corner stitch = 16.
Across six squares, this gives 96 hdc.
At each vertical seam, work one pickup stitch into each neighboring corner space. If the two corners appear as one shared opening, work 2 hdc into that opening.
FO.
How to Crochet the Crown
Use beige yarn.
Work from the center outward in joined half-double-crochet rounds.
Crown Round 1
Make an MR.
Ch 1, work 8 hdc into the ring.
Tighten the ring and sl st into the first hdc. [8]
Crown Round 2
Ch 1, hdc inc in every stitch.
Sl st into the first hdc. [16]
Crown Round 3
Ch 1, (1 hdc, hdc inc) × 8.
Join. [24]
Crown Round 4
Ch 1, (2 hdc, hdc inc) × 8.
Join. [32]
Crown Round 5
Ch 1, (3 hdc, hdc inc) × 8.
Join. [40]
Crown Round 6
Ch 1, (4 hdc, hdc inc) × 8.
Join. [48]
Crown Round 7
Ch 1, (5 hdc, hdc inc) × 8.
Join. [56]
Crown Round 8
Ch 1, (6 hdc, hdc inc) × 8.
Join. [64]
Crown Round 9
Ch 1, (7 hdc, hdc inc) × 8.
Join. [72]
Crown Round 10
Ch 1, (8 hdc, hdc inc) × 8.
Join. [80]
Crown Round 11
Ch 1, (9 hdc, hdc inc) × 8.
Join. [88]
Crown Round 12
Ch 1, (10 hdc, hdc inc) × 8.
Join. [96]
Check the Crown Diameter
Lay the crown flat without stretching it.
Compare its diameter with the sizing table. For a 51 cm head, aim for approximately 16.1 cm.
The crown’s outer edge should fit the upper band comfortably.
If the measurements do not match, remake the crown with a slightly different hook while keeping the same stitch counts. The crown and motif band may require different hooks to produce compatible dimensions.
Crown Round 13 — Turning Edge
Ch 1.
Working in BLO, hdc in every stitch.
Join. [96]
This round begins the transition from the top toward the sides.
FO with a long sewing tail.
For a slightly shallower hat, omit Round 13 and attach Crown Round 12 directly to the band.
How to Attach the Crown
Keep the right sides of both sections facing outward.
Match the crown’s 96 stitches to the upper band’s 96 pickup stitches.
Place markers every 16 stitches around the crown. Align these sections with the six squares.
Using beige yarn:
- Match one crown stitch to one band stitch.
- Whipstitch through the corresponding stitch tops.
- Continue around with even tension.
- Check that the seam does not gather or stretch.
- Secure the yarn and hide the tail.
Position the crown’s round join toward the back if you prefer it to be less noticeable.
Try the hat on before beginning the brim. Check the circumference and the position of the lower band edge.
How to Crochet the Brim
Begin with a pickup round along the bottom of the sunflower band.
Lower Band Pickup Round
With the RS facing outward, join beige at a lower corner beside a seam.
Ch 1.
Across the bottom of each square, work:
- 1 hdc in the first corner space.
- 14 hdc across the edge stitches.
- 1 hdc in the second corner space.
Repeat around all six squares.
Sl st into the first hdc. [96]
Each square contributes 16 stitches, as on the upper edge.
Keep the pickup stitches relaxed enough to preserve the band circumference.
Do not fasten off.
Brim Round 1
Ch 1.
Working in FLO, crochet:
(11 hdc, hdc inc) × 8.
Sl st into the first hdc. [104]
Brim Round 2
Ch 1.
(12 hdc, hdc inc) × 8.
Join. [112]
Brim Round 3
Ch 1, hdc in every stitch.
Join. [112]
Brim Round 4
Ch 1.
(13 hdc, hdc inc) × 8.
Join. [120]
Brim Round 5
Ch 1.
(14 hdc, hdc inc) × 8.
Join. [128]
For a narrow golden accent, change to golden yellow at the beginning of this round.
Brim Round 6
Ch 1, hdc in every stitch.
Join. [128]
FO.
Brim Round 7 — Dark Brown Edging
Join dark brown in any stitch.
Work 1 loose sl st in each stitch around. [128]
Keep the slip stitches relaxed so the edge does not draw inward. Use a slightly larger hook for this round if necessary.
Join to the first slip stitch, FO, and weave in the ends.
Optional Shorter Brim
Stop after Brim Round 4.
Work the final dark brown slip-stitch edging over 120 stitches.
Optional Wider Brim
After Brim Round 6, continue in beige:
- Additional Round 1: Ch 1, (15 hdc, hdc inc) × 8; join. [136]
- Additional Round 2: Ch 1, 136 hdc; join. [136]
Then work the dark brown slip-stitch edging over 136 stitches.
A wider brim requires additional yarn and may feel softer.
Putting Your Crochet Sunflower Bucket Hat Together
- Make one sunflower square. Check its finished width against the sizing table.
- Make five matching squares.
- Join the squares into a ring. Keep the seams flat without overlapping the edges.
- Work the upper pickup round. Check that it contains 96 hdc.
- Crochet the crown. Check its diameter before adding the turning round.
- Sew the crown to the band. Match all 96 stitches evenly.
- Try on the hat. Check the circumference and depth.
- Work the lower pickup round. It also contains 96 hdc.
- Crochet the brim and edging.
- Secure the ends and shape the hat.
If blocking is needed, follow the yarn’s care instructions. Smooth the motifs and shape the brim gently, then allow the hat to dry completely.
Avoid pulling the brim flat if you want to preserve its downward slope.
Tips for a Neater Sunflower Bucket Hat
- Measure the first square. Its width determines the fit of the band.
- Keep cluster loops even. Consistent loops produce more uniform petals.
- Count each square edge. There must be 14 hdc between corner spaces.
- Compare all six motifs. Correct noticeable size differences before assembly.
- Keep seams flat. Overlapping squares reduces the circumference.
- Count both pickup rounds. Each must contain 96 hdc.
- Check the crown’s physical size. Equal stitch counts still require matching measurements.
- Avoid tight sewing. A tight crown seam can restrict the fit.
- Keep the slip-stitch edging loose. It should finish the brim without gathering it.
- Try on before completing the brim. Fit corrections are easier at that stage.
FAQ About the Crochet Sunflower Bucket Hat Pattern
What skill level is this crochet sunflower bucket hat pattern?
It is an intermediate project. You should be comfortable with magic rings, single crochet, half double crochet, double-crochet clusters, joined rounds, and sewing motifs together.
What size is the finished hat?
The pattern is designed for a head circumference of approximately 50–53 cm.
The target finished band measures approximately 49.5–52.5 cm, depending on the wearer’s head measurement and the stretch of the fabric.
What yarn does this crochet sunflower bucket hat pattern use?
Use DK-weight cotton or a cotton blend, approximately 110–125 m per 50 g.
Allow approximately 100 g beige, 25 g golden yellow, and 20–25 g dark brown, including an allowance for swatching and sewing.
What hook size do I need?
Start with a 4 mm hook.
Adjust the hook to obtain the required square width and crown diameter. The square measurement is the main sizing check.
How many sunflower squares do I need?
Make six squares.
Each square has eight cluster petals and finishes with 14 hdc along each side between the corner spaces.
Does this pattern use puff stitches or treble clusters?
The petals use three-double-crochet clusters. Each cluster is worked into one stitch and followed by a ch-3 space.
The complete cluster instructions are included above.
How do six squares match a 96-stitch crown?
Each square contributes 16 pickup stitches:
- One in the first corner space.
- Fourteen across the edge.
- One in the second corner space.
Six groups of 16 produce 96 stitches.
Is the crown worked in a spiral?
No. The crown uses joined rounds.
Join each round with a slip stitch and begin the next round with ch 1. The beginning chain does not count as a stitch.
How do I adjust the fit?
Choose the finished square width from the sizing table.
Make one square first and adjust your hook before making all six. Check the actual ring circumference after sewing, then match the crown’s diameter to that band.
What should I check if the hat feels too tight?
Check the motif band, pickup rounds, and crown seam separately.
Tight pickup stitches or sewing can reduce the circumference even when the squares measure correctly. If the whole motif band is too small, remake the squares with a larger hook.
Can I change the colors?
Yes. Keep the same yarn thickness throughout.
Try cream or sage backgrounds, warm orange petals, or a darker brim. Color changes do not alter the stitch counts.
Can I change the brim width?
Yes. Stop after Brim Round 4 for a shorter brim, or work the two additional rounds for a wider brim.
Use the stitch count that matches your chosen stopping point when adding the final edging.
Your Next Stitch
This crochet sunflower bucket hat pattern brings together golden petals, a soft cotton fabric, and a gently flared brim. Its six matching motifs give you a manageable way to build the hat while checking the fit as you go.
Choose your colors, begin with one sunflower square, and measure it before continuing. Once the band and crown fit together comfortably, the brim provides the finishing touch.
Happy crocheting!