Crochet Gingham Bandana Pattern
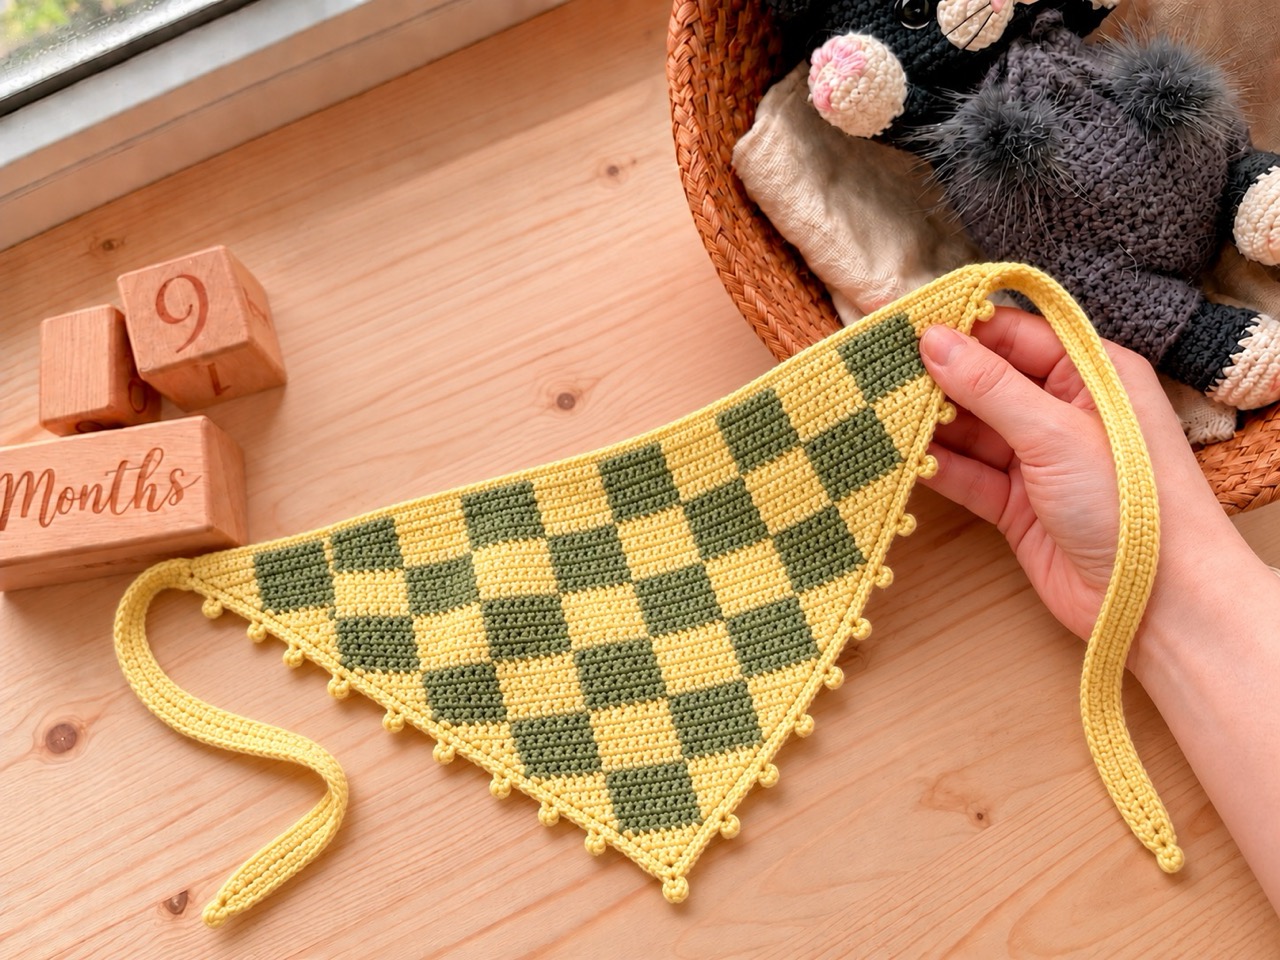
There’s something wonderfully nostalgic about a checked bandana. Its geometric blocks bring to mind vintage scarves and picnic blankets, while a soft yarn adds warmth and texture. This crochet gingham bandana pattern combines lemon and olive checks with a delicate picot edge and two adjustable flat ties.
The Meadow Check Bandana measures approximately 38 cm across its upper edge, excluding the ties. Its triangle grows from the lower point upward, with increases at both ends of each row. A complete color chart keeps the checks aligned as the fabric widens.
Below you’ll find the materials, gauge, stitch explanations, complete body instructions, border, ties, finishing notes, and answers to common questions.
Jump to a Section
- Why This Crochet Gingham Bandana Pattern Stands Out
- What You Need Before You Start
- Gauge and Finished Size
- Abbreviations and Special Stitches
- How to Work the Color Changes
- How to Crochet the Bandana Body
- How to Crochet the Foundation Border
- How to Crochet the Picot Edging
- How to Crochet the Flat Ties
- Putting Your Crochet Gingham Bandana Together
- Tips for a Neater Crochet Gingham Bandana
- FAQ About the Crochet Gingham Bandana Pattern
- Your Next Stitch
Why This Crochet Gingham Bandana Pattern Stands Out
The Meadow Check Bandana combines a symmetrical triangle with clearly counted colorwork.
- Skill level: Intermediate, mainly because of the color changes.
- Finished width: Approximately 38 cm across the upper edge, including the border and excluding the ties.
- Finished depth: Approximately 18–19 cm, including the pointed edging.
- Exposed tie length: Approximately 28–30 cm on each side.
- Starting hook: 4.5 mm.
- Construction: Worked from the lower point upward, increasing at both ends of each row.
- Checks: Six stitches wide and six rows high, with partial checks along the diagonal edges.
- Border: A single-crochet foundation followed by small picots.
- Ties: Two separately crocheted flat strips sewn behind the upper corners.
- Texture: Fine cotton and brushed lace-weight yarn are held together for a soft, slightly fuzzy finish.
What You Need Before You Start
Use one strand of fine cotton and one strand of matching brushed lace-weight yarn together for each color.
Color A — Lemon
- One 50 g ball of fine cotton, approximately 160 m per 50 g.
- One 25 g ball of matching brushed lace-weight yarn, approximately 200–225 m per 25 g.
Color A is used for part of the checkerboard, the border, and both ties.
Color B — Olive
- One 50 g ball of fine cotton, approximately 160 m per 50 g.
- One 25 g ball of matching brushed lace-weight yarn, approximately 200–225 m per 25 g.
Color B is used for the contrasting checks.
You should have some yarn left over, especially in Color B.
Tools
- 4.5 mm crochet hook as a starting point.
- Smaller or larger hook if needed to obtain gauge.
- Tapestry needle.
- Scissors.
- Stitch markers.
- Measuring tape.
- Optional blocking mat and pins.
Each working color consists of two strands: one cotton strand and one brushed strand.
When the pattern says A or B, use that color’s complete two-strand bundle.
Gauge and Finished Size
Gauge
18 sc and 20 rows = 10 × 10 cm, measured over the checkerboard fabric with the unused color carried inside the stitches.
Make a swatch using the same yarn combination and colorwork technique you will use for the bandana.
Measure the fabric after it has relaxed, without stretching it.
Finished Measurements
| Measurement | Approximate size |
|---|---|
| Upper width, including border | 38 cm |
| Depth, including pointed edging | 18–19 cm |
| Exposed length of each tie | 28–30 cm |
At the stated gauge, the final body row of 66 sc measures approximately 36.7 cm. The border brings the upper width to approximately 38 cm.
Adjust your hook size if necessary before beginning the full project.
Abbreviations and Special Stitches
This pattern uses US crochet terminology.
- ch — chain.
- sc — single crochet.
- sl st — slip stitch.
- inc — work 2 sc in the same stitch.
- dec — single crochet 2 adjacent stitches together.
- st/sts — stitch/stitches.
- RS — right side.
- WS — wrong side.
- FO — fasten off.
- [N] — stitch count after completing the row.
Picot
Ch 3, then sl st into the third chain from the hook.
This creates one small pointed decoration.
Single Crochet Decrease
- Insert the hook into the next stitch and pull up a loop.
- Insert the hook into the following stitch and pull up a loop.
- Yarn over and pull through all three loops.
Decreases are used only to taper the ends of the ties.
General Working Notes
- The body is worked in turning rows.
- Ch 1 before turning; this chain does not count as a stitch.
- Work through both loops throughout.
- Every body row after Row 1 adds two stitches.
- Full checks are six stitches wide and six rows high.
- Partial checks form along the sloping sides.
- Every row’s color sequence is symmetrical, so it reads the same in either direction.
- Work the border and ties in Color A without carrying Color B.
How to Work the Color Changes
Within a row, change color on the final pull-through of the stitch before the new color.
- Begin the final sc in the old color.
- Insert the hook and pull up a loop.
- Complete the stitch by pulling the new color through the two loops.
- Work the following stitch in the new color.
Carrying the Unused Color
Lay the unused color bundle across the top of the previous row and crochet over it.
Keep the carried yarn relaxed. After completing a color block, gently spread the stitches before continuing.
At the beginning of a new row, use the first chart color for the turning ch 1 and the first stitch.
Keep the cotton and brushed strands organized as two separate working bundles.
How to Crochet the Bandana Body
Begin at the lower point and work toward the long upper edge.
Foundation and Row 1
With Color A, ch 2.
Work 2 sc into the second chain from the hook. [2]
Mark the RS.
For consistent thickness, you may lay Color B beside the foundation and crochet over it from this first row.
Shaping Rule for Rows 2–33
For every following body row:
- Ch 1 and turn.
- Work 2 sc in the first stitch.
- Work 1 sc in each middle stitch.
- Work 2 sc in the last stitch.
Follow the color chart for the color of each resulting stitch.
An increase produces two stitches. Both count toward the color sequence, and they may be different colors.
How to Read the Color Chart
- A6 means six completed sc in Color A.
- B3 means three completed sc in Color B.
- The numbers describe stitches produced, including stitches made within increases.
For example, Row 4: B1 A6 B1 is worked as follows:
- In the first stitch: 1 sc in B, then 1 sc in A.
- In the next four stitches: 1 sc in A in each stitch.
- In the last stitch: 1 sc in A, then 1 sc in B.
This produces eight stitches: B1, A6, B1.
Complete Body Color Chart
Apply the shaping rule to every row after Row 1.
| Row | Color sequence | Total stitches |
|---|---|---|
| 1 | A2 | 2 |
| 2 | A4 | 4 |
| 3 | A6 | 6 |
| 4 | B1 A6 B1 | 8 |
| 5 | B2 A6 B2 | 10 |
| 6 | B3 A6 B3 | 12 |
| 7 | A4 B6 A4 | 14 |
| 8 | A5 B6 A5 | 16 |
| 9 | A6 B6 A6 | 18 |
| 10 | B1 A6 B6 A6 B1 | 20 |
| 11 | B2 A6 B6 A6 B2 | 22 |
| 12 | B3 A6 B6 A6 B3 | 24 |
| 13 | A4 B6 A6 B6 A4 | 26 |
| 14 | A5 B6 A6 B6 A5 | 28 |
| 15 | A6 B6 A6 B6 A6 | 30 |
| 16 | B1 A6 B6 A6 B6 A6 B1 | 32 |
| 17 | B2 A6 B6 A6 B6 A6 B2 | 34 |
| 18 | B3 A6 B6 A6 B6 A6 B3 | 36 |
| 19 | A4 B6 A6 B6 A6 B6 A4 | 38 |
| 20 | A5 B6 A6 B6 A6 B6 A5 | 40 |
| 21 | A6 B6 A6 B6 A6 B6 A6 | 42 |
| 22 | B1 A6 B6 A6 B6 A6 B6 A6 B1 | 44 |
| 23 | B2 A6 B6 A6 B6 A6 B6 A6 B2 | 46 |
| 24 | B3 A6 B6 A6 B6 A6 B6 A6 B3 | 48 |
| 25 | A4 B6 A6 B6 A6 B6 A6 B6 A4 | 50 |
| 26 | A5 B6 A6 B6 A6 B6 A6 B6 A5 | 52 |
| 27 | A6 B6 A6 B6 A6 B6 A6 B6 A6 | 54 |
| 28 | B1 A6 B6 A6 B6 A6 B6 A6 B6 A6 B1 | 56 |
| 29 | B2 A6 B6 A6 B6 A6 B6 A6 B6 A6 B2 | 58 |
| 30 | B3 A6 B6 A6 B6 A6 B6 A6 B6 A6 B3 | 60 |
| 31 | A4 B6 A6 B6 A6 B6 A6 B6 A6 B6 A4 | 62 |
| 32 | A5 B6 A6 B6 A6 B6 A6 B6 A6 B6 A5 | 64 |
| 33 | A6 B6 A6 B6 A6 B6 A6 B6 A6 B6 A6 | 66 |
The checkerboard colors reverse after Rows 6, 12, 18, 24, and 30. Follow the complete sequences because the partial checks at the edges also change as the triangle grows.
After Row 33, FO both colors.
The long upper edge contains 66 stitches.
Weave in the Color B ends before adding the border.
How to Crochet the Foundation Border
Use Color A only.
Place the triangle with the RS facing you, its long edge at the top and its point downward.
Join A in the first stitch at one end of Body Row 33.
Ch 1; this does not count as a stitch.
Across the Upper Edge
- Work 2 sc in the first stitch.
- Work 1 sc in each of the next 64 stitches.
- Work 3 sc in the final stitch.
You are now at the opposite upper corner.
Down the First Sloping Side
Work into the row ends.
Repeat the following 11 times:
1 sc in each of the next two row ends, 2 sc in the next row end.
This uses all 33 row ends and produces 44 sc.
Mark the first and last stitches of this 44-stitch section.
Around the Lower Point
Into the foundation chain where Body Row 1 began, work:
Sc, ch 2, sc.
Mark the ch-2 space.
Up the Second Sloping Side
Repeat the following 11 times:
1 sc in each of the next two row ends, 2 sc in the next row end.
This produces another 44 sc.
Mark the first and last stitches of this side section.
Complete the Starting Corner
Work 1 more sc into the same upper-edge stitch where you began.
Together with the starting 2 sc, this gives 3 sc in that corner.
Sl st into the first border sc.
FO.
The completed foundation border contains:
- 160 sc.
- One ch-2 space at the lower point.
Each sloping side contains 44 sc, excluding the upper-corner stitches and the two stitches beside the point space.
How to Crochet the Picot Edging
The picot edging follows the two sloping sides. The upper edge remains plain.
Use Color A.
With the RS facing you, join yarn in the upper-corner stitch immediately before the first marked 44-stitch side section.
The joining stitch is an anchor and is not included in the following count.
First Sloping Side
Repeat 10 times:
Sl st in the next 4 border stitches, make one picot.
Then sl st in the final 4 stitches of that side.
You have used all 44 side stitches and made 10 picots.
Lower Point
- Sl st in the first sc beside the point space.
- Sl st into the ch-2 space.
- Make one picot.
- Sl st into the same ch-2 space again.
- Sl st in the second sc beside the point space.
Second Sloping Side
Repeat 10 times:
Sl st in the next 4 border stitches, make one picot.
Then sl st in the final 4 stitches of that side.
Sl st into the next upper-corner stitch to secure the edging.
FO.
The finished edging contains:
- 10 picots on the first side.
- One picot at the point.
- 10 picots on the second side.
There are 21 picots altogether.
Keep the slip stitches loose enough that the sides remain flat.
How to Crochet the Flat Ties
Make two ties using Color A.
Do not carry Color B.
Leave a starting tail for attachment.
Ch 4.
- Row 1: Starting in the second chain from the hook, 3 sc. [3]
- Row 2: Ch 1, turn, 3 sc. [3]
Repeat Row 2 until the straight portion measures approximately 30 cm, without stretching.
The exact row count may differ from the body gauge because the ties contain no carried yarn.
Taper the Tip
- Next row: Ch 1, turn, dec, sc. [2]
- Final row: Ch 1, turn, dec. [1]
FO and weave in the finishing tail.
Each completed tie should measure approximately 31 cm before attachment.
Attach the Ties
Place the bandana WS facing upward.
Position the blunt foundation end of one tie behind each upper corner.
The ties should extend outward along the line of the upper edge.
Overlap approximately 2 cm of each tie onto the back of the bandana.
Using matching cotton yarn:
- Sew around the overlapping section.
- Add a diagonal line of stitches across it.
- Catch both the tie fabric and the bandana border.
- Check that neither tie is twisted.
- Secure and hide the sewing ends.
The exposed ties should measure approximately 28–30 cm each.
Putting Your Crochet Gingham Bandana Together
- Make a gauge swatch. Check the fabric with the unused color carried inside the stitches.
- Crochet the triangle. Follow all 33 body rows and their color sequences.
- Check the upper edge. It must contain 66 stitches.
- Add the foundation border. Count 44 stitches along each sloping side.
- Add the picot edging. Make 21 picots in total.
- Crochet two flat ties.
- Sew the ties behind the upper corners.
- Weave in the remaining ends.
- Block gently if needed.
When weaving in the ends, secure the cotton and brushed strands separately where necessary.
Follow the yarn’s care instructions for washing and blocking.
While damp, smooth the triangle, arrange the picots, and shape the upper edge to approximately 38 cm without forcing the fabric to stretch. Keep the ties straight and let the bandana dry completely.
Tips for a Neater Crochet Gingham Bandana
- Count completed stitches. Each increase contributes two stitches to the color chart.
- Mark the first and last body stitches. This makes the shaping easier to follow.
- Check each six-row section. Confirm the color arrangement before moving into the next section.
- Keep the carried yarn relaxed. Tight strands can narrow the triangle and distort the checks.
- Spread the stitches before changing colors. This helps each block retain its width.
- Keep the yarn bundles organized. Treat each cotton-and-brushed pair as one working color.
- Count the border sections. The picot repeat depends on having 44 stitches per side.
- Keep slip stitches loose. A tight edging can pull the sides inward.
- Measure the ties. Their physical length matters more than a fixed number of rows.
- Reinforce the attachment points. The corners take the pull when the ties are knotted.
FAQ About the Crochet Gingham Bandana Pattern
What skill level is this crochet bandana pattern?
It is an intermediate project, mainly because of the changing colors and the need to follow a stitch-by-stitch color chart.
The stitches themselves are chains, single crochet, increases, decreases, slip stitches, and picots.
What size is the finished bandana?
The upper edge measures approximately 38 cm, including the border and excluding the ties.
The depth is approximately 18–19 cm, and each exposed tie measures approximately 28–30 cm.
What yarn does this crochet gingham bandana pattern use?
Each color uses one strand of fine cotton held together with one strand of matching brushed lace-weight yarn.
Allow one 50 g cotton ball and one 25 g brushed-yarn ball in each of two colors.
What hook size do I need?
Start with a 4.5 mm hook.
Adjust the hook to obtain approximately 18 sc and 20 rows per 10 cm over the carried-color checkerboard fabric.
How is the checkerboard pattern formed?
Full checks measure six stitches wide and six rows high.
The chart keeps the blocks aligned while partial checks form along the sloping sides. The grid’s colors reverse after each group of six rows.
How is the triangle shaped?
The body begins with 2 sc at the lower point.
Every following row increases in the first and last stitches, adding two stitches per row. Row 33 finishes with 66 stitches.
Can an increase contain two colors?
Yes. The chart describes the color of each completed stitch.
For example, the first increase in Row 4 contains one sc in B followed by one sc in A, both worked into the same base stitch.
Are the ties crocheted directly onto the bandana?
The ties are made separately as three-stitch-wide strips, tapered at their ends, and sewn behind the upper corners.
How many picots should I have?
There are 21 picots:
- Ten along each sloping side.
- One at the lower point.
Can I change the colors?
Yes. Keep the yarn thickness consistent between the two color bundles.
Cream and sage, dusty pink and brown, or blue and ivory can all be used with the same chart.
Can I change the tie length?
Yes. Repeat the straight three-stitch rows until the ties reach your preferred length, then work the two tapering rows.
Remember that approximately 2 cm of each tie is used for the sewn overlap.
What should I check if the bandana is too narrow?
Check your gauge and the tension of the carried yarn.
A tight carried strand can restrict the width even when the working stitches look loose. If necessary, adjust your hook and make another swatch before restarting the body.
Your Next Stitch
This crochet gingham bandana pattern brings together soft texture, lemon-and-olive checks, and a delicate pointed edge. The row chart guides the colorwork, while the separate ties let you adjust the fit.
Begin with a swatch, keep the carried yarn relaxed, and count the increases as the triangle grows. Finish with the picots and ties, then give the fabric time to relax before wearing it.
Happy crocheting!