Crochet Teddy Bear Pattern: Make Marty in Classic or Pajama Style
There’s a special kind of comfort in a handmade teddy bear. Maybe it’s the velvety chenille yarn, the rounded belly, or the way an embroidered face seems to develop its own personality.
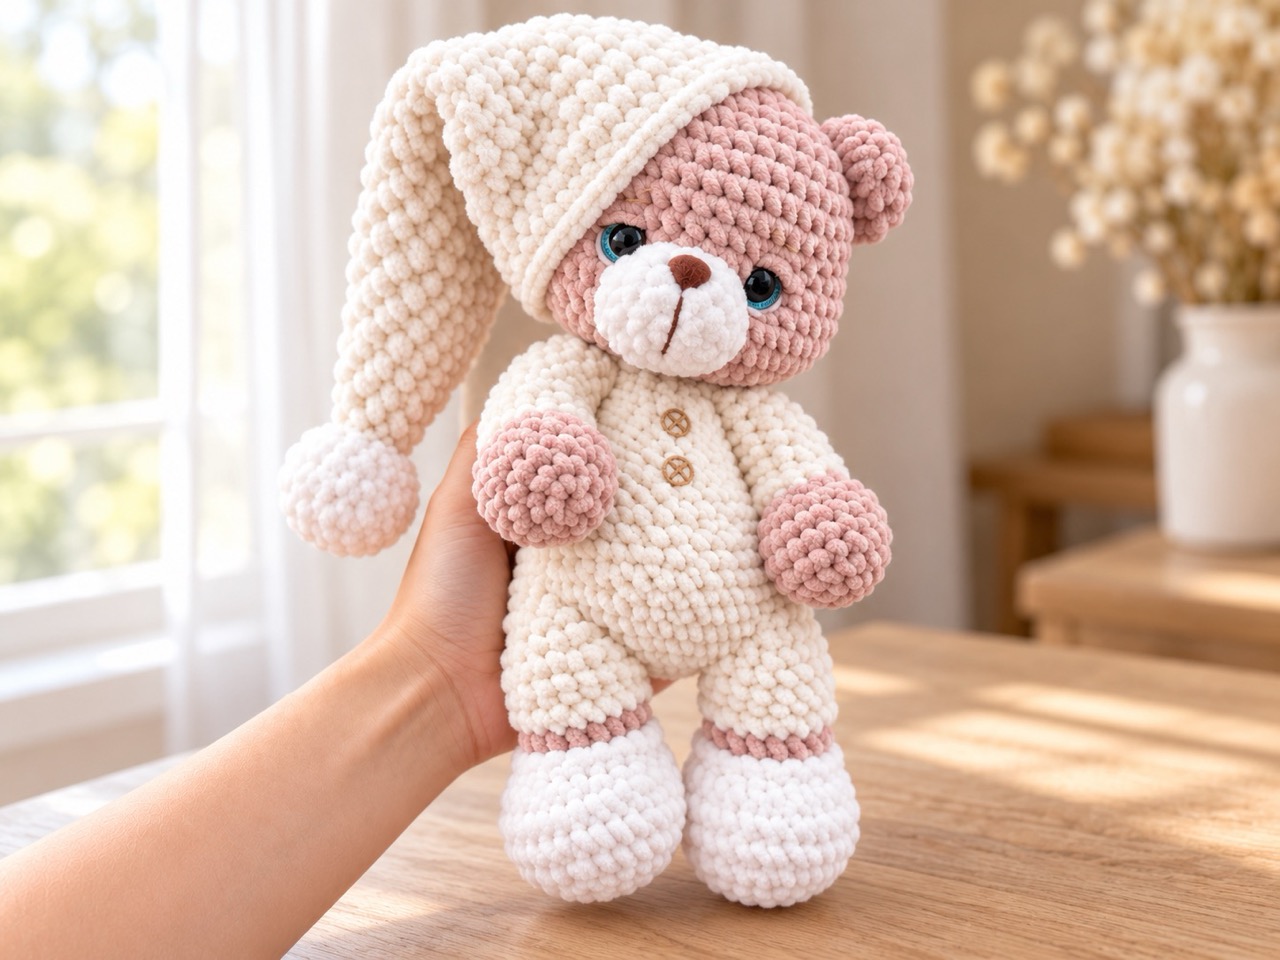
This crochet teddy bear pattern creates Marty, a soft bear that can be made in two styles: a classic teddy or a bedtime bear wearing built-in pajamas, slippers, and a floppy sleeping cap.
Marty is designed to measure approximately 30–33 cm / 11.8–13 inches tall, depending on your yarn, tension, stuffing, and assembly. The construction includes shaped oval feet, legs joined directly into the body, rounded cheeks, an oval muzzle, and matching 24-stitch head and neck openings.
Below you’ll find the complete instructions for both versions, including materials, color changes, pajama edging, facial embroidery, assembly, and sizing guidance.
Jump to a Section
- Why This Crochet Teddy Bear Pattern Stands Out
- What You Need Before You Start
- Abbreviations and Pattern Notes
- How to Crochet the Teddy Bear Head
- How to Crochet the Muzzle
- How to Crochet the Ears
- How to Crochet the Hind Legs and Feet
- How to Join the Legs and Crochet the Body
- How to Crochet the Forelegs and Arms
- How to Crochet the Tail
- Adding the Pajama Details
- How to Crochet the Pajama Cap
- Face Design and Embroidery
- Putting Your Crochet Teddy Bear Together
- Tips for a Neater Crochet Teddy Bear Pattern
- FAQ About the Crochet Teddy Bear Pattern
- Your Next Stitch
Why This Crochet Teddy Bear Pattern Stands Out
Marty combines familiar amigurumi techniques with details that give each version its own character.
- Finished size: Approximately 30–33 cm tall, measured from the soles to the ear tips with the legs extended.
- Skill level: Intermediate.
- Yarn: Super-bulky chenille yarn of consistent thickness.
- Hook: Start with a 4.5 mm hook and adjust to achieve gauge.
- Two versions: A classic bear or a bear wearing built-in pajamas and slippers.
- Joined lower body: The open legs are connected with a short chain bridge before crocheting the torso.
- Matching neckline: The head and body both finish with 24 stitches.
- Shaped cheeks: Concentrated increases create a softly rounded face.
- Oval muzzle and feet: Both begin around a foundation chain.
- Pajama trim: Reserved front loops provide attachment points for cuffs and slipper edging.
- Separate nightcap: The cap is worked from its pointed tip downward and includes two ear openings.
What You Need Before You Start
Choose Your Colors
The instructions use three color letters:
- Color A — Bear color: Honey, taupe, warm brown, or another shade you like.
- Color B — Pajama color: Dusty blue, lavender, sage, or your chosen bedtime color.
- Color C — Cream contrast: Used for the muzzle, slippers, cuffs, collar, and cap trim.
Use yarn of similar thickness for all three colors.
Materials for the Classic Bear
Approximate planning amounts:
- Color A: 200–250 m.
- Color C: 10–20 m.
For the classic version, work the head, ears, legs, body, arms, and tail in Color A. Make the muzzle in Color C.
Materials for the Pajama Bear
Approximate planning amounts, including the nightcap:
- Color A: 100–130 m.
- Color B: 150–190 m.
- Color C: 40–60 m.
Tools and Notions
For either version, you will also need:
- A 4.5 mm crochet hook, adjusted within approximately 4–5 mm to achieve gauge.
- Two 16 mm safety eyes, or embroidery yarn for stitched eyes.
- Smooth dark brown yarn for the nose, mouth, and eyebrows.
- A small amount of white yarn for optional eye details.
- Polyester stuffing.
- Strong, smooth matching yarn for sewing.
- A tapestry needle.
- Stitch markers.
- Sewing pins.
- Scissors.
The nose in this version is embroidered.
Safety Note
Attach safety eyes with their matching washers according to the manufacturer’s instructions. Do not burn, melt, or reshape the posts.
For toys intended for babies or toddlers, embroider the eyes and nose. Embroider pajama buttons and secure all seams, trim, and accessories carefully.
Gauge and Finished Size
Aim for approximately:
14 sc and 16 rounds per 10 cm in firm single crochet.
Over 5 cm, this is approximately 7 stitches and 8 rounds.
The fabric should hold the stuffing without large gaps. At this gauge, the widest part of the stuffed head should measure approximately 12–13 cm across.
Measure finished height from the soles to the ear tips with the legs extended. Fold the nightcap downward when measuring.
For closer size control, make the head and ears first. Their combined height will help you judge how much height the legs and body need to contribute.
Abbreviations and Pattern Notes
US Crochet Abbreviations
- MR: Magic ring.
- ch: Chain.
- sc: Single crochet.
- sl st: Slip stitch.
- inc: Work 2 sc in the next stitch.
- dec: Invisible single crochet decrease over the next 2 stitches.
- BLO: Back loops only.
- FLO: Front loops only.
- FO: Fasten off.
- Rnd: Round.
- (…) × number: Repeat the instructions the stated number of times.
- [number]: Stitch count at the end of the round.
General Working Notes
- Work in continuous spirals unless instructed otherwise.
- Place a marker in the first stitch of each round.
- Work through both loops unless specified.
- Joining slip stitches and turning chains do not count as stitches.
- Change color on the final yarn-over of the stitch before the new color begins.
- When a round specifies BLO, work any decreases through the back loops of the next two stitches.
- Stuff with small tufts of fiberfill to distribute the filling evenly.
- Keep the upper arms softer than the paws.
- Use strong matching sewing yarn if your chenille yarn sheds or breaks during sewing.
The pajamas are created through color changes and are not removable. The sleeping cap is made separately.
Understanding the Reserved Loops
When a round is worked in BLO, the unused front loops belong to the previous round.
For example:
- Leg Round 8 is worked in BLO, leaving front loops from Round 7 for the slipper edging.
- Leg Round 11 is worked in BLO, leaving front loops from Round 10 for the trouser cuff.
- Arm Round 8 is worked in BLO, leaving front loops from Round 7 for the sleeve cuff.
How to Crochet the Teddy Bear Head
Make one in Color A for either version.
Treat the beginning-of-round marker as the back of the head.
- Rnd 1: 6 sc in MR. [6]
- Rnd 2: 6 inc. [12]
- Rnd 3: (sc, inc) × 6. [18]
- Rnd 4: (2 sc, inc) × 6. [24]
- Rnd 5: (3 sc, inc) × 6. [30]
- Rnd 6: (4 sc, inc) × 6. [36]
- Rnd 7: (5 sc, inc) × 6. [42]
- Rnd 8: (6 sc, inc) × 6. [48]
- Rnd 9: (11 sc, inc) × 4. [52]
- Rnd 10: 52 sc. [52]
- Rnd 11: 52 sc. [52]
Shape the Cheeks
- Rnd 12: 10 sc, 2 inc, 28 sc, 2 inc, 10 sc. [56]
- Rnds 13–16: 56 sc in each round. [56]
The 28 stitches between the increase groups in Round 12 form the central front section.
Insert the eyes between Rounds 11 and 12, centered across this front section. Leave 8 complete stitches between the posts.
Check that both eyes sit at the same height before attaching their washers.
- Rnd 17: 10 sc, 2 dec, 28 sc, 2 dec, 10 sc. [52]
- Rnd 18: (11 sc, dec) × 4. [48]
- Rnd 19: (6 sc, dec) × 6. [42]
- Rnd 20: (5 sc, dec) × 6. [36]
Begin stuffing. Fill the crown and cheeks evenly, gently distributing the filling toward the cheek increases.
- Rnd 21: (4 sc, dec) × 6. [30]
- Rnd 22: (3 sc, dec) × 6. [24]
Finish stuffing the head while leaving access through the lower opening.
FO, leaving a long sewing tail.
Keep the 24-stitch opening open. It will match the body’s neck opening.
How to Crochet the Muzzle
Make one in Color C.
Ch 5. Work around both sides of the foundation chain.
- Rnd 1: Starting in the second chain from the hook, work 2 sc in that chain, sc in the next 2 chains, 3 sc in the last chain. Continue along the opposite side: sc in the next 2 chains, sc in the final chain. [10]
- Rnd 2: 2 inc, 2 sc, 3 inc, 2 sc, inc. [16]
- Rnd 3: (sc, inc) × 2, 2 sc, (sc, inc) × 3, 2 sc, sc, inc. [22]
- Rnd 4: 22 sc. [22]
- Rnd 5: 22 sc. [22]
Sl st in the next stitch and FO, leaving a sewing tail.
Leave the muzzle unstuffed until attaching it to the head.
The longer axis of the oval should run horizontally across the face.
How to Crochet the Ears
Make two in Color A.
- Rnd 1: 6 sc in MR. [6]
- Rnd 2: 6 inc. [12]
- Rnd 3: (2 sc, inc) × 4. [16]
- Rnd 4: 16 sc. [16]
- Rnd 5: 16 sc. [16]
- Rnd 6: (2 sc, dec) × 4. [12]
Do not stuff.
Flatten the opening and work 6 sc through both layers to close.
FO, leaving a sewing tail.
Pin one ear to each upper side of the head, with the attachment edges following the curve approximately between head Rounds 4 and 8.
Allow the rounded upper portions to project above the crown.
For the pajama bear, check the ear positions against the cap openings before permanently sewing the ears.
How to Crochet the Hind Legs and Feet
Make two.
The shaping is the same for both versions, with different colors and loop instructions.
Color Guide
| Leg rounds | Classic bear | Pajama bear |
|---|---|---|
| 1–7 | Color A | Color C — slippers |
| 8–9 | Color A | Color A — ankles |
| 10–15 | Color A | Color B — pajama legs |
Foot and Leg Instructions
Ch 5.
- Rnd 1: Starting in the second chain from the hook, work 2 sc in that chain, sc in the next 2 chains, 3 sc in the last chain. Continue along the opposite side: sc in the next 2 chains, sc in the final chain. [10]
- Rnd 2: 2 inc, 2 sc, 3 inc, 2 sc, inc. [16]
- Rnd 3: (sc, inc) × 2, 2 sc, (sc, inc) × 3, 2 sc, sc, inc. [22]
- Rnd 4: BLO: 22 sc. [22]
- Rnd 5: 22 sc. [22]
- Rnd 6: 22 sc. [22]
- Rnd 7: 8 sc, 4 dec, 6 sc. [18]
The decreases form the front of the foot.
For the pajama version, change to Color A at the end of Round 7.
- Rnd 8: Classic bear: 18 sc through both loops. Pajama bear: BLO, 18 sc. [18]
- Rnd 9: 18 sc. [18]
For the pajama version, change to Color B at the end of Round 9.
- Rnd 10: 18 sc. [18]
- Rnd 11: Classic bear: 18 sc through both loops. Pajama bear: BLO, 18 sc. [18]
- Rnds 12–15: 18 sc in each round. [18]
FO on both legs. Leave a tail on one leg for closing any small crotch gaps later.
Do not flatten or close the leg openings.
Stuff the feet firmly enough to preserve their shape. Keep the soles slightly flattened and the upper legs softer.
Slipper Edging — Pajama Version
Attach Color C to the unused front loops of Round 7.
- Ch 1.
- Work 18 sc around.
- Join to the first sc with a sl st.
FO and secure the ends.
Trouser Cuff — Pajama Version
Attach Color C to the unused front loops of Round 10.
- Ch 1.
- Work 18 sc around.
- Join to the first sc with a sl st.
FO and secure the ends.
Complete the edging on both legs before joining them into the body.
How to Join the Legs and Crochet the Body
Use:
- Color A for the classic bear.
- Color B for the pajama bear, changing to Color C for the final collar rounds.
Prepare the Leg Join
Place the legs side by side with:
- Both soles at the same level.
- Both toes pointing forward.
- Both openings facing upward.
Mark the stitch at the inner side of each leg—the point closest to the other leg.
Attach the body yarn with a sl st in the marked stitch of the right leg.
Ch 2 to create the bridge.
The setup slip stitch and chains are not additional stitches in the body-round count.
Body Instructions
- Rnd 1: Sc in the marked stitch of the left leg and place the round marker in this sc. Work 17 more sc around the left leg. Work 2 sc along one side of the chain bridge. Work 18 sc around the right leg, including the stitch holding the setup slip stitch. Work 2 sc along the opposite side of the bridge. [40]
There are 18 stitches around each leg and 2 stitches on each side of the bridge.
- Rnd 2: (4 sc, inc) × 8. [48]
- Rnds 3–6: 48 sc in each round. [48]
Use the leg tail to close any small gaps beside the bridge. Secure the yarn ends inside the body.
- Rnd 7: (10 sc, dec) × 4. [44]
- Rnds 8–10: 44 sc in each round. [44]
- Rnd 11: (9 sc, dec) × 4. [40]
- Rnds 12–14: 40 sc in each round. [40]
Stuff the hips and lower body, adding small tufts around the leg join.
- Rnd 15: (8 sc, dec) × 4. [36]
- Rnd 16: 36 sc. [36]
- Rnd 17: (4 sc, dec) × 6. [30]
- Rnd 18: 30 sc. [30]
- Rnd 19: (3 sc, dec) × 6. [24]
For the pajama version, change to Color C at the end of Round 19.
- Rnd 20: Classic bear: 24 sc through both loops. Pajama bear: BLO, 24 sc in Color C. [24]
- Rnd 21: 24 sc. [24]
Finish stuffing the body. Support the upper body and neck firmly without stretching the fabric.
FO.
Leave the 24-stitch neck opening open.
Adjusting the Height
Pin the head to the body and check the total height with the legs extended.
If needed, add or remove plain rounds within the 40-stitch section, Rounds 12–14.
Each plain round changes the height by approximately 0.6 cm at the suggested gauge.
Keep the shaping rounds unchanged. Shift later round references, collar placement, and arm placement by the same number of rounds.
How to Crochet the Forelegs and Arms
Make two.
Color Guide
| Arm rounds | Classic bear | Pajama bear |
|---|---|---|
| 1–7 | Color A | Color A |
| 8–18 | Color A | Color B |
Arm Instructions
- Rnd 1: 5 sc in MR. [5]
- Rnd 2: 5 inc. [10]
- Rnd 3: (sc, inc) × 5. [15]
- Rnd 4: 15 sc. [15]
- Rnd 5: 15 sc. [15]
- Rnd 6: (3 sc, dec) × 3. [12]
- Rnd 7: 12 sc. [12]
For the pajama version, change to Color B at the end of Round 7.
- Rnd 8: Classic bear: (4 sc, dec) × 2 through both loops. Pajama bear: BLO, (4 sc, dec) × 2. [10]
- Rnds 9–18: 10 sc in each round. [10]
Stuff the paw and lower arm moderately.
Use less stuffing toward the shoulder and leave the uppermost two rounds unstuffed.
Flatten the opening and work 5 sc through both layers to close.
FO, leaving a sewing tail.
Sleeve Cuff — Pajama Version
Attach Color C to the unused front loops of Round 7.
- Ch 1.
- Work 12 sc around.
- Join to the first sc with a sl st.
FO and secure the ends.
The cuff sits over the transition between the paw and sleeve.
How to Crochet the Tail
Make one in Color A.
- Rnd 1: 6 sc in MR. [6]
- Rnd 2: (sc, inc) × 3. [9]
- Rnd 3: 9 sc. [9]
- Rnd 4: (sc, dec) × 3. [6]
FO, leaving a sewing tail.
Add a small amount of stuffing. Leave the opening open for sewing.
Adding the Pajama Details
Optional Patch Pocket
Make one in Color B or Color C.
Ch 6.
- Row 1: Starting in the second chain from the hook, 5 sc. [5]
- Row 2: Ch 1, turn, 5 sc. [5]
- Row 3: Ch 1, turn, 5 sc. [5]
- Row 4: Ch 1, turn, 5 sc. [5]
- Row 5: Ch 1, turn, 5 sc. [5]
FO, leaving a sewing tail.
If desired, embroider a small sparkle with three crossed straight stitches.
Pin the pocket slightly to one side of the front belly, approximately across body Rounds 8–12.
Sew the sides and lower edge to the body. Leave the top edge open.
Embroidered Pajama Placket
With fine contrasting yarn, embroider two or three small crosses down the upper center front.
Keep the stitches clear of the pocket.
These embroidered details provide a flat finish without separate hard buttons.
How to Crochet the Pajama Cap
Make the nightcap in Color B, with Color C for the brim.
Work from the narrow tip toward the brim.
- Rnd 1: 4 sc in MR. [4]
- Rnd 2: 4 sc. [4]
- Rnd 3: 4 inc. [8]
- Rnd 4: 8 sc. [8]
- Rnd 5: 8 sc. [8]
- Rnd 6: (sc, inc) × 4. [12]
- Rnd 7: 12 sc. [12]
- Rnd 8: 12 sc. [12]
- Rnd 9: 12 sc. [12]
- Rnd 10: (2 sc, inc) × 4. [16]
- Rnd 11: 16 sc. [16]
- Rnd 12: 16 sc. [16]
- Rnd 13: (3 sc, inc) × 4. [20]
- Rnd 14: 20 sc. [20]
- Rnd 15: (4 sc, inc) × 4. [24]
- Rnd 16: 24 sc. [24]
- Rnd 17: (3 sc, inc) × 6. [30]
- Rnd 18: 30 sc. [30]
- Rnd 19: (4 sc, inc) × 6. [36]
- Rnd 20: 36 sc. [36]
- Rnd 21: (5 sc, inc) × 6. [42]
- Rnd 22: 42 sc. [42]
- Rnd 23: (6 sc, inc) × 6. [48]
- Rnd 24: 48 sc. [48]
- Rnd 25: (5 sc, inc) × 8. [56]
- Rnd 26: 56 sc. [56]
Make the Ear Openings
- Rnd 27: 8 sc, ch 6 and skip the next 6 stitches, 28 sc, ch 6 and skip the next 6 stitches, 8 sc. [56, counting each chain as one stitch]
- Rnd 28: 56 sc, working 1 sc into each stitch and each chain. [56]
The 28-stitch section between the openings is the front of the cap. The shorter section across the beginning and end of the round is the back.
Try the cap on the head. Ease the ears through the openings and check that the front edge sits above the eyes.
Change to Color C.
- Rnd 29: BLO: 56 sc. [56]
- Rnd 30: 56 sc. [56]
Sl st in the next stitch and FO.
Fold the cream brim outward if desired. Leave the cap unstuffed so the tip can fall naturally to one side.
Soft Cap Pompom
Make one in Color C.
- Rnd 1: 6 sc in MR. [6]
- Rnd 2: 6 inc. [12]
- Rnd 3: (2 sc, inc) × 4. [16]
- Rnd 4: 16 sc. [16]
- Rnd 5: (2 sc, dec) × 4. [12]
Add a small amount of stuffing.
- Rnd 6: 6 dec. [6]
FO, leaving a long sewing tail.
Gather the remaining front loops closed.
Sew the pompom securely to the narrow tip of the cap with several passes.
Face Design and Embroidery
The cheek increases and careful stuffing provide the basic facial shaping. Needle sculpting is not required for this version.
Embroider the Nose and Mouth
Before attaching the muzzle, hold it horizontally.
With smooth dark brown yarn:
- Embroider a small nose approximately 1.5 cm wide across the upper center of the muzzle.
- Fill the nose shape with several close satin stitches.
- From the lower center of the nose, make a vertical stitch approximately 0.8 cm long.
- Add two small curved stitches from its lower end to form a gentle smile.
Secure the embroidery on the inside of the muzzle.
Attach the Muzzle
Center the muzzle beneath the eyes, approximately across head Rounds 13–19.
Pin it in place with its long axis horizontal.
Sew around most of the edge. Add a small amount of stuffing before closing the final section.
Keep the center softly raised and the outer edge close to the face.
Add the Finishing Details
If desired:
- Embroider one short diagonal eyebrow above each eye.
- Add a small curved white stitch along the lower outer edge of each eye.
- Add a loose upper-eyelid stitch in Color A.
Keep embroidery tension gentle so the eye positions remain even.
Putting Your Crochet Teddy Bear Together
Pin the pieces before sewing. Check the bear from the front, back, and sides.
1. Finish the Head
Complete the muzzle, nose, mouth, and optional eye details.
Sew the ears symmetrically to the upper sides of the head, approximately between head Rounds 4 and 8.
For the pajama bear, try the nightcap over the pinned ears before completing their seams.
2. Attach the Head to the Body
The head and body openings each contain 24 stitches.
- Mark the center front and center back of both pieces.
- Pin the head to the neck with the face aligned over the toes and front belly.
- Match the two openings stitch for stitch.
- Sew around the neck, leaving a small gap.
- Add enough stuffing through the gap to support the base of the head.
- Complete the seam.
- Make a second reinforcing pass around the neck if needed, using strong matching yarn.
Keep the head upright and centered.
3. Attach the Arms
Pin the closed arm edges to the sides of the upper body, approximately across body Rounds 16–18.
Check that:
- Both arms begin at the same height.
- The paws face slightly forward.
- The arms hang naturally beside the belly.
Sew through the five-stitch closed edges and catch a small area behind each shoulder for a secure attachment.
Leave the lower arms free to move.
4. Check the Joined Legs
The legs are already connected to the body and do not need separate attachment seams.
Check that:
- Both feet point forward.
- The soles sit at the same level.
- The crotch gaps are closed.
- The stuffing is evenly distributed through the hips.
5. Attach the Tail
Center the tail on the back of the lower body, approximately across body Rounds 5–7, above the leg join.
Sew around its six-stitch opening.
Add a little more stuffing before completing the final stitches if necessary.
6. Finish the Pajama Version
For the pajama bear:
- Check the slipper edging and trouser cuffs.
- Secure the sleeve cuffs.
- Attach the optional pocket and embroidered placket details.
- Place the cap on the head with the ears through the openings.
- Fold the tip to one side.
Leave the cap removable, or secure it with concealed stitches at the back and sides. Secure it permanently or omit it when a removable accessory would be unsuitable for the intended recipient.
7. Shape and Finish Marty
- Gently distribute the stuffing through the cheeks, belly, and feet.
- Keep the soles slightly flattened.
- Check that the arms sit evenly.
- Secure every sewing tail inside the bear.
- Remove all pins and temporary markers.
- Measure from the soles to the ear tips with the legs extended.
The intended finished height is approximately 30–33 cm.
Tips for a Neater Crochet Teddy Bear Pattern
Use a Stitch Marker
Mark the first stitch of every round. Move the marker as you work so the cheek shaping and color changes stay organized.
Count the Shaping Rounds
Check the total after each increase or decrease round. This is especially useful around the cheeks, foot shaping, leg join, and nightcap openings.
Keep the Oval Foundations Flat
After the first three rounds of the muzzle and feet, check that you have worked along both sides of the chain without skipping an end stitch.
Stuff Gradually
Add small tufts rather than one large piece of filling. Shape the cheeks and feet as you go.
Keep the Shoulders Flexible
Use less stuffing near the arm openings. Soft upper arms help the paws hang naturally beside the belly.
Mark the Reserved Loops
Place a spare marker in the front loops reserved for each cuff. This makes them easier to find after the limbs are finished.
Check the Neck Before Closing
The neck supports the head. Add enough stuffing to the upper body and lower head to prevent a weak join, then sew the two 24-stitch openings evenly.
Fit the Cap Before Sewing the Ears
The nightcap has two ear openings. Checking it over the pinned ears helps you coordinate their placement.
Use Strong Sewing Yarn
If your chenille yarn sheds or breaks under tension, use a smooth matching yarn for the seams.
FAQ About the Crochet Teddy Bear Pattern
What skill level is this crochet teddy bear pattern?
This version is intended for an intermediate crocheter.
You should be comfortable with magic rings, increases, decreases, oval foundations, color changes, working in back loops, joining legs, and sewn assembly.
How big is the finished Marty teddy bear?
Marty is designed to measure approximately 30–33 cm / 11.8–13 inches tall, measured from the soles to the ear tips with the legs extended.
Exact size depends on your yarn, gauge, stuffing, and assembly.
What yarn should I use?
Use super-bulky chenille yarn of consistent thickness for the main colors.
Choose a yarn-and-hook combination that produces firm fabric at approximately 14 sc and 16 rounds per 10 cm.
What hook size does the pattern use?
Start with a 4.5 mm hook.
Adjust within approximately 4–5 mm if necessary to approach gauge while maintaining dense fabric.
Can I make Marty without pajamas?
Yes.
Work the head, ears, legs, body, arms, and tail in Color A. Use Color C for the muzzle.
Follow the classic-bear instructions on the rounds where the pajama version specifies BLO or a color change. Omit the cuffs, pocket, and cap.
How do I make the pajama version
Are the limbs crocheted into the body?
The legs are joined directly into the body with a two-chain bridge.
The arms are made separately and sewn to the upper body.
How many stitches are in the head and neck openings?
Both openings contain 24 stitches, allowing a stitch-for-stitch seam.
What size eyes should I use?
This version uses 16 mm safety eyes.
Place them between head Rounds 11 and 12, leaving 8 complete stitches between the posts.
You can embroider eyes at the same positions.
Does the pattern use a plastic nose?
No. This version uses an embroidered nose approximately 1.5 cm wide.
Your Next Stitch
This crochet teddy bear pattern gives you two ways to make Marty. The classic version has a simple, familiar appearance, while the pajama version adds cream slippers, cuffs, a small pocket, and a floppy nightcap.
The joined legs, shaped cheeks, oval muzzle, and rounded body create a soft bear designed to finish approximately 30–33 cm tall.
Choose your chenille colors, check your gauge, and begin with the head. Take your time with the face, try the cap over the pinned ears, and check the overall proportions before finishing the seams.
Happy crocheting!