Crochet Bat Pattern Amigurumi Bat for Halloween
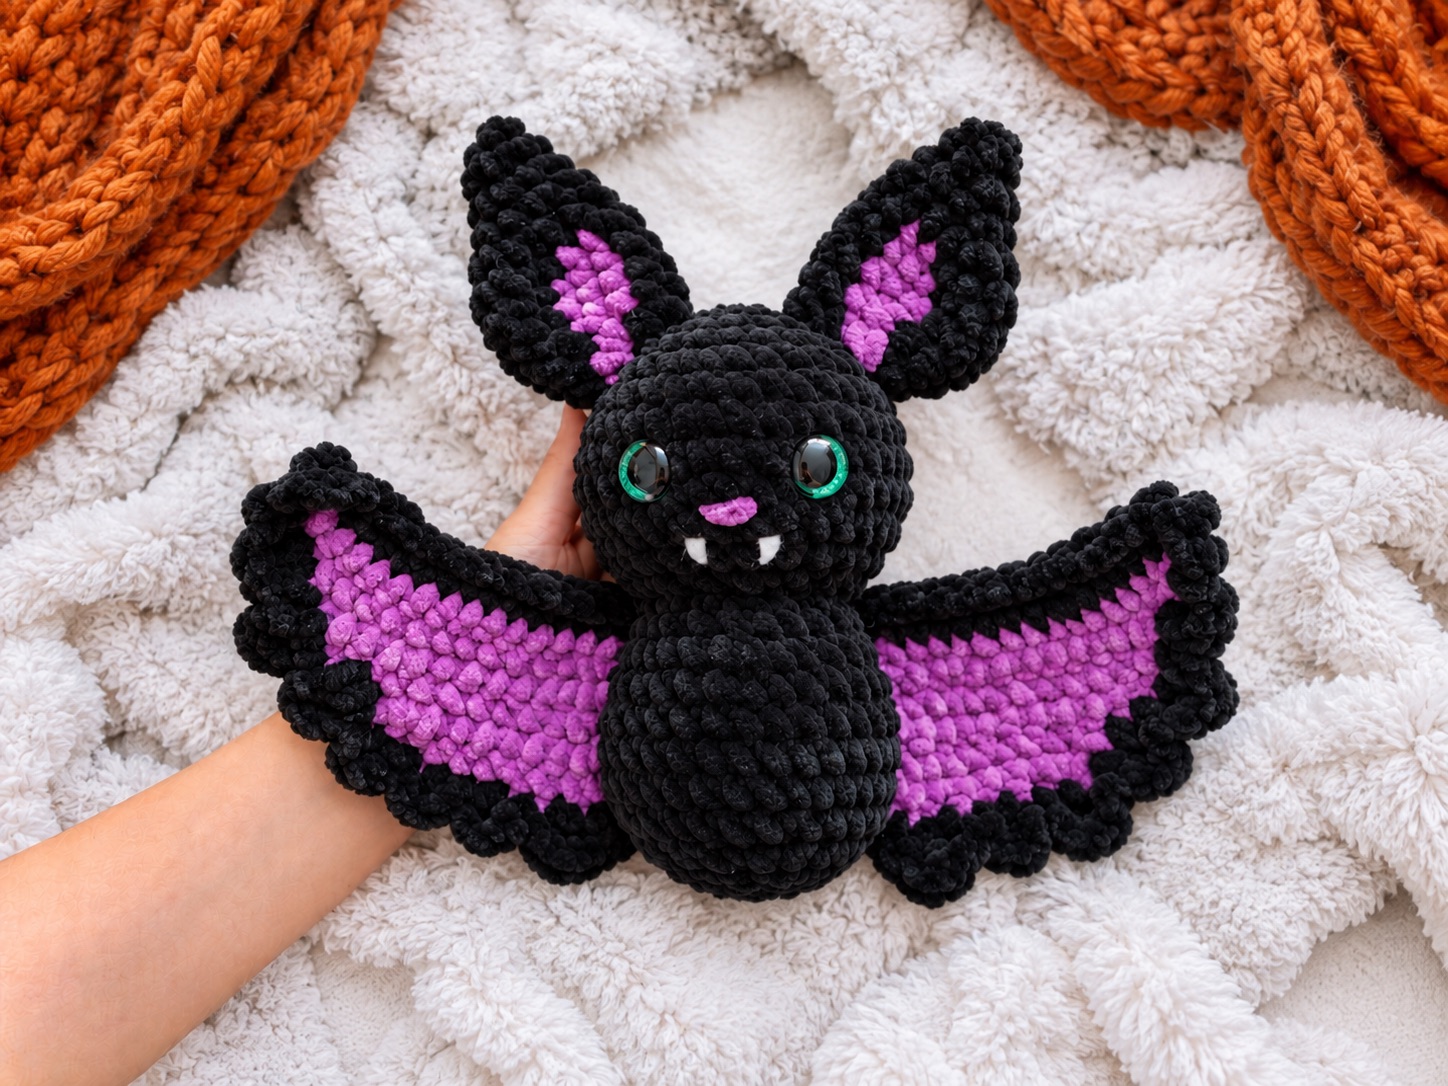
A handmade bat brings a little playful spookiness to a shelf, a Halloween display, or a branch hung with seasonal decorations. With tall ears, purple wing panels, and two tiny embroidered fangs, this crochet bat pattern creates a character with plenty of personality.
The Moonberry Bat is designed to measure approximately 12–14 cm tall, including the ears, with a wingspan of approximately 20–23 cm. Its body and head are crocheted in one piece from the bottom upward. Separate purple inserts give the ears and wings their contrasting details.
Below you’ll find the complete pattern, including materials, stitch explanations, assembly instructions, facial embroidery, an optional hanging loop, and tips for finishing.
Jump to a Section
- Why This Crochet Bat Pattern Stands Out
- What You Need Before You Start
- Abbreviations and Special Techniques
- How to Crochet the Bat Head and Body
- How to Crochet the Bat Ears
- How to Crochet the Wings
- Putting Your Crochet Bat Together
- How to Add the Nose, Fangs, and Face Details
- Tips for a Neater Crochet Bat Pattern
- FAQ About the Crochet Bat Pattern
- Your Next Stitch
Why This Crochet Bat Pattern Stands Out
The bat combines a rounded body with tall ears and pointed wing borders.
- height: 12–14 cm, including the ears.
- wingspan: 20–23 cm with the wings spread.
- Skill level: Confident beginner to intermediate, particularly for working the wing edging into row ends.
- Yarn: DK cotton in black and a contrasting color.
- Suggested hook: 2.5 mm, adjusted to achieve firm fabric.
- Eyes: Embroidered with black thread, white outlines, and highlights.
- Construction: Body and head worked continuously from the bottom upward.
- Ears: Two identical black outer ears with separate purple inserts.
- Wings: Flat black panels with purple inserts and four pointed details on each outer border.
- Finishing: Pink nose, embroidered fangs, and an optional hanging loop.
Purple gives the bat a classic Halloween look. You can substitute red, plum, or another color of the same yarn thickness.
What You Need Before You Start
Yarn and Hook
Use DK cotton yarn approximately 120–150 m per 50 g.
Allow approximately:
- Black: 35–45 g for the body, head, outer ears, and wing panels.
- Purple: 10–15 g for the inner ears and wing inserts.
- Small amounts of pink, white, and black embroidery thread.
These quantities are rather than measured consumption.
Use a 2.5 mm hook, or a size that produces firm fabric without visible stuffing. Keep the black and purple yarns similar in thickness so the inserts fit their outer pieces.
Notions and Tools
- Polyester stuffing.
- Yarn needle.
- Embroidery needle.
- Stitch marker.
- Pins.
- Scissors.
- Optional dark gray embroidery thread for the mouth.
Gauge and Finished Size
A working guide is approximately 24 sc and 28 rounds per 10 cm in firm crochet fabric.
The intended finished size is approximately 12–14 cm tall, including the ears, and 20–23 cm across the spread wings.
Yarn thickness, tension, stuffing, and assembly affect these measurements. Make one sample to confirm the dimensions with your chosen materials.
Abbreviations and Special Techniques
This pattern uses US crochet terminology.
- MR: Magic ring.
- ch: Chain.
- sc: Single crochet.
- dc: Double crochet.
- sl st: Slip stitch.
- inc: Work 2 sc into the same stitch.
- dec: Single crochet decrease over the next 2 stitches.
- R: Round.
- st/sts: Stitch/stitches.
- […] × number: Repeat the enclosed instructions.
- (number): Completed stitch count.
Working in Rounds and Rows
The body, head, and outer ears are worked in continuous rounds. Mark the first stitch of each round.
The inner ears and wing panels are worked in rows. Turning chains do not count as stitches.
Round numbers for the body and head continue from R1 through R31. Assembly references to head rounds use this same numbering.
Invisible Decrease for the Rounded Pieces
- Insert the hook through the front loop of the next stitch.
- Insert it through the front loop of the following stitch.
- Yarn over and pull through both front loops.
- Yarn over and pull through the remaining two loops.
Decrease for the Flat Pieces
For wing and inner-ear rows, use regular sc2tog:
- Insert the hook into the next stitch and pull up a loop.
- Insert it into the following stitch and pull up another loop.
- Yarn over and pull through all three loops.
Picot
Ch 3, then sl st into the third chain from the hook.
This forms the small points on the wing border.
Closing a Flattened Ear
Flatten the ear opening so the stitches line up in two layers.
Insert the hook through one stitch from each layer and make a single crochet. A 12-stitch opening becomes six stitches across the flattened edge.
Leave sewing tails approximately 25–30 cm long unless otherwise stated.
How to Crochet the Bat Head and Body
Use black yarn. Begin at the bottom of the body and work upward into the head.
Body
- R1: 6 sc in MR. (6)
- R2: Inc in every stitch. (12)
- R3: [Sc, inc] × 6. (18)
- R4: [2 sc, inc] × 6. (24)
- R5: [3 sc, inc] × 6. (30)
- R6: [4 sc, inc] × 6. (36)
- R7–R10: Sc around. (36 each round)
- R11: [4 sc, dec] × 6. (30)
- R12: Sc around. (30)
- R13: [3 sc, dec] × 6. (24)
- R14: Sc around. (24)
- R15: [2 sc, dec] × 6. (18)
- R16: Sc around. (18)
Stuff the body now. Keep the lower section rounded and gently flatten the bottom against your palm.
Add enough stuffing to support the neck without stretching the stitches.
Continue Into the Head
Do not fasten off.
- R17: [2 sc, inc] × 6. (24)
- R18: [3 sc, inc] × 6. (30)
- R19: [4 sc, inc] × 6. (36)
- R20: [5 sc, inc] × 6. (42)
- R21–R25: Sc around. (42 each round)
- R26: [5 sc, dec] × 6. (36)
- R27: [4 sc, dec] × 6. (30)
- R28: [3 sc, dec] × 6. (24)
Begin stuffing the head. Add small pieces evenly around the sides and check that the neck remains supported.
- R29: [2 sc, dec] × 6. (18)
- R30: [Sc, dec] × 6. (12)
Finish stuffing before the final round.
- R31: Dec × 6. (6)
Fasten off. Thread the yarn tail through the front loops of the remaining six stitches and pull gently to close.
Secure the end and hide it inside the head.
How to Crochet the Bat Ears
Make two identical black outer ears and two purple inner ears.
Black Outer Ears — Make Two
Begin at the pointed tip.
- R1: 4 sc in MR. (4)
- R2: Sc around. (4)
- R3: [Sc, inc] × 2. (6)
- R4: [2 sc, inc] × 2. (8)
- R5: [3 sc, inc] × 2. (10)
- R6: [4 sc, inc] × 2. (12)
- R7: [5 sc, inc] × 2. (14)
- R8: Sc around. (14)
- R9: [5 sc, dec] × 2. (12)
- R10: Sc around. (12)
Do not stuff.
Flatten the opening so six stitches face six stitches. Work 6 sc through both layers to close the base.
Fasten off with a sewing tail.
Purple Inner Ears — Make Two
Work in rows from the narrow tip toward the wider base.
Ch 2.
- Row 1: Sc in the second chain from the hook. (1)
- Row 2: Ch 1, turn, inc. (2)
- Row 3: Ch 1, turn, 2 sc. (2)
- Row 4: Ch 1, turn, inc in both stitches. (4)
- Row 5: Ch 1, turn, 4 sc. (4)
- Row 6: Ch 1, turn, inc, 2 sc, inc. (6)
- Row 7: Ch 1, turn, 6 sc. (6)
Fasten off with a sewing tail.
Assemble the Ears
Center one purple piece on the front of each black ear.
Leave the black tip visible and keep the purple base above the ear’s closing seam.
Sew around the purple edges with small stitches. Keep the ear flat and avoid pulling the sewing yarn tightly.
How to Crochet the Wings
Each wing consists of a black panel, a pointed black border, and a smaller purple insert.
Make two of each panel, then arrange them as a mirrored pair before sewing the inserts.
Black Wing Panels — Make Two
Use black. Ch 19.
- Row 1: Beginning in the second chain from the hook, 18 sc. (18)
- Row 2: Ch 1, turn, 18 sc. (18)
- Row 3: Ch 1, turn, dec twice, 14 sc. (16)
- Row 4: Ch 1, turn, 12 sc, dec twice. (14)
- Row 5: Ch 1, turn, dec twice, 10 sc. (12)
- Row 6: Ch 1, turn, 8 sc, dec twice. (10)
- Row 7: Ch 1, turn, dec twice, 6 sc. (8)
- Row 8: Ch 1, turn, 4 sc, dec twice. (6)
- Row 9: Ch 1, turn, dec twice, 2 sc. (4)
- Row 10: Ch 1, turn, dec twice. (2)
- Row 11: Ch 1, turn, dec. (1)
Do not fasten off.
Identify the Wing Edges
Before adding the border, identify these points:
- The first stitch of Row 1 is the outer wingtip.
- The last stitch of Row 1 is the upper inner corner beside the body.
- The foundation chain forms the straight upper edge.
- The edge shaped by the decreases is the sloping lower edge.
- The remaining straight side is the inner edge that attaches to the body.
Pointed Wing Border
Continue with black.
Ch 1, then rotate the panel to work into the row ends along the sloping edge. Begin at the lower point and move toward the outer wingtip.
Treat each row end as one attachment point.
- Row 11 end: 1 sc.
- Row 10 end: 1 sl st.
- Row 9 end: Work dc, picot, dc into the same row end.
- Row 8 end: 1 sl st.
- Row 7 end: 1 sl st.
- Row 6 end: Work dc, picot, dc into the same row end.
- Row 5 end: 1 sl st.
- Row 4 end: 1 sl st.
- Row 3 end: Work dc, picot, dc into the same row end.
- Row 2 end: 1 sl st.
- Row 1 end, at the outer wingtip: Work sc, picot, sc into the same row end.
This section contains 15 border stitches plus four picots. The initial chain, picot chains, and picot joining slip stitches are excluded from that count.
Continue along the straight upper edge:
- Work 18 sc into the unused loops of the foundation chain, moving from the outer wingtip toward the body attachment corner.
Fasten off with a sewing tail. Leave the straight inner edge unworked.
Complete the second black wing in the same way.
Purple Wing Inserts — Make Two
Use purple. Ch 13.
- Row 1: Beginning in the second chain from the hook, 12 sc. (12)
- Row 2: Ch 1, turn, 12 sc. (12)
- Row 3: Ch 1, turn, dec twice, 8 sc. (10)
- Row 4: Ch 1, turn, 6 sc, dec twice. (8)
- Row 5: Ch 1, turn, dec twice, 4 sc. (6)
- Row 6: Ch 1, turn, 2 sc, dec twice. (4)
- Row 7: Ch 1, turn, dec twice. (2)
- Row 8: Ch 1, turn, dec. (1)
Fasten off with a sewing tail. Do not add a border.
Assemble the Wing Layers
Lay the black panels flat with their straight inner edges facing each other. Turn one panel over to create a mirrored pair.
The surfaces facing you will be the fronts of the wings.
Position a purple insert on each wing:
- Keep its straight upper edge parallel to the black upper edge.
- Place it approximately one row below the black upper edge.
- Leave approximately one stitch of black visible along the straight inner edge.
- Keep the purple panel clear of the pointed border.
Pin the inserts and sew around their edges with small stitches. Both layers should remain flat.
For optional wing veins, embroider two black lines across each purple panel. Begin near the upper inner corner and angle the lines toward two lower border points.
Use several short stitches for each line and avoid pulling the fabric inward.
Putting Your Crochet Bat Together
Prepare the completed body and head, two assembled ears, and two assembled wings.
Attach the Ears
Choose the front of the bat and mark its center with a pin.
Position the ears on the upper left and right sides of the head, with the purple inserts facing forward.
- Place the bases approximately across R26–R28.
- Leave approximately three stitches between the inner corners when viewed from the front.
- Angle the tips slightly outward.
Pin both ears before sewing. Check their height and angle, then sew the flattened bases securely to the head.
Attach the Wings
Position one wing on each side of the body, purple panels facing forward.
For each wing:
- Pin the upper inner corner near R15, just below the head.
- Position the lower inner point around R5–R6.
- Let the upper edge extend outward from the shoulder.
- Keep the pointed border facing downward.
Sew the entire straight inner edge to the side of the body. Position the seam slightly toward the back so the wings can spread beside the bat.
Adjust the lower attachment point if your row gauge makes the wing’s inner edge slightly longer or shorter than the suggested area.
Leave the outer edges and wing points free.
How to Add the Nose, Fangs, and Face Details
Use fine embroidery thread so the facial features remain proportionate to the head.
Embroidered Eyes
Mark the eye centers between R23 and R24, approximately seven stitch spaces apart from center to center.
For each eye:
- Make a small black oval approximately 5–6 mm tall.
- Build the shape with several short, parallel stitches.
- Add a slim white crescent along the outer edge to define it against the black head.
- Add one tiny white highlight near the upper part of the eye.
Keep the tension gentle to avoid dimpling the face.
Pink Nose
Center a small pink triangle between R22 and R23, approximately two stitches wide.
Fill the triangle with two or three short stitches.
Mouth
With black thread, make a short line below the nose and a shallow curved mouth around R21–R22.
Use dark gray thread if you want the mouth to show more clearly against the black yarn.
White Fangs
Place one fang beneath each side of the mouth, with their centers approximately three stitch spaces apart.
For each fang:
- Make two short white stitches that meet at a lower point.
- Keep their upper ends slightly apart.
- Extend the point toward R20–R21.
This creates a small downward-pointing triangle. Add an extra stitch inside the triangle if needed.
Optional Cheeks
Embroider a short pink stitch beneath the outer side of each eye.
Optional Hanging Loop
Use black yarn and leave a starting tail approximately 15 cm long.
- Ch 16.
- Sl st into the first chain to form a loop.
- Fasten off, leaving another 15 cm tail.
Sew the joined end of the loop to the back of the crown between the ears. Anchor both tails through several stitches, then secure and hide them inside the head.
Tips for a Neater Crochet Bat Pattern
- Use a stitch marker. The body and head continue through 31 rounds without a joining seam.
- Count after every shaping round. Correct a missed increase or decrease before continuing.
- Work black yarn in good light. A pale background behind your work can make the stitches easier to see.
- Stuff gradually. Small pieces of filling help create an even surface.
- Leave ears and wings unstuffed. Their shape comes from the crochet fabric and layered inserts.
- Mark the wing row ends. Temporary markers at Rows 3, 6, and 9 help you place the pointed border.
- Check the mirrored wings before sewing. Both purple inserts should face forward once attached.
- Keep sewing tension gentle. Tight stitches can make the purple panels pucker.
- Pin both ears at once. Compare their height and angle before securing them.
- Outline the embroidered eyes. Small white details help black eyes show against black fabric.
- Use a needle to hide yarn ends. Pass through the inside of the fabric and secure the tails neatly.
- Make one sample first. Confirm size, panel fit, and placement before making several bats.
FAQ About the Crochet Bat Pattern
What skill level is this crochet bat pattern?
It suits confident beginners to intermediate crocheters. You should be comfortable with magic rings, single crochet, double crochet, increases, decreases, turning rows, and sewing separate pieces.
The wing edging requires identifying and working into row ends.
How big is the finished crochet bat?
The size is 12–14 cm tall, including the ears, with a 20–23 cm wingspan.
These measurements are targets rather than tested dimensions. Yarn, tension, stuffing, and assembly affect the result.
What yarn and hook should I use?
Use DK cotton approximately 120–150 m per 50 g and start with a 2.5 mm hook.
Adjust the hook if necessary to produce firm fabric without visible stuffing.
What colors do I need for this crochet bat pattern?
You need black for the body, head, outer ears, and wing panels, plus purple for the inserts.
You also need small amounts of black, white, and pink embroidery thread. Red or another contrasting yarn can replace the purple.
Are the head and body crocheted together?
Yes. Begin at the bottom of the body and continue upward into the head, finishing at the crown.
The combined piece has 31 rounds.
Are the left and right ears different?
Both ears use the same instructions. Their symmetrical placement comes from how you position them on the head.
Each ear has one black outer piece and one purple insert.
Does this pattern use safety eyes?
The written instructions use embroidered eyes with white outlines and highlights.
Where do I place the eyes?
Place the eye centers between R23 and R24, approximately seven stitch spaces apart from center to center.
How do I make the wing points?
The border uses double crochet stitches and picots worked into specified row ends along the sloping edge.
Three pointed details sit along that edge, with a fourth at the outer wingtip.
Should I stuff the wings or ears?
Leave both unstuffed. Stuff only the body and head.
How do I make the fangs?
Embroider two small white triangles beneath the mouth. Their centers sit approximately three stitch spaces apart, with the points extending toward R20–R21.
Can I turn the bat into an ornament?
Yes. Make the optional 16-chain loop and sew it securely to the back of the crown between the ears.
Your Next Stitch
Choose your contrast color and begin with the body’s first magic ring. The rounded shape comes together first, followed by the tall ears, layered wings, and embroidered face.
Before making a whole group, finish one bat to check the measurements and placement with your own tension. Small adjustments to the ear angle, wing position, and expression will give each one its own character.
Happy crocheting!