
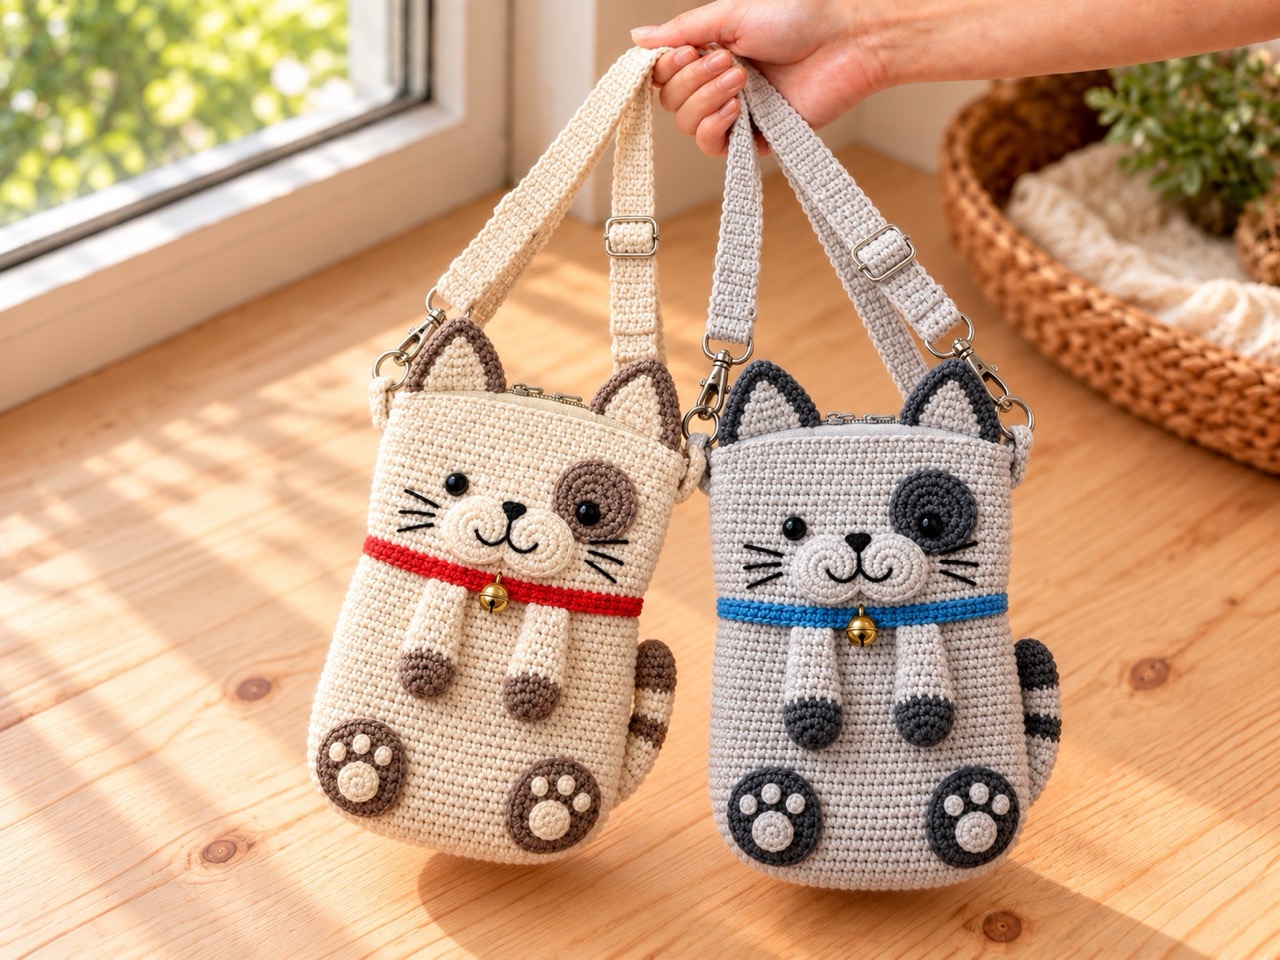
Crochet Cat Phone Bag Pattern Crossbody Pouch
There’s something incredibly satisfying about making something that’s both ridiculously cute and genuinely useful. This crochet cat phone bag pattern, featured on Crochhet Handmade, combines a practical phone pouch with pointed ears, soft paws, a little striped tail, and an adjustable crossbody strap. Choose cream and taupe for a warm look, or light gray and charcoal for a cooler combination, then add a red or denim collar for a touch of color.
The target finished size is approximately 25 cm tall, including the ears, and 15 cm wide when the empty bag is laid flat. The body and head are crocheted together as one continuous hollow pouch, with a zipper across the top behind the ears. A phone’s screen size alone cannot confirm whether it will fit, so check your phone and case against the actual pocket as you work.
Below you’ll find the materials, gauge, complete crochet instructions, face details, zipper installation, adjustable strap, and assembly steps for this larger version.
Jump to a Section
- What You Need Before You Start
- Abbreviations and Gauge
- How to Crochet the Bag
- How to Crochet the Ears
- How to Crochet the Paws and Paw Pads
- How to Crochet the Tail
- How to Add the Face and Collar
- How to Sew in the Zipper
- How to Crochet the Shoulder Strap
- Assembly and Finishing
- Tips for a Neater Cat Phone Bag
- FAQ About the Crochet Cat Phone Bag Pattern
Credits and sharing
Rights to any third-party text, designs, and images remain with their respective owners. Please do not republish their material without the rights holder’s permission. Follow the credited designer’s terms where applicable. When sharing a project featured on Crochhet, please link to Crochhet. Thank you for your support!
What You Need Before You Start
Yarn and Supplies
- Color A: approximately 200 g of cream or light gray cotton, about 300 to 340 m per 100 g, including a crocheted strap.
- Color B: approximately 50 g of taupe, light brown, or charcoal cotton of the same weight.
- Color C: approximately 20 g of red or denim cotton for the collar.
- Main hook: start with 3.5 mm and adjust to obtain gauge.
- Detail hook: approximately 2 mm for single-strand inner ears and paw pads.
- One 14 cm nonseparating zipper, measured along the closed teeth between the stops. Confirm this size against the completed opening before purchasing or sewing it in.
- Two D rings, two swivel clips, and one three-bar strap slider, all with approximately 30 mm inside width.
- Optional cotton webbing approximately 25 mm wide to back the strap and reinforce its attachment tabs.
- Black embroidery yarn or floss, and a tapestry needle.
- Optional 12 to 15 mm safety eyes. Embroidered eyes also work.
- Optional small sew-on bell or ring for the collar.
- A little fiberfill, stitch markers, sewing needle, matching sewing thread, pins or clips, and scissors.
- Optional lightweight woven cotton for a lining.
Hold two strands together for the pouch, outer ears, limbs, tail, strap, and attachment tabs. Use one strand for the inner ears and paw pads. The yarn quantities above are total yarn used, including both strands. Divide each color into two balls if necessary.
Size and Fit
- Overall target height: Approximately 25 cm from the bottom of the bag to the ear tips.
- Main pouch height: Approximately 22 cm before adding the ears.
- Width: Approximately 15 cm across the widest part of the empty bag when laid flat.
- Strap: Excluded from the bag measurements; made to approximately 140 cm before hardware folds, then adjusted to the wearer.
- Skill level: Intermediate.
Keep the paws and curved tail within the pouch outline to preserve the stated overall measurements. The oval base gives the pouch some depth, so its width changes when filled. Only the limbs and tail receive stuffing; the body and head remain hollow.
Measure your phone’s complete height, width, and thickness, including its case. Check it against the inside of the pouch, the narrowed collar, and the zippered opening. The advertised screen diagonal is not a reliable bag-fit measurement.
Abbreviations and Gauge
This pattern uses US crochet terminology. The number in parentheses at the end of an instruction is the finished stitch count.
Abbreviations and Working Methods
- ch: chain.
- sc: single crochet.
- sl st: slip stitch.
- st or sts: stitch or stitches.
- inc: work 2 sc in one stitch.
- dec: work one single crochet decrease across the next 2 stitches.
- MR: magic ring.
- Rnd: round.
- (instructions) x number: repeat the instructions the stated number of times.
Use a regular sc2tog decrease in the pouch and flat pieces. An invisible decrease can be used on the stuffed pieces.
Work the main pouch in joined, unturned rounds. At the beginning of each round, ch 1; at the end, sl st into the first sc. The chain and joining slip stitch never count as stitches. Place the first sc in the first actual stitch, not in the joining slip stitch. Work through both loops unless stated otherwise.
Work the small round pieces in continuous rounds without joining. Move the marker after every round. For flat pieces, ch 1 and turn after each row, except the final row; the turning chain does not count.
To change color, complete the last pull-through of the preceding stitch with the new color. Carry neither unused color around the pouch; cut and secure the ends at each collar change.
Gauge and Measurement Checkpoints
Target gauge with two strands and the main hook: 20 sc and 24 rounds or rows per 10 cm, measured over relaxed single crochet. Make a swatch larger than 10 cm, wash and dry it as you will the bag, and measure the central area. Also check the pouch because gauge in rounds can differ from a flat swatch.
At this gauge, the 60-stitch pouch circumference is approximately 30 cm, giving an empty laid-flat width of approximately 15 cm. One extra plain round changes the height by approximately 0.4 cm.
- After Round 12, flatten the pouch without stretching it. The widest part should be close to 15 cm. If it is substantially different, adjust the hook or yarn and restart before adding details.
- At the end of the lower body, measure from the folded bottom to the working edge. Aim for approximately 12 cm before making the neck and collar.
- Before fitting the zipper, the pouch alone should be approximately 22 cm tall. The ears should add approximately 3 cm.
If the lower body needs more height, add plain 60-sc rounds before Round 30; if it is too tall, omit plain rounds near the end of the lower body. Keep the later printed round labels so the face and collar instructions remain easy to follow. Treat the printed round counts as a starting point for the target measurements.
How to Crochet the Bag
Crochet the body, collar, and head as one continuous pouch. Use joined, unturned rounds throughout this section.
Oval base
Use Color A held double and the main hook. Ch 15. Work around both sides of the foundation chain. In Round 1, the last 2 sc go into the same foundation chain that received the first sc.
- Rnd 1: Starting in the second ch from the hook, sc in the next 13 ch, work 3 sc in the last ch. Rotate the chain and work along its underside: sc in the next 12 ch, then work 2 sc in the starting chain. Join. (30)
- Rnd 2: Inc, 12 sc, 3 inc, 12 sc, 2 inc. (36)
- Rnd 3: (1 sc, inc), 12 sc, (1 sc, inc) x 3, 12 sc, (1 sc, inc) x 2. (42)
- Rnd 4: (2 sc, inc), 12 sc, (2 sc, inc) x 3, 12 sc, (2 sc, inc) x 2. (48)
- Rnd 5: (3 sc, inc), 12 sc, (3 sc, inc) x 3, 12 sc, (3 sc, inc) x 2. (54)
- Rnd 6: (4 sc, inc), 12 sc, (4 sc, inc) x 3, 12 sc, (4 sc, inc) x 2. (60)
You now have two straight sections with 12 sc each, joined by rounded ends. Continue without turning; the following rounds form the walls.
Lower body
- Rnds 7 to 29: Sc in every st. Work 23 rounds total. (60 each round)
Check the width after Round 12. After Round 29, fold the empty bag flat and check that the distance from its bottom to the working edge is approximately 12 cm. Add or omit plain rounds here if needed. Test your phone and case inside before continuing.
Neck and collar
- Rnd 30, Color A: (8 sc, dec) x 6. (54)
- Rnd 31, Color C: Sc in every st. (54)
- Rnd 32, Color C: Sc in every st. (54)
- Rnd 33, Color A: (8 sc, inc) x 6. (60)
Head section
- Rnds 34 to 53, Color A: Sc in every st. Work 20 rounds total. (60 each round)
Fasten off after joining Round 53. Weave in all ends. Keep the pouch open and unstuffed. Check for a main pouch height of approximately 22 cm. If necessary, add or remove plain rounds at the top before fastening off permanently. Place the face relative to the actual upper edge if you change this section.
Lay the bag flat so its oval base folds naturally, with the two rounded ends at the sides. Mark the folds at the top between stitches, giving a front edge of 30 sts and a back edge of 30 sts. Choose the side with the neater color changes as the front.
How to Crochet the Ears
Outer Ears
Make 2 in Color B held double with the main hook. Work continuously from the tip to the base.
- Rnd 1: 6 sc in MR. (6)
- Rnd 2: (1 sc, inc) x 3. (9)
- Rnd 3: (2 sc, inc) x 3. (12)
- Rnd 4: (3 sc, inc) x 3. (15)
- Rnd 5: (4 sc, inc) x 3. (18)
- Rnd 6: 18 sc. (18)
- Rnd 7: 18 sc. (18)
Fasten off with a sewing tail. Do not stuff. Flatten each ear so there are 9 stitches on each side of its base. Sew the two layers together across the base with a needle. The flattened ear should be approximately 3 cm tall; adjust the number of final plain rounds if needed.
Inner Ears
Make 2 in Color A using one strand and the smaller hook. Work in turned rows.
- Row 1: Ch 2, sc in the second ch from the hook. (1)
- Row 2: Inc. (2)
- Row 3: Inc in each st. (4)
- Row 4: Inc, 2 sc, inc. (6)
- Row 5: 6 sc. (6)
Fasten off with a sewing tail. Sew each triangle to the front of an outer ear, with its narrow end pointing toward the ear tip. Keep a contrasting border visible all around. Make sure the inner ear lies flat without stretching the outer ear.
How to Crochet the Paws and Paw Pads
Front Paws
Make 2, beginning in Color B held double with the main hook. Work continuously from the paw upward.
- Rnd 1: 6 sc in MR. (6)
- Rnd 2: 6 inc. (12)
- Rnd 3: (3 sc, inc) x 3. (15)
- Rnd 4: (4 sc, inc) x 3. (18)
- Rnd 5: 18 sc. (18)
- Rnd 6: (4 sc, dec) x 3. (15)
- Rnd 7: (3 sc, dec) x 3. (12)
- Rnd 8, Color A: 12 sc. (12)
- Rnd 9: 12 sc. (12)
- Rnd 10: 12 sc. (12)
- Rnd 11: 12 sc. (12)
- Rnd 12: 12 sc. (12)
Lightly stuff the rounded paw only. Leave the upper part soft. Flatten the 12-stitch opening into two layers of 6 stitches. Work 6 sc through both layers to close, with each closing sc passing through one stitch from each layer. Fasten off with a long sewing tail.
Back Paws
Make 2 in Color B held double with the main hook. Work continuously.
- Rnd 1: 6 sc in MR. (6)
- Rnd 2: 6 inc. (12)
- Rnd 3: (1 sc, inc) x 6. (18)
- Rnd 4: (2 sc, inc) x 6. (24)
- Rnd 5: 24 sc. (24)
- Rnd 6: 24 sc. (24)
- Rnd 7: (2 sc, dec) x 6. (18)
- Rnd 8: (1 sc, dec) x 6. (12)
Add a little stuffing and flatten the foot slightly so it forms a soft oval.
- Rnd 9: 6 dec. (6)
Fasten off with a long tail. Thread it through the front loops of the remaining 6 stitches and pull closed. Keep the tail for attachment to the bag.
Paw Pads
Use one strand of Color A and the smaller hook. Work continuously. Make the pads before attaching the feet to the pouch.
Large Pads
Make 2.
- Rnd 1: 6 sc in MR. (6)
- Rnd 2: 6 inc. (12)
- Rnd 3: (1 sc, inc) x 6. (18)
Fasten off with sewing tails. Sew one pad onto the lower center of the visible face of each back foot.
Toe Pads
Make 6.
- Rnd 1: 5 sc in MR. (5)
Fasten off and sew 3 small toe pads in an arc above each large pad. Keep all pad stitching within the foot rather than through the main bag.
How to Crochet the Tail
Begin in Color B held double with the main hook. Work continuously from the tip toward the attachment end.
- Rnd 1: 6 sc in MR. (6)
- Rnd 2: (1 sc, inc) x 3. (9)
- Rnd 3: (2 sc, inc) x 3. (12)
- Rnds 4 to 6, Color B: 12 sc for 3 rounds. (12 each round)
- Rnds 7 to 12, Color A: 12 sc for 6 rounds. (12 each round)
- Rnds 13 to 16, Color B: 12 sc for 4 rounds. (12 each round)
- Rnds 17 to 23, Color A: 12 sc for 7 rounds. (12 each round)
- Rnd 24, Color A: (1 sc, dec) x 4. (8)
Add a very small amount of stuffing as you work; the tail should bend easily. Flatten the opening and close it with 4 sc through both layers. Fasten off with a long sewing tail. The tail is approximately 9 to 10 cm long; its curve is formed during sewing, not by the round shaping.
How to Add the Face and Collar
Complete the face while the pouch is still open and you can reach inside.
Optional Eye Patch
Make 1 in Color B held double with the main hook. Work continuously.
- Rnd 1: 6 sc in MR. (6)
- Rnd 2: 6 inc. (12)
- Rnd 3: (1 sc, inc) x 6. (18)
- Rnd 4: (2 sc, inc) x 6. (24)
Fasten off with a sewing tail. Pin the patch behind the position of one eye. Sew it flat with small stitches. If using a safety eye, push its post through both the patch and the pouch before fitting the washer.
Muzzle Circles
Make 2 in Color A held double with the main hook. Work continuously.
- Rnd 1: 6 sc in MR. (6)
- Rnd 2: 6 inc. (12)
- Rnd 3: (1 sc, inc) x 6. (18)
Fasten off with sewing tails. Sew the circles flat, slightly overlapping at the center below the eyes. Leave them unstuffed so the phone space remains clear.
Face Placement and Embroidery
- With the front facing you, identify its center line. Pin the muzzle circles over approximately Rounds 40 to 44, with a small overlap in the middle.
- Position the eyes between Rounds 44 and 45, approximately 10 to 11 stitches apart measured center to center across the front. This places them approximately 3.5 to 4 cm below the top edge. Adjust the expression while everything is pinned.
- Add the optional patch behind one eye. Install safety-eye washers inside the pouch now, or embroider both eyes.
- Sew the muzzle circles flat. Embroider a small triangular nose where they meet, a short line downward, and a curved mouth. Add two whiskers on each side.
- Keep the interior free of loose threads and long floats. A lining can cover the embroidery backs and eye washers.
Collar
The collar is already crocheted into the main pouch in Rounds 31 and 32 using Color C. Round 30 narrows the neck, and Round 33 returns the stitch count to 60 for the head. No separate collar strip is needed.
If desired, sew a small bell or decorative ring to the center front of the collar with strong sewing thread. Keep the decoration on the outside so the pocket remains clear.
How to Sew in the Zipper
Finish the face, ears, paws, tail, and strap-tab sewing before installing the zipper and optional lining. Use a zipper with approximately 14 cm of closed teeth between its stops, checking it against your actual opening.
- Flatten the top into two 30-stitch edges. Mark off the outermost stitch at each end of each edge; the middle 28 stitches form each side of the zipper opening.
- At the target gauge, these 28 stitches measure approximately 14 cm. Check the actual opening against the closed teeth between the zipper stops. If needed, change the number of end stitches sewn closed equally at both ends or choose a zipper that fits; do not stretch either piece to force a match.
- Sew the front and back together across the reserved end stitches only, leaving the center open. With a 14 cm opening at the target gauge, this closes one front stitch to one back stitch at each end.
- Pin the closed zipper under the two open edges, with its teeth centered between them. Turn the tape ends to the inside, away from the slider.
- Baste the zipper in position. Open and close it several times, checking that the ears and crochet stay clear of the teeth.
- Sew the tape to the inside of each crochet edge using small backstitches and matching sewing thread. Keep the crochet close to the teeth while leaving enough clearance for the slider to travel freely.
How to Crochet the Shoulder Strap
D Ring Attachment Tabs
Make 2 in Color A held double with the main hook. Work in turned rows.
- Row 1: Ch 7, sc in the second ch from the hook and each remaining ch. (6)
- Row 2: 6 sc. (6)
- Row 3: 6 sc. (6)
- Row 4: 6 sc. (6)
- Row 5: 6 sc. (6)
- Row 6: 6 sc. (6)
- Row 7: 6 sc. (6)
- Row 8: 6 sc. (6)
- Row 9: 6 sc. (6)
- Row 10: 6 sc. (6)
Fasten off with sewing tails. Each tab is approximately 3 cm wide and 4 cm long. If adding webbing, cut a piece to fit inside each folded tab and secure it with sewing thread. Fold a tab through each D ring and bring the two short ends together.
Adjustable Strap
Use Color A held double with the main hook. Work in turned rows.
- Row 1: Ch 7, sc in the second ch from the hook and each remaining ch. (6)
- Row 2: 6 sc. (6)
- Rows 3 to 336: 6 sc in each row. (6 each row)
At the stated row gauge, 336 rows give approximately 140 cm before the hardware folds. Measure the actual strip and work fewer or more rows to reach approximately 140 cm, or the length needed by the wearer. Fasten off and weave in the ends.
Optional webbing backing reduces stretch. Cut it to match the finished strip, tuck its cut ends under, and stitch it to the wrong side before attaching hardware. Confirm that the reinforced strap slides freely through the hardware before sewing its ends.
Threading the Strap
- Pass one end around the center bar of the slider. Fold approximately 4 cm back onto the strap and stitch the fold securely.
- Take the free end through the ring at the base of the first swivel clip.
- Return the free end through the slider: up through one opening, across the center bar over the fixed end, and down through the other opening. Keep the strip flat.
- Take the free end through the ring of the second swivel clip. Fold back approximately 4 cm and pin it in place.
- Check the adjustment range and try the strap with the bag before sewing the second fold permanently. Make the strip longer if the required maximum length is not available.
- Sew both folds securely through all layers. Use a rectangle of stitching with a diagonal cross, adding strong sewing thread through the webbing if used.
Attaching the D Ring Tabs
Position a folded D ring tab at each upper side fold, with its raw ends pointing downward and its ring toward the top. Place the overlap approximately across Rounds 47 to 51, adjusting it so the ring and clip clear both the ear and zipper.
Sew both layers of each tab onto the side of the pouch with a rectangle of stitches and a diagonal cross. Reinforce inside with a small webbing or woven-fabric patch if available. Catch only that side wall; do not stitch the front and back of the bag together. Clip on the strap and test the balance with the intended phone inside before adding the lining.
Assembly and Finishing
Pin all the decorative pieces before sewing. Check the cat from the front and back, keep the side folds aligned, and make sure the zipper will have a clear route behind the ears. Complete all exterior attachment sewing before adding the zipper and lining.
The face and strap-tab placements are described in their sections above. Use the following steps for the ears, paws, and tail.
Attaching the Ears
- Pin the ears upright along the outer corners of the front top edge, with the inner triangles facing forward.
- Sew each closed ear base to approximately 9 stitches of the front edge, leaving about 12 front stitches between them.
- Catch only the front wall of the pouch when attaching the ears. Keep the back edge free and the zipper route clear behind the ears. The ears should add approximately 3 cm above the main pouch.
Attaching the Paws and Tail
- Sew the closed tops of the front legs to the front just below the collar, approximately at Rounds 28 to 29. Space them evenly on either side of the center line and let the paws hang downward.
- Position the two back feet on the lower front of the bag, with their pads facing forward. Keep their lowest edges level with or above the bottom of the pouch. Sew each foot on firmly through several adjacent stitches.
- Attach the flattened base of the tail to one lower side or the lower back. Curve the tail upward against the back and secure it with two or three discreet anchor stitches. Keep it within the silhouette for the stated overall dimensions.
Optional Fabric Lining
Lay the finished empty pouch flat and trace its outline on paper, excluding ears, legs, and tail. Check the tracing against the actual interior and reduce it slightly as needed so the lining will sit inside comfortably. Add 1 cm seam allowance around the sides and bottom and 1 cm above the intended finished top edge. Cut two fabric pieces.
With right sides together, sew the lining sides and bottom using the marked seam line, leaving the top open. Keep the lining wrong side out and place it inside the pouch so the wrong sides of the lining and crochet face each other. Turn its upper seam allowance outward between the lining and crochet, then hand-sew the folded edge to the zipper tape below the teeth. Test the zipper again and ensure the lining does not pull the collar or base out of shape.
Finishing Checks
- The unfilled bag measures close to 25 cm to the ear tips and 15 cm across its widest laid-flat section.
- The phone and case pass through both the zipper opening and narrowed collar and sit comfortably inside.
- The zipper opens freely without catching the ears, lining, or crochet.
- The feet and tail stay within the intended outline.
- The strap adjusts smoothly, and its tabs remain secure when the phone is inside.
- All ends are secured, and the pouch interior remains hollow.
Tips for a Neater Cat Phone Bag
- Measure before adding details. Check the width after Round 12, the lower-body height before Round 30, and the pouch height before fitting the zipper.
- Use the correct round method. Join the main pouch rounds without turning; work the small round pieces continuously.
- Count only actual stitches. The main pouch’s beginning chain and joining slip stitch do not add to the round total.
- Hold both strands consistently. Catching only one strand can leave a thin area in the pouch or strap.
- Mark the front center. This helps you balance the eyes, muzzle, collar decoration, and front paws.
- Sew the pads first. Attach the large pad and three toe pads to each back paw before sewing the paw to the pouch.
- Stuff lightly. Fill the paw ends and tail just enough to shape them; leave the pouch and ears unstuffed.
- Keep the ears clear of the zipper. Attach their bases to the front wall only.
- Reinforce the strap tabs. Spread the attachment stitches across several pouch stitches and add an interior fabric patch if available.
- Baste the zipper before sewing it permanently. Test the slider with the ears and lining in position.
- Fit the strap hardware before closing the folds. Check that the finished strip, including any backing, passes through the slider freely.
FAQ About the Crochet Cat Phone Bag Pattern
How Big Is the Finished Cat Phone Bag?
The target size is approximately 25 cm tall including the ears and 15 cm wide when laid flat. The main pouch should measure approximately 22 cm tall, with the ears adding about 3 cm. The strap is excluded from these measurements.
Will a 6.8 Inch Phone Fit?
Screen size alone cannot confirm the fit. Measure the phone’s complete height, width, and thickness with its case, then test it in the pouch. It needs to pass through both the zippered opening and the narrowed collar comfortably.
Is the Cat Head Crocheted Separately?
No. The body and head form one continuous hollow pouch. The collar is worked into the pouch in Rounds 31 and 32, and the head continues above it. The ears, muzzle circles, paws, and tail are separate pieces.
What Gauge Should I Use?
Aim for 20 sc and 24 rounds or rows per 10 cm with the main yarn held double. A 3.5 mm hook is a starting point; adjust it to match the gauge. At this stitch gauge, the 60-stitch circumference gives a laid-flat width of approximately 15 cm.
How Is the Zipper Opening Made?
The pouch remains open after Round 53. Flatten its rim into front and back edges of 30 stitches each. At the target gauge, closing one stitch pair at each end leaves the middle 28 stitches on each edge for an approximately 14 cm zipper opening. Check the actual size before sewing.
Can I Embroider the Eyes?
Yes. Position them approximately between Rounds 44 and 45, around 10 to 11 stitches apart from center to center. If you change the head height, use the actual top edge as your guide: the eyes sit approximately 3.5 to 4 cm below it.
Can I Change the Strap Length?
Yes. The strap is 6 sc wide, approximately 3 cm at the stated gauge. The suggested 336 rows give approximately 140 cm before hardware folds. Work to the measured length needed by the wearer, then test the adjustment range before sewing the final fold.
Do I Need to Add a Separate Collar?
No. The two Color C rounds form the collar. You can add a small bell or decorative ring at its center front if desired.
Should I Stuff the Cat Bag?
Keep the entire main pouch hollow so it can hold your phone. Add only a little stuffing to the front paw ends, back paws, and tail. The ears and muzzle circles remain unstuffed.
Can I Make the Bag Taller?
Add plain rounds of 60 sc before Round 30 to lengthen the lower body. At the target row gauge, each extra round adds approximately 0.4 cm. Keep the later printed round labels when following the face and collar placements, and check the actual measurements as you work.
Your Next Stitch
Start with the pouch and let the measurements guide you. Once the phone fits comfortably, add the pointed ears, little paws, and curved tail to give the cat its expression. Finish with the zipper, lining if desired, and an adjustable strap fitted to the wearer. Your handmade cat pouch is ready to become a useful part of your day.
3 Comments
Comments are closed.