Crochet Kitten Pattern Make Amigurumi Kitten
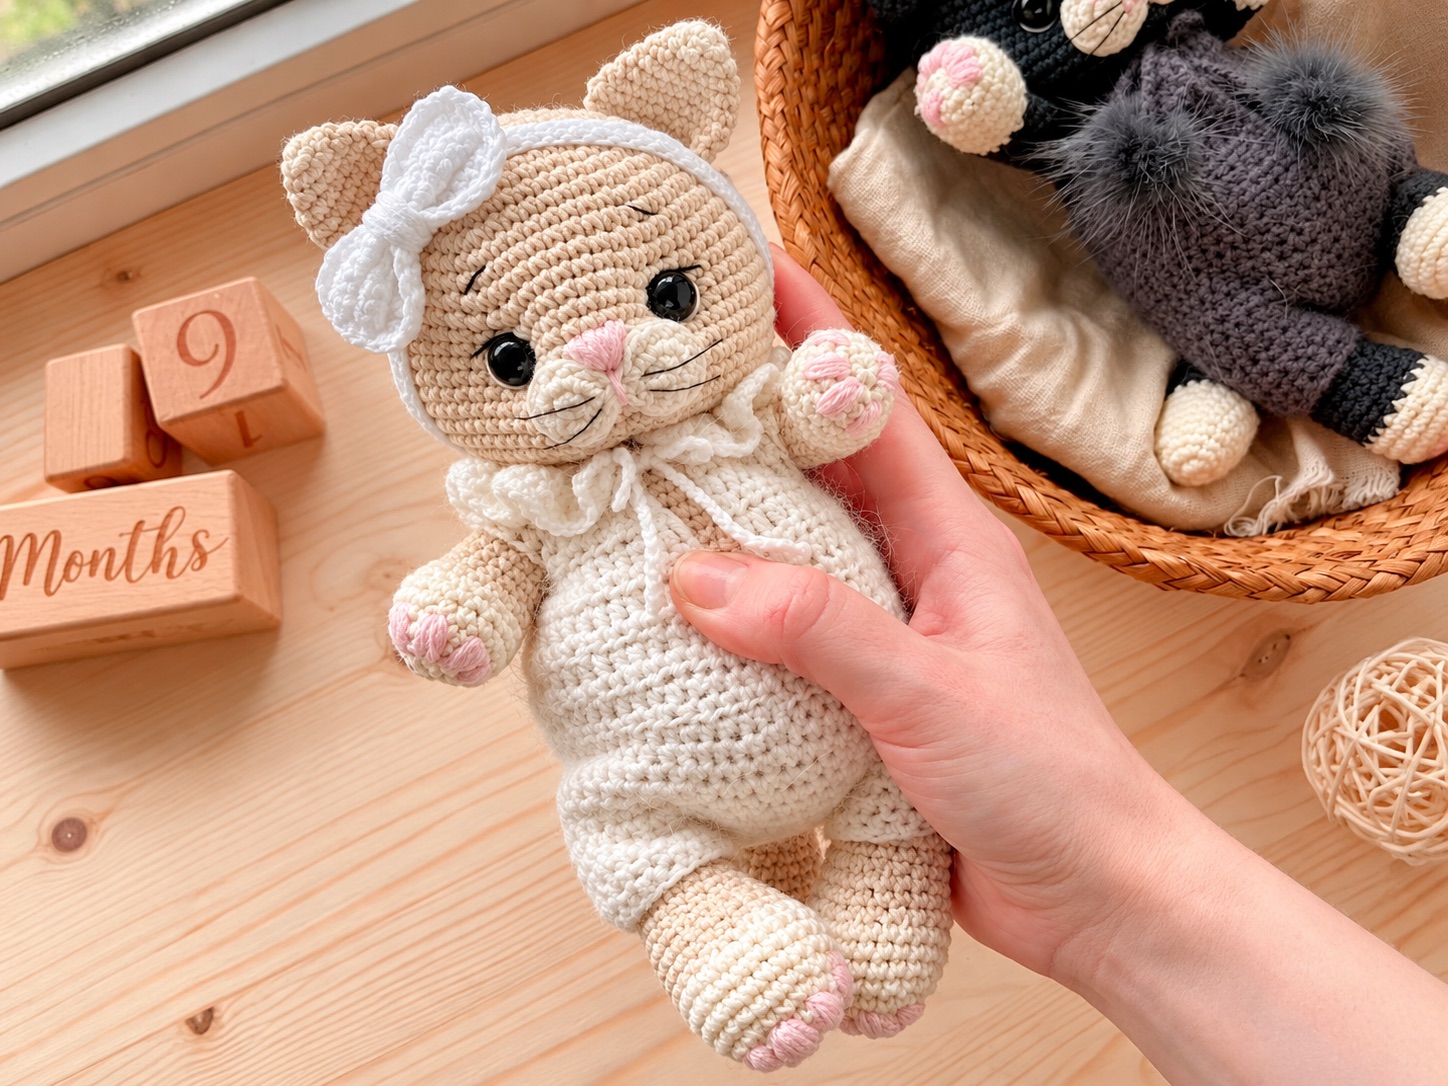
There’s something about a tiny kitten in a handmade outfit that makes you stop and smile. Maybe it’s the way the jumpsuit hugs the round little body, the bow perched between the ears, or the embroidered toe beans on the paws. This crochet kitten pattern pairs cream-tipped paws and a rounded muzzle with a pink jumpsuit that buttons at the back. The outfit is made separately, so you can dress the kitten after assembly or display it without the jumpsuit. Whether you’re making it for a child, a fellow cat lover, or yourself, this little kitten is the kind of handmade friend that becomes part of the family.
Below is a complete guide to the Kitten Master Class. You’ll find the materials, abbreviations, step-by-step instructions for the head, body, limbs, tail, muzzle, eye sculpting, jumpsuit, and headband, plus assembly notes, tips, and answers to common questions.
Jump to a Section
- Why This Crochet Kitten Pattern Stands Out
- What You Need Before You Start
- Abbreviations and Crochet Notes
- How to Crochet the Kitten Head
- How to Crochet the Muzzle and Face
- How to Crochet the Body
- How to Crochet the Legs and Arms
- How to Crochet the Ears and Tail
- Putting Your Crochet Kitten Together
- How to Crochet the Pink Jumpsuit
- How to Crochet the Headband Bow
- Tips for a Neater Crochet Kitten
- FAQ About the Crochet Kitten Pattern
- Your Next Stitch
Why This Crochet Kitten Pattern Stands Out
The kitten’s rounded head, two-piece cream muzzle, and pointed ears give it a gentle expression. Its clothes are a separate project: a sleeveless jumpsuit with short legs, a tail opening, a front bib, and two buttoned shoulder straps.
- Target height: Approximately 23 cm, including the ears.
- Skill level: Intermediate. The toy uses basic amigurumi shaping; the fitted outfit adds a little more planning.
- Yarn: Fine cotton-blend yarn such as YarnArt Jeans.
- Hook: 2 mm to start, adjusted for your tension.
- Face: Safety or embroidered eyes, an embroidered nose, and optional gentle eye shaping.
- Outfit: A separate pink jumpsuit and a headband bow.
What You Need Before You Start
Yarn and Tools
- Main kitten color: Fine yarn such as YarnArt Jeans color 05, approximately one skein
- Cream: YarnArt Jeans color 03 for paws, muzzle, and ear tips
- Rose or pink: A small amount for the nose and optional paw pads
- Pink jumpsuit yarn: Approximately half a skein of YarnArt Jeans or another fine yarn of similar thickness
- Bow yarn: A small amount of a matching or contrasting color, such as YarnArt Jeans color 20
- Eyes: One pair of 10–12 mm safety eyes, or dark embroidery thread
- Other supplies: 2 mm hook, fiberfill, stitch marker, tapestry needle, pins, scissors, thin thread for facial details, and two 9 mm buttons
Use a hook that makes tight stitches without gaps. Make the kitten before the jumpsuit so you can try the garment on during construction. If you choose a fluffy yarn for the outfit, its gauge may differ substantially from the kitten yarn.
Abbreviations and Crochet Notes
- MR — magic ring
- ch — chain
- sc — single crochet
- inc — 2 sc in one stitch
- dec — decrease over 2 stitches
- sl st — slip stitch
- [N] — stitches at the end of a round or row
- × N — repeat N times
This pattern uses US crochet terms. Work the kitten pieces in continuous spirals and move your marker each round. The jumpsuit has both joined leg cuffs and turning rows; follow the directions in that section. Change colors by pulling the new color through the final two loops of the last stitch in the old color.
How to Crochet the Kitten Head
Use the main kitten color. Begin at the crown and work toward the neck.
- Rnd 1: 6 sc in MR [6]
- Rnd 2: 6 inc [12]
- Rnd 3: (sc, inc) × 6 [18]
- Rnd 4: (2 sc, inc) × 6 [24]
- Rnd 5: (3 sc, inc) × 6 [30]
- Rnd 6: (4 sc, inc) × 6 [36]
- Rnd 7: (5 sc, inc) × 6 [42]
- Rnd 8: (6 sc, inc) × 6 [48]
- Rnd 9: (7 sc, inc) × 6 [54]
- Rnds 10–15: 54 sc [54]
- Rnd 16: (7 sc, dec) × 6 [48]
- Rnd 17: 48 sc [48]
- Rnd 18: (6 sc, dec) × 6 [42]
- Rnd 19: (5 sc, dec) × 6 [36]
- Rnd 20: (4 sc, dec) × 6 [30]
- Rnd 21: (3 sc, dec) × 6 [24]
- Rnd 22: (2 sc, dec) × 6 [18]
- Rnd 23: 18 sc [18]
If using safety eyes, pin them between rounds 12 and 13, approximately 8–9 stitches apart. Pin the muzzle pieces below them before deciding on the final eye placement. Secure the eye backs while the head is still open.
Stuff the head evenly, leaving room to shape the face gently. Fasten off with a long sewing tail and leave the 18-stitch neck opening unclosed.
How to Crochet the Muzzle and Face
Cream Muzzle Pieces — Make 2
Each small rounded piece forms one side of the kitten’s muzzle.
- Rnd 1: 6 sc in MR [6]
- Rnd 2: (sc, inc) × 3 [9]
- Rnd 3: (2 sc, inc) × 3 [12]
- Rnd 4: 12 sc [12]
Fasten off each piece with a long tail. Pin them side by side below the eyes across approximately head rounds 16–19. Sew around their edges, adding a pinch of stuffing to each before closing its seam.
Embroider a small rose-colored triangle at the top where the two muzzle pieces meet. Add a short line downward and a curved mouth beneath it. Use thin dark thread for optional eyebrows, eyelashes, and two or three whiskers on each side.
Optional Gentle Eye Shaping
Before joining the head to the body, thread a long needle with strong yarn that matches the head. Enter through the open neck, bring the needle out beside the inner edge of one eye, take a small stitch, and return through the neck opening. Pull just enough to create a slight indentation, then secure the thread inside. Repeat on the other side with equal tension. Avoid pulling so hard that the fabric stretches or the eyes tilt.
How to Crochet the Body
Use the main kitten color. Begin at the bottom and work upward.
- Rnd 1: 6 sc in MR [6]
- Rnd 2: 6 inc [12]
- Rnd 3: (sc, inc) × 6 [18]
- Rnd 4: (2 sc, inc) × 6 [24]
- Rnd 5: (3 sc, inc) × 6 [30]
- Rnd 6: (4 sc, inc) × 6 [36]
- Rnd 7: (5 sc, inc) × 6 [42]
- Rnd 8: (6 sc, inc) × 6 [48]
- Rnds 9–13: 48 sc [48]
- Rnd 14: (6 sc, dec) × 6 [42]
- Rnds 15–16: 42 sc [42]
- Rnd 17: (5 sc, dec) × 6 [36]
- Rnds 18–19: 36 sc [36]
- Rnd 20: (4 sc, dec) × 6 [30]
- Rnds 21–22: 30 sc [30]
- Rnd 23: (3 sc, dec) × 6 [24]
- Rnds 24–25: 24 sc [24]
- Rnd 26: (2 sc, dec) × 6 [18]
- Rnd 27: 18 sc [18]
Stuff the lower body firmly and the shoulders a little more gently. Fasten off, leaving the 18-stitch neck opening.
How to Crochet the Legs and Arms
Lower Paws and Legs — Make 2
Begin with cream yarn.
- Rnd 1: 6 sc in MR [6]
- Rnd 2: 6 inc [12]
- Rnd 3: (sc, inc) × 6 [18]
- Rnd 4: (2 sc, inc) × 6 [24]
- Rnds 5–6: 24 sc [24]
- Rnd 7: (2 sc, dec) × 6 [18]
- Rnd 8: (sc, dec) × 6 [12]
- Rnds 9–10: Change to the main kitten color; 12 sc [12]
- Rnds 11–17: 12 sc [12]
- Rnd 18: (2 sc, inc) × 4 [16]
- Rnds 19–20: 16 sc [16]
Stuff the cream paws firmly and the upper legs lightly. Flatten each opening and crochet 8 sc through both layers. Fasten off with a long sewing tail. Add three short toe lines and optional rose-colored paw pads.
Upper Paws and Arms — Make 2
Begin with cream yarn.
- Rnd 1: 6 sc in MR [6]
- Rnd 2: 6 inc [12]
- Rnd 3: (2 sc, inc) × 4 [16]
- Rnds 4–5: 16 sc [16]
- Rnd 6: (2 sc, dec) × 4 [12]
- Rnds 7–16: Change to the main kitten color; 12 sc [12]
- Rnd 17: (sc, dec) × 4 [8]
- Rnds 18–19: 8 sc [8]
Stuff the hands and lower arms lightly, leaving the narrow tops unstuffed. Flatten each opening and crochet 4 sc through both layers. Fasten off with long sewing tails.
How to Crochet the Ears and Tail
Pointed Ears — Make 2
Begin with cream for the tip of each ear. Leave the ears unstuffed.
- Rnd 1: 4 sc in MR [4]
- Rnd 2: (sc, inc) × 2 [6]
- Rnd 3: Change to the main kitten color; 6 sc [6]
- Rnd 4: (2 sc, inc) × 2 [8]
- Rnd 5: (3 sc, inc) × 2 [10]
- Rnd 6: (4 sc, inc) × 2 [12]
- Rnd 7: (5 sc, inc) × 2 [14]
- Rnd 8: (6 sc, inc) × 2 [16]
- Rnd 9: 16 sc [16]
Flatten the base and crochet 8 sc through both layers. Fasten off with a long sewing tail.
Curved Tail
Begin with cream for the tip.
- Rnd 1: 6 sc in MR [6]
- Rnd 2: (2 sc, inc) × 2 [8]
- Rnds 3–5: 8 sc [8]
- Rnds 6–17: Change to the main kitten color; 8 sc [8]
- Rnd 18: (3 sc, inc) × 2 [10]
- Rnds 19–20: 10 sc [10]
Put a little stuffing in the cream tip and wider base, leaving the middle flexible. Fasten off with a long sewing tail.
Putting Your Crochet Kitten Together
Pin all the pieces in place and check the kitten from the front and side before sewing.
- Join the head and body. Match their 18-stitch openings and sew them together stitch for stitch. Add stuffing at the neck before closing the seam.
- Attach the legs. Sew their flattened tops to opposite sides of the lower body around body rounds 6–10. Set the kitten on a flat surface to check that the paws are level.
- Attach the arms. Sew them just below the neck around body rounds 22–25.
- Attach the ears. Position them on the upper sides of the head around head rounds 4–8, leaving a few stitches between them at the crown.
- Attach the tail. Sew its wider end to the center back around body rounds 10–12. Curve it gently as you sew.
- Finish the face and paws. Add any remaining embroidery, then weave the yarn ends securely inside.
How to Crochet the Pink Jumpsuit
Make the jumpsuit after assembling the kitten. This sleeveless design has short trouser legs, a tail opening, a front bib, and two straps that button at the back. Use pink fine yarn and a 2 mm hook to start. Try it on as you go.
Leg Cuffs — Make 2
For each cuff, ch 25. Join with a sl st to the first chain without twisting, making a ring of 24 chains. Work in continuous rounds.
- Rnd 1: 24 sc [24]
- Rnds 2–3: 24 sc [24]
Fasten off the first cuff. Keep the yarn attached to the second cuff.
Join the Cuffs and Make the Shorts
- Rnd 4: From the second cuff, ch 2. Work 24 sc around the first cuff, ch 2, then work 24 sc around the second cuff [52, counting the four bridge chains]. Mark the beginning of the new round.
- Rnds 5–6: 52 sc, working into the bridge chains on round 5 [52].
- Rnd 7: 23 sc, ch 8 and skip the next 8 stitches, 21 sc [52]. The chain space makes the tail opening at the back.
- Rnd 8: 23 sc, 8 sc along the chain, 21 sc [52].
- Rnds 9–10: 52 sc [52].
- Rnd 11: (11 sc, dec) × 4 [48].
- Rnds 12–13: 48 sc [48].
Fasten off. Pull the shorts over the kitten’s paws and body, guiding the tail through its opening. The waistband should sit below the arms. Check the fit before making the bib.
Front Bib
With the shorts on the kitten, mark the center front of the waistband opposite the tail opening. Attach the pink yarn 9 stitches to one side of that center. Work across 18 consecutive stitches of round 13 in turning rows. Chain 1 to turn; the turning chain does not count as a stitch.
- Row 1: 18 sc; ch 1, turn [18]
- Rows 2–3: 18 sc; ch 1, turn after each row [18]
- Row 4: Dec, 14 sc, dec; ch 1, turn [16]
- Row 5: 16 sc; ch 1, turn [16]
- Row 6: Dec, 12 sc, dec; ch 1, turn [14]
- Row 7: 14 sc; ch 1, turn [14]
- Row 8: 14 sc [14]
Fasten off and weave in the bib end.
Buttoned Shoulder Straps
Make one strap at each top corner of the bib.
- Attach pink yarn to a corner stitch and ch 26.
- Sl st into the sixth chain from the hook to form a small button loop at the free end.
- Sl st along the remaining 20 chains back toward the bib. Fasten off securely.
- Repeat at the other corner.
Bring both straps over the kitten’s shoulders. Mark where the loops reach the back waistband, then sew a 9 mm button at each mark. If the bib pulls upward or sags, adjust the strap chain length before fastening it off.
How to Crochet the Headband Bow
Headband
With your chosen bow color, make a chain long enough to sit comfortably around the kitten’s head behind its ears. Start with about 58 chains, but try it on before joining: yarn and tension will change the fit.
Join the chain into a ring without twisting. Work one round of sc, placing one sc in each chain. Fasten off and weave in the ends.
Bow
- Foundation: Ch 15.
- Rows 1–6: Starting in the second chain from the hook, work 14 sc. Chain 1 and turn after rows 1–5 [14].
Fasten off with a long tail. Pinch the rectangle at its center and wrap the tail around it several times to form the bow. Secure the wraps at the back, then sew the bow to the headband. Place it between one ear and the center of the forehead.
Tips for a Neater Crochet Kitten
- Count at each shaping round. Accurate counts keep paired arms, legs, and ears alike.
- Stuff the paws and body in small amounts. This helps the fabric stay smooth.
- Pin the muzzle before fixing the eyes. Their spacing changes the kitten’s expression.
- Keep eye shaping gentle. A small indentation is enough.
- Make the outfit after the toy. The assembled kitten gives you a reliable fit check.
- Check the tail opening early. Guide the tail through it before completing the jumpsuit waistband.
- Pin both legs at once. Adjust them until the kitten sits or stands as you intend.
- Secure the button straps. Make several sewing passes through each button and the fabric beneath it.
FAQ About the Crochet Kitten Pattern
How big is the finished crochet kitten?
The design aims for about 23 cm from paw bottoms to ear tips with fine yarn and a small hook.
What skill level is this crochet kitten pattern?
It is an intermediate project. The kitten uses standard amigurumi shaping, while the separate fitted jumpsuit requires careful counting and try-ons.
What yarn and hook should I use?
Fine cotton-blend yarn such as YarnArt Jeans and a 2 mm hook are the starting materials. Adjust the hook if your stitches show stuffing or are too tight to work comfortably.
Are safety eyes required?
No. You can embroider the eyes with dark thread. If using safety eyes, position them before closing the head and attach their washers according to the manufacturer’s instructions.
Is the pink jumpsuit removable?
Yes. The roomy trouser legs slide over the kitten’s paws, the tail passes through the back opening, and the shoulder straps button onto the waistband.
Does the jumpsuit have sleeves or a ruffle collar?
This version is a sleeveless jumpsuit with a front bib and shoulder straps. Its decoration comes from the buttoned straps and matching headband bow.
How do I adjust the jumpsuit fit?
Try the shorts on after round 13. A slightly different hook size can change the width. Add or remove plain rounds in the shorts or bib to adjust the length, and change the strap chains to reach the buttons comfortably.
Your Next Stitch
Begin with the kitten’s rounded head, then give it cream paws, a soft muzzle, and pointed ears. Once the toy is assembled, you can fit its pink jumpsuit and set the bow between its ears. The result is a small dressed kitten with plenty of room for your own color choices and embroidered details.
Happy crocheting!