Crochet Pattern Sweet Penguin Lovey Blanket
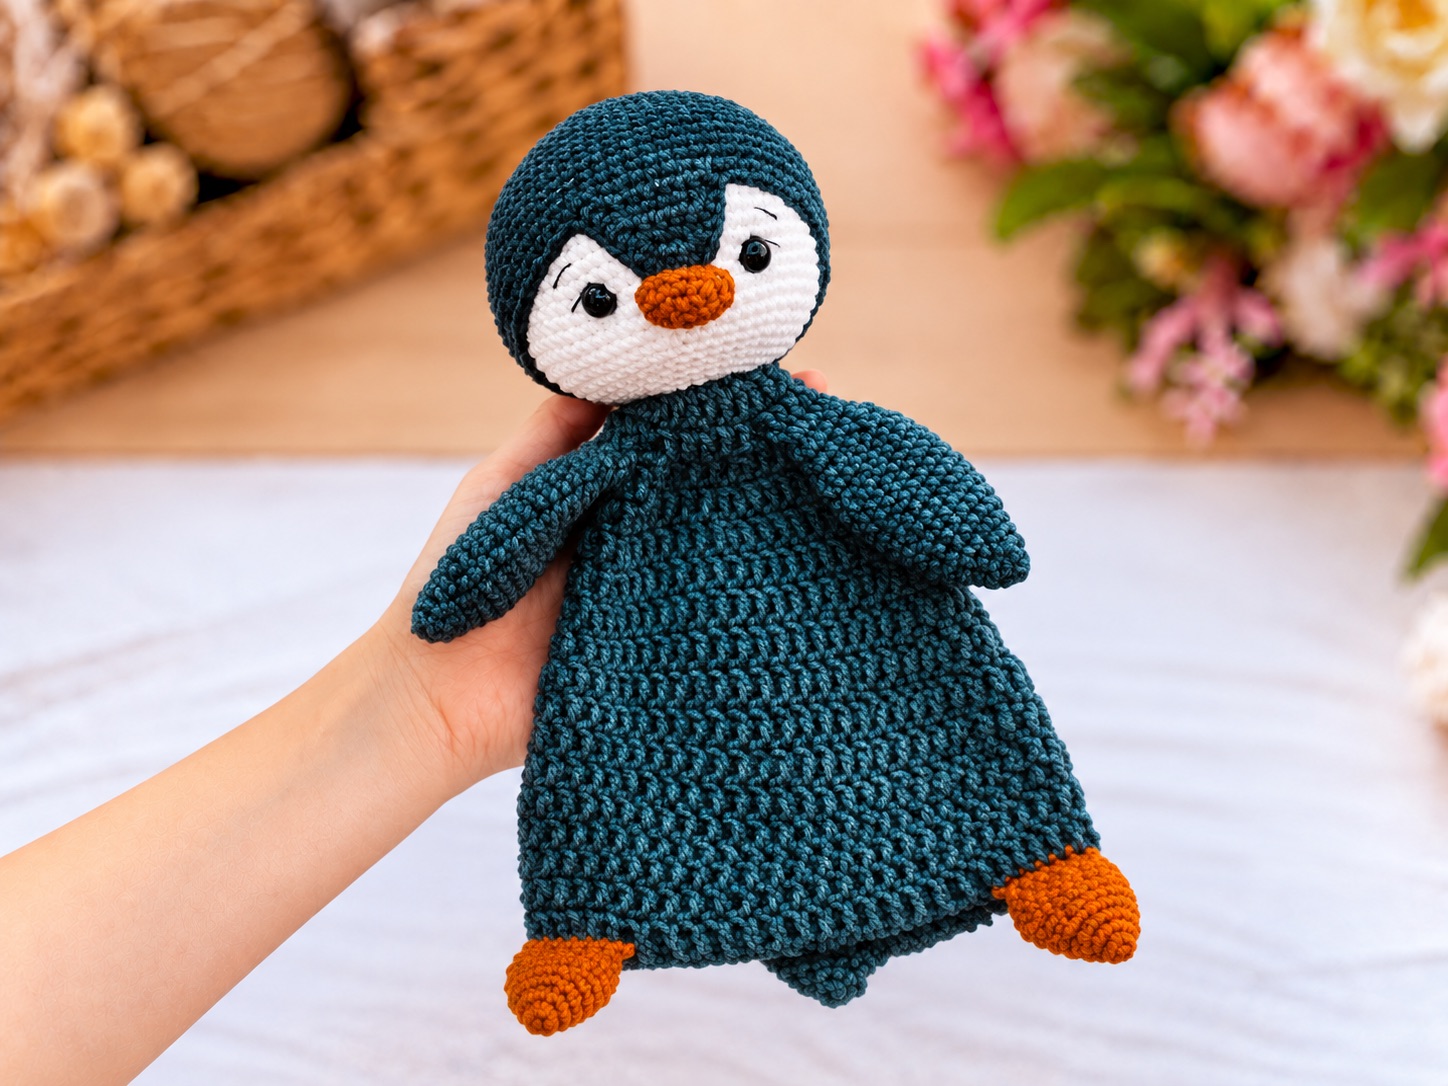
There’s something special about a handmade lovey. It can become a soft companion for supervised cuddles, a thoughtful baby-shower gift, or a keepsake that stays in the family long after childhood. This crochet penguin lovey blanket pattern creates a sweet penguin with a firmly stuffed head, floppy unstuffed body, cream belly, golden feet, little wings, tail, and a removable drooping cap finished with a ribbed brim.
The completed penguin measures approximately 25 cm overall when wearing the naturally draped cap. Without the cap, it measures about 22–23 cm from the feet to the top of the head. Exact measurements will vary with yarn, hook size, tension, and stuffing.
Below you’ll find the complete original pattern, including materials, abbreviations, instructions for every piece, assembly guidance, finishing tips, safety notes, and answers to common questions.
Jump to a Section
- Why This Crochet Penguin Lovey Blanket Stands Out
- What You Need Before You Start
- Abbreviations and Special Stitches
- How to Crochet the Penguin Head
- How to Crochet the Beak
- How to Crochet the Wings
- How to Crochet the Tail
- How to Crochet the Feet
- How to Crochet the Belly Patch
- How to Crochet the Lovey Body
- How to Crochet the Removable Cap
- Adding the Penguin’s Face
- Putting Your Crochet Penguin Lovey Together
- Tips for a Neater Crochet Penguin Lovey
- Important Safety Notes
- FAQ About the Crochet Penguin Lovey Blanket Pattern
- Your Next Stitch
Why This Crochet Penguin Lovey Blanket Stands Out
This original penguin lovey combines the softness of a security blanket with the personality of an amigurumi toy.
- Finished size: Approximately 25 cm overall with the cap naturally draped, or 22–23 cm without the cap.
- Skill level: Intermediate beginner.
- Yarn: DK or light-worsted cotton, cotton-blend, or acrylic yarn.
- Construction: The head is stuffed, while the body, wings, tail, and feet remain flat and soft.
- Joined pieces: The wings, tail, and feet are crocheted directly into the body.
- Neat neckline: The body and head each finish with 18 stitches for a one-to-one joining seam.
- Removable accessory: The drooping cap is made separately and finished with a textured ribbed brim.
- Customizable: Use traditional black, cream, and gold, or create a pastel, winter, or rainbow penguin.
- Minimal sewing: Only the beak, belly patch, head, and facial details require sewing.
The stitch counts have been mathematically checked. Because this is a newly drafted pattern and individual tension differs, try the cap on the head and pin all facial pieces before permanently attaching them.
What You Need Before You Start
Yarn
Use DK or light-worsted yarn measuring approximately 150–170 metres per 50 grams.
Suggested quantities:
- Black: 70–80 g for the body, wings, tail, and cap
- Cream: 35–45 g for the head and belly patch
- Saffron or golden yellow: 20–25 g for the beak, feet, and cap brim
- Small amount of black and cream embroidery thread
YarnArt Jeans or a similar cotton-blend yarn will create a clean, well-defined finish.
Hooks and Notions
- 2.25 mm hook: Head, beak, wings, tail, feet, and belly patch
- 2.5 mm hook: Removable cap
- 3 mm hook: Lovey body
- Two 8–10 mm safety eyes
- Polyester fiberfill
- Yarn needle
- Stitch markers
- Sewing pins
- Scissors
- Small bell or yarn pompom for the cap
General Notes
- The pattern uses US crochet terminology.
- Work the head and small pieces in continuous spiral rounds unless instructed otherwise.
- Use a stitch marker to identify the first stitch.
- The body is worked in joined rounds from the neckline downward.
- The body’s joining seam remains at the center front and is later covered by the cream belly patch.
- The beginning chain on the body and cap brim does not count as a stitch.
- The head and beak are stuffed.
- The body, wings, tail, feet, belly patch, and cap are not stuffed unless stated otherwise.
- Make the wings, tail, and feet before beginning the body.
- Use invisible decreases for the smoothest shaping.
Abbreviations and Special Stitches
- MR — magic ring
- ch — chain
- sc — single crochet
- hdc — half double crochet
- dc — double crochet
- sl st — slip stitch
- inc — 2 sc in one stitch
- hdc-inc — 2 hdc in one stitch
- dec — invisible single crochet decrease
- BLO — back loop only
- FPdc — front-post double crochet
- BPdc — back-post double crochet
- st/sts — stitch/stitches
- FO — fasten off
- (…) × N — repeat the instructions inside the parentheses N times
- (N) — total number of stitches after completing the round
Front-Post Double Crochet
Yarn over and insert the hook from front to back and then back to front around the post of the next stitch. Yarn over, pull up a loop, and complete the double crochet normally.
Back-Post Double Crochet
Yarn over and insert the hook from back to front and then front to back around the post of the next stitch. Yarn over, pull up a loop, and complete the double crochet normally.
Alternating front-post and back-post stitches creates the stretchy ribbed cap brim.
How to Crochet the Penguin Head
Use cream yarn and the 2.25 mm hook. Stuff the head firmly as you work.
- Rnd 1: 6 sc in MR (6)
- Rnd 2: 6 inc (12)
- Rnd 3: (1 sc, inc) × 6 (18)
- Rnd 4: (2 sc, inc) × 6 (24)
- Rnd 5: (3 sc, inc) × 6 (30)
- Rnd 6: (4 sc, inc) × 6 (36)
- Rnd 7: (5 sc, inc) × 6 (42)
- Rnd 8: (6 sc, inc) × 6 (48)
- Rnds 9–16: 48 sc (48)
- Rnd 17: (6 sc, dec) × 6 (42)
- Rnd 18: 42 sc (42)
- Rnd 19: (5 sc, dec) × 6 (36)
- Rnd 20: (4 sc, dec) × 6 (30)
Insert the safety eyes between rounds 13 and 14. Leave approximately seven visible stitches between the eye posts. Make sure both eyes are centered opposite the round marker.
Begin stuffing the head. Shape it into a gently rounded oval rather than a perfect sphere.
- Rnd 21: (3 sc, dec) × 6 (24)
- Rnd 22: (2 sc, dec) × 6 (18)
Finish stuffing the head firmly, paying particular attention to the cheeks and sides.
Do not close the remaining opening. FO and leave a long yarn tail for sewing the head to the body.
How to Crochet the Beak
Use saffron yarn and the 2.25 mm hook. Crochet around both sides of the foundation chain.
- Rnd 1: Ch 5. Starting in the second ch from the hook: 3 sc, 3 sc in the last ch; continue along the opposite side of the chain: 2 sc, inc (10)
- Rnd 2: Inc, 2 sc, 3 inc, 2 sc, 2 inc (16)
- Rnds 3–4: 16 sc (16)
Finish with a sl st in the next stitch. FO and leave a long sewing tail.
Add only a small amount of stuffing. The beak should look gently rounded while remaining slightly flattened.
Pin the beak between approximately rounds 14 and 17 of the head. Center its upper edge between and just below the eyes. Sew around the open edge.
How to Crochet the Wings
Make two with black yarn and the 2.25 mm hook. Do not stuff.
- Rnd 1: 6 sc in MR (6)
- Rnd 2: 6 inc (12)
- Rnd 3: (1 sc, inc) × 6 (18)
- Rnds 4–6: 18 sc (18)
- Rnd 7: (4 sc, dec) × 3 (15)
- Rnds 8–9: 15 sc (15)
- Rnd 10: (3 sc, dec) × 3 (12)
- Rnds 11–13: 12 sc (12)
Flatten the opening and crochet 6 sc through both layers.
FO and secure the yarn end. The wings will be joined while crocheting round 6 of the body.
How to Crochet the Tail
Use black yarn and the 2.25 mm hook. Do not stuff.
- Rnd 1: 6 sc in MR (6)
- Rnd 2: 6 inc (12)
- Rnd 3: (1 sc, inc) × 6 (18)
- Rnds 4–5: 18 sc (18)
- Rnd 6: (1 sc, dec) × 6 (12)
Flatten the opening and crochet 6 sc through both layers.
FO and secure the yarn end. The tail will be joined to the center back of the body in round 14.
How to Crochet the Feet
Make two with saffron yarn and the 2.25 mm hook. Do not stuff, or use only a tiny amount of fiberfill if you prefer puffier feet.
- Rnd 1: Ch 5. Starting in the second ch from the hook: 3 sc, 3 sc in the last ch; work along the opposite side of the chain: 2 sc, inc (10)
- Rnd 2: Inc, 2 sc, 3 inc, 2 sc, 2 inc (16)
- Rnd 3: 1 sc, inc, 2 sc, (1 sc, inc) × 3, 2 sc, (1 sc, inc) × 2 (22)
- Rnd 4: BLO 22 sc (22)
- Rnd 5: 22 sc (22)
- Rnd 6: 5 sc, 6 dec, 5 sc (16)
- Rnd 7: 4 sc, 4 dec, 4 sc (12)
Flatten each foot so the decreases sit at the upper front. Crochet 6 sc through both layers.
FO and secure the yarn end. The feet will be joined to the final body round.
How to Crochet the Belly Patch
Use cream yarn and the 2.25 mm hook. Crochet around both sides of the foundation chain.
- Rnd 1: Ch 8. Starting in the second ch from the hook: 6 sc, 3 sc in the last ch; work along the opposite side: 5 sc, inc (16)
- Rnd 2: Inc, 5 sc, 3 inc, 5 sc, 2 inc (22)
- Rnd 3: 1 sc, inc, 5 sc, (1 sc, inc) × 3, 5 sc, (1 sc, inc) × 2 (28)
- Rnd 4: 28 sc (28)
Finish with a sl st. FO and leave a long sewing tail.
The belly patch will cover the body’s joining seam and clearly identify the center front.
How to Crochet the Lovey Body
Use black yarn and the 3 mm hook. Work from the neck downward in joined rounds.
Ch 18 and join with a sl st in the first chain, taking care not to twist the chain.
At the beginning of every round, ch 1. This chain does not count as a stitch. Join each completed round with a sl st in the first hdc or sc.
Keep the joining seam at the center front.
- Rnd 1: 18 hdc (18)
- Rnd 2: (2 hdc, hdc-inc) × 6 (24)
- Rnd 3: (3 hdc, hdc-inc) × 6 (30)
- Rnd 4: (4 hdc, hdc-inc) × 6 (36)
- Rnd 5: (5 hdc, hdc-inc) × 6 (42)
Join the Wings
Place each flattened wing against the outside of the body. The narrow tip should point downward. Crochet through one body stitch and one wing stitch simultaneously.
- Rnd 6: 4 hdc, 6 hdc through the body and first wing, 22 hdc, 6 hdc through the body and second wing, 4 hdc (42)
- Rnds 7–8: 42 hdc (42)
- Rnd 9: (6 hdc, hdc-inc) × 6 (48)
- Rnds 10–12: 48 hdc (48)
- Rnd 13: (7 hdc, hdc-inc) × 6 (54)
Join the Tail
Because the joining seam is at the center front, the middle of the following round is the center back.
- Rnd 14: 24 hdc, 6 hdc through the body and both flattened layers of the tail, 24 hdc (54)
- Rnds 15–17: 54 hdc (54)
Join the Feet
Switch from hdc to sc for the final round. Position both feet at the lower front, one on each side of the joining seam. The rounded toes should point slightly outward.
- Rnd 18: 3 sc, 6 sc through the body and first foot, 36 sc, 6 sc through the body and second foot, 3 sc (54)
Join with a sl st and FO. The body remains open and unstuffed.
Attach the Belly Patch
Center the cream patch vertically over the front joining seam, approximately across body rounds 7–15.
Pin it in place before sewing. Stitch around its edge while catching only the front layer of the body. Do not sew through the back layer.
How to Crochet the Removable Cap
Use black yarn and the 2.5 mm hook. Begin at the pointed tip and work downward. Do not stuff the cap.
- Rnd 1: 6 sc in MR (6)
- Rnd 2: 6 sc (6)
- Rnd 3: (1 sc, inc) × 3 (9)
- Rnd 4: 9 sc (9)
- Rnd 5: (2 sc, inc) × 3 (12)
- Rnd 6: 12 sc (12)
- Rnd 7: (3 sc, inc) × 3 (15)
- Rnd 8: 15 sc (15)
- Rnd 9: (4 sc, inc) × 3 (18)
- Rnd 10: 18 sc (18)
- Rnd 11: (2 sc, inc) × 6 (24)
- Rnd 12: 24 sc (24)
- Rnd 13: (3 sc, inc) × 6 (30)
- Rnd 14: (4 sc, inc) × 6 (36)
- Rnd 15: (5 sc, inc) × 6 (42)
- Rnd 16: (6 sc, inc) × 6 (48)
- Rnd 17: (7 sc, inc) × 6 (54)
- Rnds 18–19: 54 sc (54)
Try the cap on the head. It should fit around the upper head without covering the eyes.
If your tension is tight or the cap feels too small, add the following optional round:
- Optional Rnd 20: (8 sc, inc) × 6 (60)
Change to saffron yarn. Work the brim in joined rounds.
- Brim Rnd 1: Ch 2, 1 dc in every stitch around; join with sl st in the first dc (54 or 60)
- Brim Rnd 2: Ch 2, alternate 1 FPdc and 1 BPdc around; join with sl st in the first post stitch (54 or 60)
FO and weave in all yarn ends.
Sew a small bell or yarn pompom securely to the starting ring at the pointed end. The cap remains separate and removable; do not sew it to the penguin’s head.
Adding the Penguin’s Face
Complete the face before sewing the head to the body.
Optional Eye Sculpting
Use a long needle and strong cream yarn.
- Insert the needle through the opening at the bottom of the head.
- Bring it out beside the outer corner of the first eye.
- Insert it beside the inner corner of that eye.
- Bring the needle back through the lower head opening.
- Pull gently until a slight eye indentation forms.
- Secure the yarn without pulling too tightly.
- Repeat around the second eye using the same amount of tension.
The sculpting should be subtle. Pulling too hard can distort the face or damage the crocheted fabric.
Embroidery
Using black embroidery thread:
- Add a short curved eyelid above each eye.
- Embroider a small eyebrow one or two rounds above each eye.
- Add a short vertical line below the center of the beak if desired.
Using cream embroidery thread:
- Add one small highlight beside each eye.
- Keep the highlights symmetrical.
Putting Your Crochet Penguin Lovey Together
1. Finish the Head
Make sure the head is firmly and evenly stuffed. Add more filling around the lower sides if the cheeks look flat.
The bottom opening must contain 18 stitches.
2. Check the Body
Lay the body flat and confirm that:
- The belly patch faces forward.
- The wings sit on opposite sides.
- The tail is centered at the back.
- The feet sit on either side of the center front.
- The neckline contains 18 stitches.
3. Join the Head to the Body
Place the body neckline against the open bottom of the head.
Align the center front of the body with the center of the penguin’s face. Match one body stitch to one head stitch and sew around the entire neckline.
Before closing the last few stitches, add a small amount of stuffing around the neck if it feels weak. Do not add stuffing to the lovey body.
Secure the seam and hide the yarn tail inside the head.
4. Shape the Pieces
Gently flatten and arrange:
- The body
- Wings
- Tail
- Feet
- Belly patch
The wings should hang naturally rather than point straight outward.
5. Add the Cap
Place the cap on the penguin’s head and let its pointed end fall naturally to one side. Because the cap is removable, it should not be sewn to the head.
6. Finish the Project
- Check every seam.
- Secure the beak carefully.
- Weave in all loose yarn tails.
- Trim stray fibers.
- Reshape the head with your hands.
- Confirm that the bell or pompom is firmly attached.
Tips for a Neater Crochet Penguin Lovey
- Use stitch markers. Mark both the beginning of the round and the body’s center front.
- Count every round. The body attachments depend on precise stitch counts.
- Use invisible decreases. They create smoother head and foot shaping.
- Stuff gradually. Small pieces of filling create a smoother head than inserting one large amount.
- Keep the body flat. Do not add stuffing to the body, wings, tail, or feet.
- Pin before sewing. Check the beak and belly patch from the front and side before attaching them.
- Keep the body seam forward. The belly patch is designed to cover it.
- Check attachment direction. Wing tips point downward, the tail points away from the belly, and foot decreases face upward.
- Try on the cap. Crochet tension differs, so test the fit before making its brim.
- Avoid over-sculpting. Gentle tension is enough to define the eyes.
- Use matching sewing yarn. It makes the head and beak seams less visible.
- Block the flat pieces lightly. Gentle hand shaping is usually enough; avoid high heat on acrylic yarn.
Important Safety Notes
This handmade lovey contains small or removable elements when made with safety eyes, a bell, and a separate cap.
- For a young child, embroider the eyes instead of using plastic safety eyes.
- Replace the bell with a securely sewn yarn pompom.
- Consider omitting the removable cap entirely.
- Inspect all seams and attachments regularly.
- Do not add buttons, beads, wire, or loosely attached decorations.
- Use the lovey only under appropriate adult supervision.
- Follow current local safe-sleep guidance and do not place soft toys or loveys in an infant’s sleeping space.
FAQ About the Crochet Penguin Lovey Blanket Pattern
What skill level is this crochet penguin lovey blanket pattern?
It is suitable for an intermediate beginner. You should know how to make a magic ring, single crochet, half double crochet, double crochet, increases, decreases, joined rounds, and basic post stitches.
How large is the finished penguin lovey?
It measures approximately 25 cm overall when wearing the naturally draped cap. Without the cap, it measures approximately 22–23 cm from the feet to the top of the head.
Your finished measurement will depend on yarn thickness, hook size, tension, and stuffing.
What yarn should I use?
Use DK or light-worsted cotton, cotton-blend, or acrylic yarn measuring approximately 150–170 metres per 50 grams. YarnArt Jeans is one suitable option.
What hook sizes are required?
The pattern uses:
- 2.25 mm for the head and small pieces
- 2.5 mm for the cap
- 3 mm for the lovey body
If your stitches have gaps, use a smaller hook. If the fabric is too stiff, move up by 0.25–0.5 mm.
What size eyes does the penguin need?
Use 8–10 mm safety eyes. For a toy intended for a young child, embroidered eyes are the safer choice.
Is the body stuffed?
No. Only the head and a small portion of the beak are stuffed. The body, wings, feet, tail, belly patch, and cap remain unstuffed so the penguin feels soft and flexible like a lovey.
How are the wings attached?
The flattened wings are crocheted directly into body round 6. Each wing is joined across six stitches.
How is the tail attached?
The flattened tail is crocheted directly into the center back during body round 14.
How are the feet attached?
The feet are crocheted into the final body round. Each foot is joined across six stitches on the lower front of the lovey.
How is the cap removable?
The cap is crocheted separately and placed over the penguin’s head. It is not sewn, glued, or fastened to the head.
If the finished lovey is intended for a young child, omit the removable cap to avoid a loose accessory.
Can I make the penguin larger?
Yes. Use thicker yarn and a hook that creates a firm, gap-free fabric. Keep in mind that thicker yarn will also require larger eyes and more stuffing.
Can I use plush yarn?
You can, but plush yarn will substantially increase the finished size. Stitch definition will also be less visible, especially around the post-stitch brim and small beak.
Why is the body seam at the front?
Keeping the seam at the center front makes the tail and feet easy to position accurately. The cream belly patch covers the seam after the body is complete.
Your Next Stitch
This crochet penguin lovey blanket pattern combines a soft security blanket with the expressive face of a handmade amigurumi. The stuffed head gives the penguin personality, while its flat body, dangling wings, little tail, golden feet, and removable cap make it playful and comforting.
Whether you make it in traditional black, cream, and saffron or choose your own winter-inspired palette, the finished lovey will be a thoughtful handmade gift.
Gather your yarn, choose your hooks, and begin with the first magic ring. Work carefully through the attachments, check the cap as you crochet, and take your time shaping the face. By the final stitch, you’ll have a charming 25 cm penguin ready for supervised cuddles, gifting, or display.
Happy crocheting!