The Ultimate Guide to the Crochet Pattern Black Cat
There is a distinct kind of magic that settles over a room when you sit down with a ball of yarn, a well-loved hook, and a stretch of uninterrupted quiet. If you are anything like the passionate crafters who spend hours hunting for that exact statement piece, you know that making a handmade toy is never just about passing the time. It is about infusing personality, patience, and warmth into every single stitch.
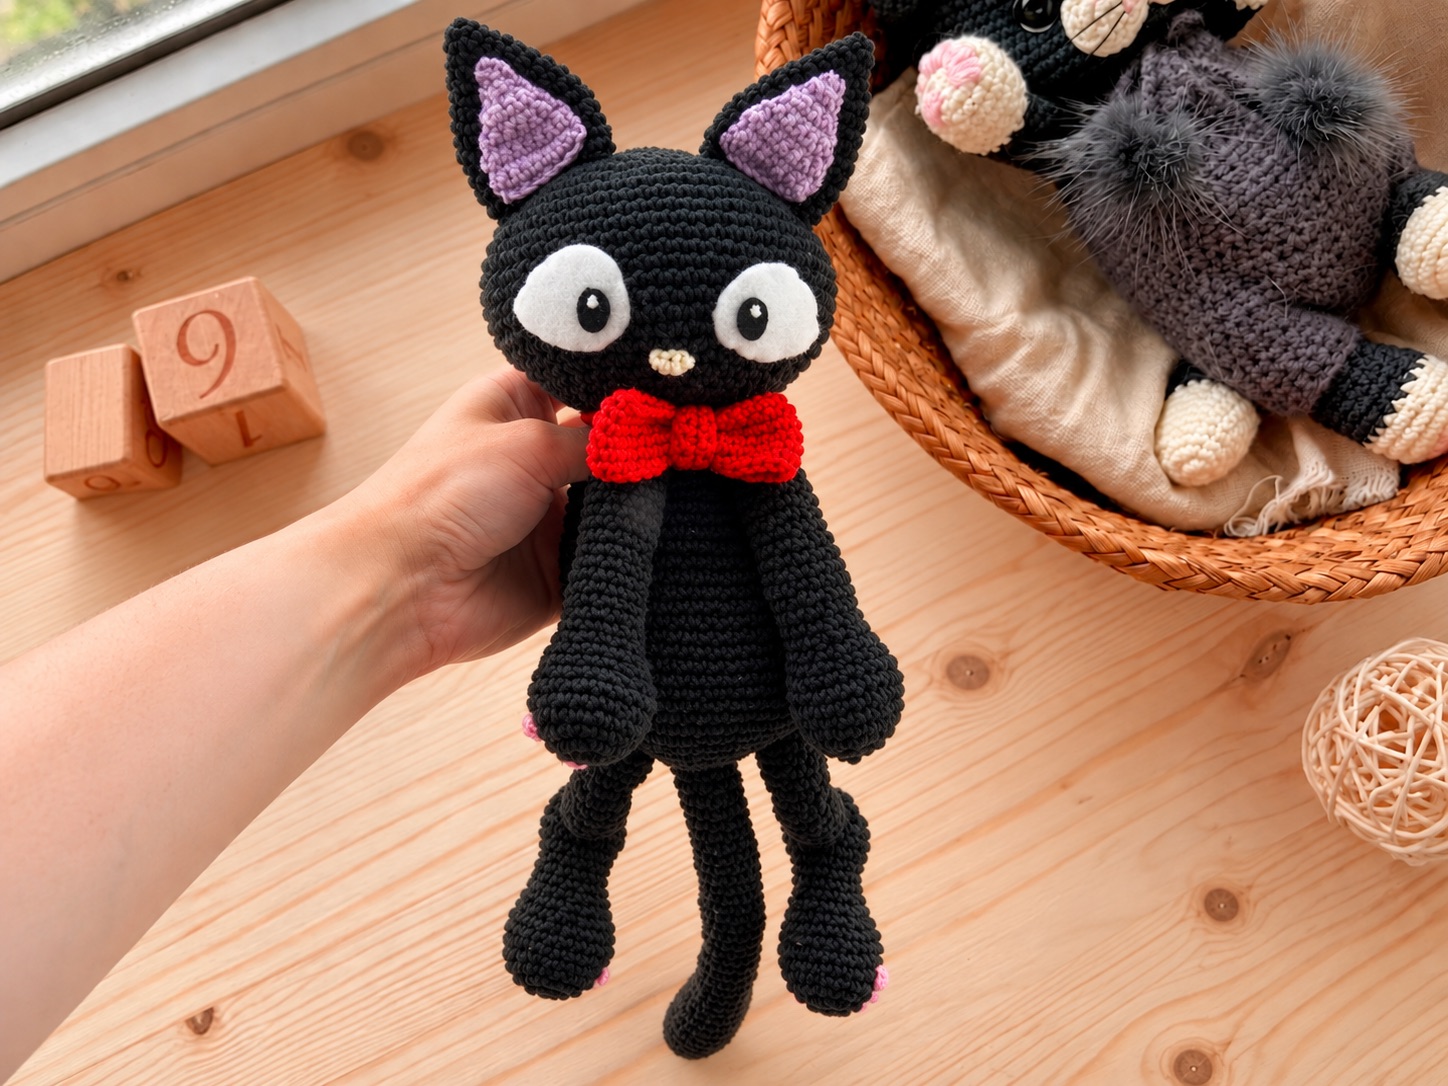
Whether you are gearing up for the spooky October season or simply want a charming, long-legged feline companion to guard your bookshelf, working on a Crochet Pattern Black Cat offers an exceptionally rewarding creative outlet. Measuring nearly 35 cm (13.8 inches) from the tips of its pointy ears down to the end of its sweeping tail, this project delivers a substantial, huggable creation that stands out from standard amigurumi designs.
Let’s walk through everything you need to bring this charismatic kitty to life, covering materials, abbreviations, step-by-step construction, expert assembly tips, and an extensive FAQ section to ensure your project goes off without a hitch.
Jump to a Section
- Essential Materials and Tools for Your Crochet Pattern Black Cat
- Decoding Standard Abbreviations
- Step-by-Step Construction of Your Black Cat
- Front legs
- Hind legs and paw pads
- Tail
- Eyes and embroidered face
- Red bow and neckband
- Assembly and final shaping
- Frequently Asked Questions About Crochet Pattern Black Cat
- Conclusion
Essential Materials and Tools for Your Crochet Pattern Black Cat
Before you make your first loop, assembling the right toolkit ensures your project maintains structural integrity and a professional finish. Skimping on yarn weight or hook size can alter the gauge and change the final dimensions, so it pays off to match your supplies carefully.
- Yarn Specifications: category 5: allow approximately 250–300 m. At 100 m per 100 g, this is 250–300 g; actual use depends on the yarn. Matching-weight red yarn, about 25 m; lavender, pink and white yarn, about 10–15 m each.
- Color Palette:
- Black (base fur color)
- Light purple (inside ears)
- Light pink (paw pads)
- Light yellow (nose)
- Red (detachable bowtie)
- Hooks and Hardware: Start with a 4 mm hook; adjust yarn and hook to meet the gauge below while keeping a dense fabric. Use the main hook for all crocheted pieces.
- Notions: Black and white felt for the expressive eyes and pupils, cotton wool or alternative stuffing, a sewing needle, thread, pins, and scissors.
Quick Materials Reference Table
| Component | Material / Yarn Color | Recommended Size / Quantity |
| Base Body & Limbs | Black Cotton Yarn | Sport / 5-ply |
| Inner Ears | Light Purple Cotton Yarn | Tuned rows |
| Paw Pads | Light Pink Cotton Yarn | 4 big pads, 12 small pads |
| Nose | Light Yellow Cotton Yarn | 4 chain foundation |
| Bowtie | Red Cotton Yarn | Base, middle, and neck strap |
| Eyes | Black and White Felt | 2 white bases, 2 oval pupils |
Decoding Standard Abbreviations
Amigurumi patterns rely heavily on shorthand notation to keep instructions concise. Familiarizing yourself with these terms before you dive into the stitches will keep your hands moving smoothly without constant interruptions.
- SC: Single crochet
- ch: Chain
- SS: Slip stitch
- hdc: Half double crochet
- dc: Double crochet
- BLO / FLO: Back loops only / Front loops only in this row
- inc / dec: Increase / Decrease
- MR: Magic ring
- FO: Fasten off
- (12): Total number of stitches after completing that specific row
Step-by-Step Construction of Your Black Cat
Constructing an amigurumi cat requires building individual components—head, body, ears, limbs, tail, and accessories—before assembling them into a cohesive masterpiece.
Head
Make 1 in black, working from the crown toward the neck. Keep the beginning-of-round marker at the back when positioning the face.
R1: 6 sc in MR. (6)
R2: inc x 6. (12)
R3: [sc, inc] x 6. (18)
R4: [2 sc, inc] x 6. (24)
R5: [3 sc, inc] x 6. (30)
R6: [4 sc, inc] x 6. (36)
R7: [5 sc, inc] x 6. (42)
R8: [6 sc, inc] x 6. (48)
R9: 48 sc. (48)
R10: 48 sc. (48)
R11: 48 sc. (48)
R12: [7 sc, inc] x 6. (54)
R13: 54 sc. (54)
R14: 54 sc. (54)
R15: 54 sc. (54)
R16: [7 sc, dec] x 6. (48)
R17: [6 sc, dec] x 6. (42)
R18: [5 sc, dec] x 6. (36)
Begin filling the head. Spread filling into both cheek areas without stretching the stitches.
R19: [4 sc, dec] x 6. (30)
R20: [3 sc, dec] x 6. (24)
R21: 24 sc. (24)
R22: 24 sc. (24)
FO, leaving a long sewing tail. Keep the 24-stitch neck opening open. Finish filling to a rounded shape with slightly fuller lower cheeks. Do not flatten the opening or gather it closed.
Face planning
The crown is R1 and the neck is R22. The eyes will be vertical on the front, approximately across R7–R15, with about 2 uncovered head stitches visible between their inner edges. Keep the nose centered just below their lower edges. Pin the face pieces before committing to their final position.
The head has 54 stitches at its fullest point and a 24-stitch neck opening. The body finishes with 24 stitches so the two openings can be sewn together stitch for stitch.
Body
Make 1 in black, working from the seated base toward the neck. This section creates a rounded lower body that narrows gradually through the chest.
R1: 8 sc in MR. (8)
R2: inc x 8. (16)
R3: [sc, inc] x 8. (24)
R4: [2 sc, inc] x 8. (32)
R5: [3 sc, inc] x 8. (40)
R6: [4 sc, inc] x 8. (48)
R7: 48 sc. (48)
R8: 48 sc. (48)
R9: 48 sc. (48)
R10: 48 sc. (48)
R11: 48 sc. (48)
R12: 48 sc. (48)
R13: [6 sc, dec] x 6. (42)
R14: 42 sc. (42)
R15: 42 sc. (42)
R16: 42 sc. (42)
R17: 42 sc. (42)
R18: [5 sc, dec] x 6. (36)
R19: 36 sc. (36)
R20: 36 sc. (36)
R21: 36 sc. (36)
R22: 36 sc. (36)
Fill the lower body evenly. Press the base gently against a flat surface to form a stable seat; avoid making the bottom hard and ball-shaped.
R23: [4 sc, dec] x 6. (30)
R24: 30 sc. (30)
R25: 30 sc. (30)
R26: 30 sc. (30)
R27: [3 sc, dec] x 6. (24)
R28: 24 sc. (24)
FO, leaving a sewing tail. Keep the 24-stitch opening open. Fill the chest and neck firmly enough to support the head, while keeping the base slightly flat. The starting ring sits underneath the cat.
Orientation
Mark the center front and center back with removable yarn markers. The front legs attach high on the chest. The hind thighs attach low on the sides, and the tail attaches centrally at the back. All body round references in the assembly section count upward from the starting ring.
Ears and ear inserts
Outer ears
Make 2 in black, from tip to base. Leave both ears unstuffed.
R1: 4 sc in MR. (4)
R2: 4 sc. (4)
R3: [sc, inc] x 2. (6)
R4: [2 sc, inc] x 2. (8)
R5: [3 sc, inc] x 2. (10)
R6: [4 sc, inc] x 2. (12)
R7: [5 sc, inc] x 2. (14)
R8: [6 sc, inc] x 2. (16)
R9: [7 sc, inc] x 2. (18)
R10: [8 sc, inc] x 2. (20)
R11: 20 sc. (20)
R12: 20 sc. (20)
FO, leaving a long tail. Flatten each ear with the increase lines at the side folds, so its 20-stitch opening forms two aligned layers of 10 stitches. After attaching the insert, whipstitch the 10 opposing pairs together. Keep the tail for sewing the ear to the head.
Inner ear panels
Make 2 in lavender. Ch 8. Work in flat rows, beginning in the second chain from the hook. Ch 1 and turn between rows; do not count the turning chain.
Row 1: 7 sc. (7)
Row 2: 7 sc. (7)
Row 3: dec, 3 sc, dec. (5)
Row 4: 5 sc. (5)
Row 5: 5 sc. (5)
Row 6: dec, sc, dec. (3)
Row 7: 3 sc. (3)
Row 8: dec, sc. (2)
Row 9: 2 sc. (2)
Row 10: dec. (1)
FO, leaving a sewing tail. The 7-stitch edge is the bottom and the final stitch is the tip. Center the panel on the front of an outer ear, with its tip below the black tip. Sew around the panel through the front wall only, leaving a visible black border. Close the outer ear base as described above.
Front legs
Make 2 in black, from paw to shoulder. The paw is rounded and the upper leg is narrow. Work both legs identically.
R1: 6 sc in MR. (6)
R2: inc x 6. (12)
R3: [sc, inc] x 6. (18)
R4: 18 sc. (18)
R5: 18 sc. (18)
R6: 18 sc. (18)
R7: [4 sc, dec] x 3. (15)
R8: 15 sc. (15)
R9: [3 sc, dec] x 3. (12)
Fill the paw. Add small amounts of filling to the lower leg as you continue; leave the uppermost 3 rounds empty so the shoulder can lie flat.
R10: 12 sc. (12)
R11: 12 sc. (12)
R12: 12 sc. (12)
R13: 12 sc. (12)
R14: 12 sc. (12)
R15: 12 sc. (12)
R16: 12 sc. (12)
R17: 12 sc. (12)
R18: 12 sc. (12)
R19: 12 sc. (12)
R20: 12 sc. (12)
R21: 12 sc. (12)
R22: 12 sc. (12)
R23: 12 sc. (12)
R24: 12 sc. (12)
R25: 12 sc. (12)
R26: 12 sc. (12)
FO, leaving a long tail. Flatten the 12-stitch opening into two layers of 6 stitches. Whipstitch the 6 opposing pairs closed. Do not add another round. Keep the tail for attaching the shoulder.
Front paw center pads
Make 2 in pink. Leave flat and unstuffed.
R1: 5 sc in MR. (5)
R2: inc x 5. (10)
Sl st into the first stitch of R2 and FO, leaving a sewing tail. The slip stitch is not included in the count.
Hind legs and paw pads
Make 2 in black. Each piece runs from the toe through the narrow ankle to the rounded thigh. There are no separate calf or thigh tubes.
R1: 6 sc in MR. (6)
R2: inc x 6. (12)
R3: [sc, inc] x 6. (18)
R4: [2 sc, inc] x 6. (24)
R5: 24 sc. (24)
R6: 24 sc. (24)
R7: 24 sc. (24)
R8: [2 sc, dec] x 6. (18)
R9: [4 sc, dec] x 3. (15)
R10: 15 sc. (15)
R11: 15 sc. (15)
R12: 15 sc. (15)
Fill the toe and foot. Leave the ankle at R9–R12 lightly filled so it bends when the leg is positioned.
R13: [4 sc, inc] x 3. (18)
R14: [2 sc, inc] x 6. (24)
R15: 24 sc. (24)
R16: 24 sc. (24)
R17: 24 sc. (24)
Fill the thigh evenly. Keep the narrow ankle soft.
R18: [2 sc, dec] x 6. (18)
R19: [sc, dec] x 6. (12)
R20: dec x 6. (6)
FO, leaving a long tail. Thread through the front loops of the final 6 stitches and draw closed. Secure the closure, retaining the tail for attachment.
Hind paw center pads
Make 2 in pink, flat and unstuffed.
R1: 6 sc in MR. (6)
R2: inc x 6. (12)
Sl st into the first stitch of R2 and FO with a sewing tail; the slip stitch does not count.
Toe pads
Make 12 in pink, 3 for each paw.
R1: 4 sc in MR. (4)
Sl st into the first stitch, tighten the ring and FO with a sewing tail. Sew one center pad onto the underside of each paw, approximately across paw R3–R7. Arrange 3 small pads in an arc toward the toe, nearer R1–R3. Pin first and keep all pad edges within the black paw surface. If a toe pad crowds its neighbors, replace it with a few compact pink embroidery stitches.
Tail
Make 1 in black, beginning at the tip. The fuller tip narrows into a long, flexible tail.
R1: 5 sc in MR. (5)
R2: inc x 5. (10)
R3: 10 sc. (10)
R4: 10 sc. (10)
R5: 10 sc. (10)
R6: [3 sc, dec] x 2. (8)
Add a little filling to the tip. Continue with only a thin wisp of filling along the tail so it stays flexible.
R7: 8 sc. (8)
R8: 8 sc. (8)
R9: 8 sc. (8)
R10: 8 sc. (8)
R11: 8 sc. (8)
R12: 8 sc. (8)
R13: 8 sc. (8)
R14: 8 sc. (8)
R15: 8 sc. (8)
R16: 8 sc. (8)
R17: 8 sc. (8)
R18: 8 sc. (8)
R19: 8 sc. (8)
R20: 8 sc. (8)
R21: 8 sc. (8)
R22: 8 sc. (8)
R23: 8 sc. (8)
R24: 8 sc. (8)
R25: 8 sc. (8)
R26: 8 sc. (8)
R27: 8 sc. (8)
R28: 8 sc. (8)
R29: 8 sc. (8)
R30: 8 sc. (8)
R31: 8 sc. (8)
R32: 8 sc. (8)
R33: 8 sc. (8)
R34: 8 sc. (8)
FO, leaving a long tail. Keep the final 8-stitch opening open. Leave the last 2 rounds unstuffed. Sew this opening to the center back of the body around body R5–R7, then curve the tail around one side. A small concealed tack can hold the curve if desired.
Eyes and embroidered face
White eye ovals
Make 2 in white. Ch 5. Work around both sides of the chain; the same end chains receive stitches from both sides.
R1: Sc in the second ch from the hook, sc in the next 2 ch, 3 sc in the last ch. Turn the work to follow the underside of the chain: sc in the next 2 ch, 2 sc in the last ch. (10)
R2: inc, 2 sc, inc x 3, 2 sc, inc x 2. (16)
R3: sc, inc, 2 sc, [sc, inc] x 3, 2 sc, [sc, inc] x 2. (22)
Sl st into the first stitch of R3 and FO, leaving a sewing tail. Flatten the oval without stretching. Position its long axis vertically.
Pupils and highlights
Before attaching the eye ovals, use smooth black yarn to embroider an upright oval pupil on each one. Aim for about 1 cm wide and 2–2.5 cm high, leaving white visible around the pupil. Fill the shape with closely spaced straight stitches without pulling the eye into a cup. Add a small white highlight at the same upper corner of each pupil.
Eye placement
Pin the eyes to the front of the stuffed head, with their tops around head R7 and bottoms around R15. Leave about 2 head stitches visible between the inner eye edges. Adjust this position slightly if your ovals differ in size. Sew around each white edge with small, even stitches, keeping the two pupils at the same height.
Nose and mouth
With pale yellow yarn, embroider a small downward-pointing triangle centered below the eyes. Place its top edge around head R15 and its point near R16. Make it approximately 0.8–1 cm wide. Fill with short satin stitches.
For an optional mouth, use pale gray or pale yellow yarn. Make a short vertical stitch below the nose, then one short curved stitch to each side. Keep the mouth compact so the eyes remain the main feature. Optional whiskers can be two short surface stitches on each cheek.
Red bow and neckband
Bow rectangle
Make 1 in red. Ch 13. Work in rows, beginning in the second ch from the hook. Ch 1 and turn between rows; the turning chain does not count.
Row 1: 12 sc. (12)
Row 2: 12 sc. (12)
Row 3: 12 sc. (12)
Row 4: 12 sc. (12)
Row 5: 12 sc. (12)
Row 6: 12 sc. (12)
Row 7: 12 sc. (12)
FO and weave in the ends. Keep the 12-stitch edges horizontal. Fold the center into a small accordion pleat and secure it with several turns of red yarn. The two broad sides become the bow loops.
Center wrap
Make 1 in red. Ch 8. Start in the second ch from the hook.
Row 1: 7 sc. (7)
Row 2: 7 sc. (7)
FO, leaving a sewing tail. Wrap the strip around the pinched center of the bow, bringing the short ends together at the back. Sew the short ends securely, then tack the wrap to the bow so it cannot slide.
Neckband
Make 1 in red after joining the head and body. The following starting size gives 25 stitches along the band; adjust the initial chain to fit the actual neck seam.
Ch 26. Work the first row in the second ch from the hook. Ch 1 and turn before Row 2.
Row 1: 25 sc. (25)
Row 2: 25 sc. (25)
FO with a sewing tail. Wrap the band around the neck without compressing the stuffing. If the ends do not meet comfortably, remake it with more or fewer chains; each row will contain one stitch fewer than the starting chain. Sew the short ends together at the back. Tack the band to the neck in 4 places, then sew the bow to the center front.
The bow is fixed in place. The design uses no button or detachable fastening.
Assembly and final shaping
Complete the face and paw pads before attaching the limbs. Pin all major parts first, sit the cat on a flat surface and check symmetry from the front, side and back. Round placements below are starting guides; small adjustments may be needed for your yarn and stuffing.
1. Position the ears Place the ear bases on the upper left and right sides of the head. Aim for their lower outer corners around head R7–R8, with the inner corners higher toward the crown. Leave a visible gap between the inner bases and tilt the tips slightly outward. Sew along each closed base, then add a few stitches immediately behind the base to help it stand.
2. Join the head and body Align the 24-stitch head opening with the 24-stitch body opening, keeping the face above the marked front of the body. Pin at front, back and both sides. Sew corresponding stitches one to one, adding filling through the final gap so the neck has support. Close the gap and make a second reinforcing pass around the join.
3. Attach the front legs Place the flattened shoulder ends on the front of the body around body R24–R26, with a gap of roughly 3–4 body stitches between their inner edges. The paws should hang side by side and reach the supporting surface. Rotate the pads toward the underside and slightly toward the back. Sew each closed shoulder seam to the chest, then secure its upper corners.
4. Set the seated pose Position each hind thigh against a lower side of the body, approximately across body R6–R11. Point the feet forward and slightly outward. Bend the lightly filled ankle so the thigh rests against the body while the foot projects in front. Rotate the soles slightly upward if you want the pink pads visible.
5. Sew the hind legs Sew a small oval attachment area through the inner side of each thigh, approximately across hind-leg R14–R18, and the corresponding body surface. Keep the ankle and foot free to bend. Use matching attachment heights on both sides and check that the seated base still rests on the surface.
6. Attach the tail Sew the open tail base centrally to the back around body R5–R7. Curve the tail around either side without lifting the body off its seat. Add one concealed tack near the end of the curve only if you want it to hold that position.
7. Add the bow Fit and finish the neckband as described on the previous page, then secure the bow at the front. Check that the band lies over the neck seam and does not pull the head downward.
8. Finish and measure Remove every pin and temporary marker. Secure and bury all yarn ends, check the seams and massage the filling into an even shape. Measure vertically from the supporting surface to the highest ear tip. Record the finished height, yarn, hook, stitch gauge and round gauge for any repeat sample.
Frequently Asked Questions About Crochet Pattern Black Cat
How long does it take to complete this black cat project?
Completion time varies based on your individual crochet speed and daily schedule, but because the finished cat measures nearly 35 cm (13.8 inches) long including its tail, most makers treat it as an engaging weekend or multi-session project.
Can I use hot glue instead of sewing for the felt features?
Yes, absolutely. Because felt can be challenging to stitch evenly without warping, using a hot glue gun to attach the black pupils to the white felt eyes—and subsequently mounting them to the head—is a widely accepted shortcut among amigurumi artists.
Is the removable bowtie difficult to make?
Not at all. The bowtie is broken down into three simple components (the base, the middle wrap, and the neck strap). By incorporating a small loop and a button fastening system, it slides on and off effortlessly, making it a fun interactive feature for children or collectors.
What yarn weight works best if I cannot find 5-ply sport yarn?
While the Crochhet recommends a 55% cotton sport/5-ply yarn, you can experiment with DK or light worsted weight yarns. Just keep in mind that changing your yarn weight will also require adjusting your hook size to maintain tight stitches so the stuffing does not peek through.
Conclusion
Embarking on a Crochet Pattern Black Cat project is a wonderful way to blend creativity, patience, and love into a single handmade masterpiece. Whether you are crafting a seasonal companion for the autumn holidays or a cuddly feline friend to keep you company year-round, the detailed shaping and customizable bowtie make this journey deeply rewarding.
Grab your 4.0 mm hook, pick out your favorite shades of cotton yarn, and dive into the magical process of bringing your very own handmade companion to life today!
Ready to start your next crafting adventure? Drop a comment below sharing what color bowtie you plan to give your cat, or sign up for our newsletter to receive more exclusive amigurumi patterns straight to your inbox!