Crochet Baby Cow Plush Pattern Velvet Amigurumi Cow
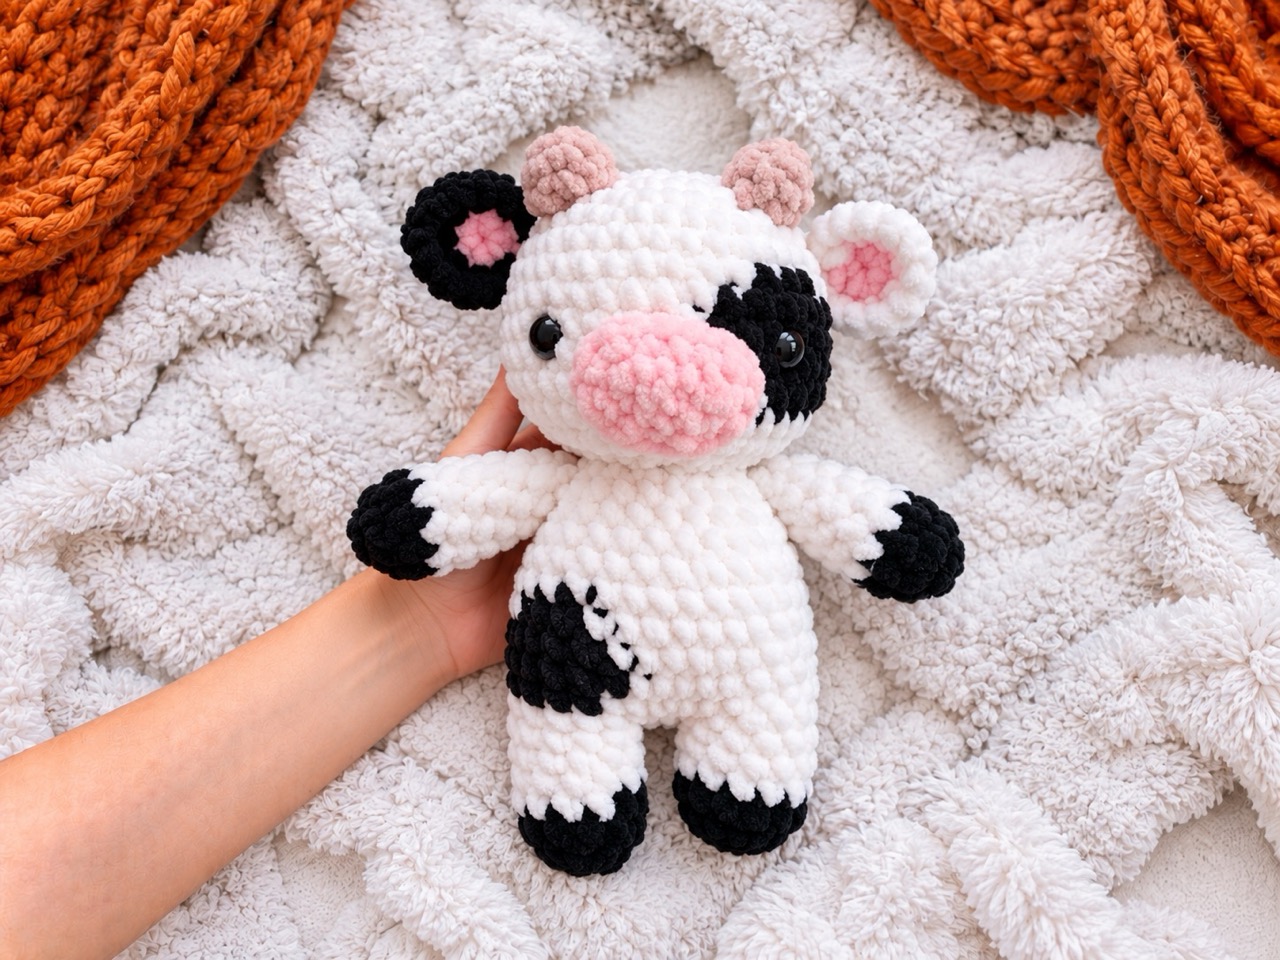
There’s something incredibly sweet about a tiny, soft cow. Maybe it’s the little pink nose, the floppy ears, or the way a velvet yarn cow feels like a cloud in your hands. This crochet baby cow plush pattern by Crochhet captures all of that charm in a project that’s perfect for a last-minute gift, a market stall, or a little treat for yourself. With its soft velvet wool, contrasting black and white spots, and tiny brown horns, this little cow is as fun to make as it is to squish. Whether you’re a beginner looking for a confidence-boosting project or an experienced maker wanting a quick, adorable make, this pattern delivers a huggable friend that’s sure to bring a smile.
The finished cow is designed to stand about 12–14 cm tall, including the horns. Its exact size will depend on your yarn and tension. Follow the rounds below to make the complete cow, then pin the details in place before sewing to give it an expression you like.
Jump to a Section
- Why Make This Crochet Baby Cow Plush?
- What You Need Before You Start
- Abbreviations and Pattern Notes
- How to Crochet the Baby Cow Head
- How to Crochet the Eye Patch and Muzzle
- How to Crochet the Ears and Horns
- How to Crochet the Arms
- How to Crochet the Legs and Body
- How to Crochet the Body Spot and Tail
- Putting Your Crochet Baby Cow Together
- Tips for a Neater Crochet Baby Cow
- FAQ About the Crochet Baby Cow Plush Pattern
- Your Next Stitch
Why Make This Crochet Baby Cow Plush?
- Target size: Approximately 12–14 cm tall, including the horns.
- Skill level: Confident beginner to intermediate. You’ll use basic amigurumi stitches, join two legs, and sew on small pieces.
- Yarn: Velvet or plush chenille in white, black, pink, and brown.
- Construction: The legs and body are one continuous piece. The head, arms, ears, horns, muzzle, spot, and tail are made separately.
- Face: One eye sits on a crocheted black patch. The other sits directly on the white head.
- Personal touches: You can shift the spots or embroider the eyes to change the cow’s expression.
The spots are sewn on after crocheting, so you can place them without tracking color changes inside the head and body rounds.
What You Need Before You Start
Yarn and Tools
- White plush or velvet yarn for the head, body, legs, ears, and tail
- Black yarn for the hooves, eye patch, body spot, and tail tuft
- Pink yarn for the muzzle and inner ears
- Brown yarn for the horns
- 3 mm crochet hook, or a size that produces a firm fabric with your yarn
- 10 mm safety eyes, optional
- A little black yarn or embroidery floss for the nostrils and mouth
- Fiberfill stuffing
- Stitch marker, darning needle, pins, and scissors
If the cow is intended for a young child, embroider the eyes and sew every small part securely.
Size Note
The 12–14 cm height , not a guaranteed measurement. Plush yarns vary considerably. Check your work as you go and keep your stitches close enough that the filling does not show through.
Abbreviations and Pattern Notes
This pattern uses US crochet terminology.
- MR — magic ring
- ch — chain
- sc — single crochet
- inc — 2 sc in one stitch
- dec — single crochet 2 stitches together
- sl st — slip stitch
- (…) × N — repeat the instructions N times
Work in continuous rounds unless a section says otherwise. Move the stitch marker after every round. The number at the end of an instruction is the stitch count for that round.
How to Crochet the Baby Cow Head
Start at the top of the head with white yarn.
- Rnd 1: 6 sc in MR (6).
- Rnd 2: 6 inc (12).
- Rnd 3: (Sc, inc) × 6 (18).
- Rnd 4: (2 sc, inc) × 6 (24).
- Rnd 5: (3 sc, inc) × 6 (30).
- Rnd 6: (4 sc, inc) × 6 (36).
- Rnd 7: (5 sc, inc) × 6 (42).
- Rnds 8–12: 42 sc (42).
Pause here to position the eye patch and eyes. Place the eyes between rounds 10 and 11, about 8 stitches apart between the posts. Sew the eye patch around one planned eye position before securing the safety-eye washers inside the head.
- Rnd 13: (5 sc, dec) × 6 (36).
- Rnd 14: 36 sc (36).
- Rnd 15: (4 sc, dec) × 6 (30).
- Rnd 16: (3 sc, dec) × 6 (24).
Stuff the head while you can still reach inside it.
- Rnd 17: (2 sc, dec) × 6 (18).
Fasten off, leaving a long sewing tail. Do not close the 18-stitch opening; it will meet the opening at the top of the body.
How to Crochet the Eye Patch and Muzzle
Black Eye Patch
Work in black.
- Rnd 1: 6 sc in MR (6).
- Rnd 2: 6 inc (12).
- Rnd 3: (Sc, inc) × 6 (18).
Fasten off with a sewing tail. Pin the flat circle on one side of the face, covering approximately head rounds 8–12. Sew around its edge. If using a safety eye, pass its post through the patch near the center and then through the head before attaching the washer.
Pink Muzzle
Work in pink around both sides of a foundation chain.
- Rnd 1: Ch 6. Starting in the second ch from the hook, 4 sc, then 3 sc in the last ch. Work along the other side of the chain: 3 sc, then inc in the first ch (12).
- Rnd 2: Inc, 3 sc, 3 inc, 3 sc, 2 inc (18).
- Rnd 3: (2 sc, inc) × 6 (24).
- Rnd 4: 24 sc (24).
Fasten off with a long tail. Embroider two small black nostrils on the muzzle. Pin it below the eyes, covering roughly head rounds 11–15. Put a small pinch of stuffing beneath it as you sew around the edge. Add a short embroidered smile below it if you like.
How to Crochet the Ears and Horns
Outer Ears — Make 2
Work in white.
- Rnd 1: 4 sc in MR (4).
- Rnd 2: (Sc, inc) × 2 (6).
- Rnd 3: (2 sc, inc) × 2 (8).
- Rnd 4: (3 sc, inc) × 2 (10).
- Rnd 5: (4 sc, inc) × 2 (12).
- Rnd 6: 12 sc (12).
Do not stuff. Flatten each ear and crochet 6 sc through both layers to close its base. Leave a long sewing tail.
Inner Ears — Make 2
Work in pink in turning rows. The turning chain does not count as a stitch.
- Row 1: Ch 4. Starting in the second ch from the hook, 3 sc (3). Ch 1, turn.
- Row 2: Inc, sc, inc (5). Ch 1, turn.
- Row 3: 5 sc (5).
Fasten off. Sew one pink piece to the front of each white ear. Attach the completed ears to the sides of the head around rounds 5–7.
Brown Horns — Make 2
- Rnd 1: 4 sc in MR (4).
- Rnd 2: 4 sc (4).
- Rnd 3: (Sc, inc) × 2 (6).
- Rnd 4: 6 sc (6).
Fasten off with a long tail. Add a tiny amount of stuffing if needed, then sew the horns to the top of the head around rounds 2–4, leaving space between them.
How to Crochet the Arms
Make two, beginning at the black hooves.
- Rnd 1: With black, 6 sc in MR (6).
- Rnd 2: (Sc, inc) × 3 (9).
- Rnd 3: 9 sc (9).
- Rnds 4–7: Change to white; 9 sc (9).
- Rnd 8: (Sc, dec) × 3 (6).
Stuff the hoof lightly. Flatten the top and crochet 3 sc through both layers. Fasten off with a long sewing tail. Attach the arms to the upper sides of the body around body rounds 14–17.
How to Crochet the Legs and Body
The two legs are joined, then crocheted upward to form the body.
First Leg
Begin in black.
- Rnd 1: 6 sc in MR (6).
- Rnd 2: 6 inc (12).
- Rnds 3–5: Change to white; 12 sc (12).
Fasten off and stuff the leg lightly.
Second Leg
Repeat rounds 1–5 of the first leg, but do not fasten off. Stuff lightly and ch 2. Hold the two legs together with the hooves facing forward.
Join the Legs and Work the Body
- Rnd 6: Starting in a stitch of the first leg, 12 sc around the first leg, 2 sc along one side of the connecting chain, 12 sc around the second leg, and 2 sc along the other side of the chain (28).
- Rnd 7: (6 sc, inc) × 4 (32).
- Rnd 8: (7 sc, inc) × 4 (36).
- Rnds 9–11: 36 sc (36).
- Rnd 12: (4 sc, dec) × 6 (30).
- Rnd 13: 30 sc (30).
- Rnd 14: (3 sc, dec) × 6 (24).
- Rnds 15–16: 24 sc (24).
- Rnd 17: (2 sc, dec) × 6 (18).
- Rnd 18: 18 sc (18).
Stuff the body firmly, especially where the legs join. Fasten off and leave the 18-stitch neck opening unclosed.
How to Crochet the Body Spot and Tail
Black Body Spot
Work around both sides of a foundation chain.
- Rnd 1: Ch 5. Starting in the second ch from the hook, 3 sc, then 3 sc in the last ch. Work along the other side: 2 sc, then inc in the first ch (10).
- Rnd 2: Inc, 2 sc, 3 inc, 2 sc, 2 inc (16).
Fasten off with a sewing tail. Pin the spot to one side of the body around rounds 8–12, then sew around its edge.
Tail
With white yarn, ch 9. Starting in the second ch from the hook, work 8 sl st back along the chain. Fasten off, leaving a tail for sewing.
Cut three short lengths of black yarn. Fold them over the free end of the crocheted tail and secure them with several tight stitches to create a tuft. Trim the ends evenly. Sew the white end of the tail to the back of the body around round 10.
Putting Your Crochet Baby Cow Together
- Sew the black patch to the head and finish the eyes while the head is still open.
- Embroider the muzzle’s nostrils. Sew the muzzle beneath the eyes, adding a pinch of stuffing before closing its seam.
- Sew the pink inner ears to the white ears, then attach the ears and horns to the head.
- Pin and sew the black body spot.
- Align the 18 stitches of the head opening with the 18 stitches of the body opening. Sew them together stitch by stitch. Add a little stuffing to the neck before closing the last part of the seam.
- Sew the arms to the upper body and the tail to the back.
- Weave in the ends and shape the ears, hooves, and muzzle gently with your hands.
Tips for a Neater Crochet Baby Cow
- Use a stitch marker. The legs, body, and head are worked in continuous rounds.
- Check each stitch count. It is especially useful when joining the legs and shaping the head.
- Pin the face pieces first. Small placement changes can make the cow look quite different.
- Stuff gradually. Fill the legs and body before their openings become difficult to reach.
- Keep the neck firm. A little extra filling at the join helps support the head.
- Sew with matching yarn. It helps the seams blend into the plush surface.
- Secure the tail tuft carefully. Pull gently on the strands after sewing to check that they hold.
FAQ About the Crochet Baby Cow Plush Pattern
How big is the finished crochet baby cow plush?
The target height is about 12–14 cm, including the horns. Your yarn and tension may produce a different size.
What skill level is this pattern?
It suits a confident beginner or intermediate crocheter. You’ll use single crochet, increases, decreases, an oval foundation, and a two-leg join.
What hook and yarn should I use?
The pattern is designed around plush or velvet yarn and a 3 mm hook. Choose a hook that makes a firm fabric without large gaps.
Are the black spots made with color changes?
No. The eye patch and body spot are crocheted separately and sewn on. This lets you check their placement before attaching them.
Where do the eyes go?
Place them between head rounds 10 and 11, about 8 stitches apart between the posts. One eye goes through the black patch.
Can I embroider the eyes instead?
Yes. Embroider them in the same positions. This also avoids using plastic eye parts.
How are the head and body joined?
Both pieces end with 18-stitch openings. Align them and sew one stitch of the head to one stitch of the body all the way around, adding neck stuffing before finishing.
Your Next Stitch
Start with the head and legs, then lay out the muzzle, spots, ears, and horns before sewing. Those small choices give each cow its own expression. Once the seams are secure, you’ll have a soft little plush ready to display or give as a handmade gift.